Brett's RS GTD

Glen,
I am hoping to go and pick up my front cage section from Mick next week, so I may have more photos to show next weekend. My build has gone even slower since Rhys arrived... and now I have even less money to fund it!!!

Brett
 
Well I finally gor some time in the garage today. I was allowed to use my day offin the garage :thumbsup:

Last month I picked up a front roll cage section from Mick Sollis. He normally welds his into the roll over hoop in the southerngt. However, I still have the good old fashioned GTD box section, so I decided that it would be easier to bolt the cage in. I am adding it purely fo more protection, it will not be used for competition, so does not need to pass MSA standards. As Mick wasn't sure of the length, he made the arms that go back to the hooop section long, so today was cutting that down and then welding it to the plate. I also have welded in 4mm plate at the bpttom of the A pillar and then put in 1" box to support it, which goes onto 6mm plate over the sill/tank area.
 

Attachments

  • DSC02074.jpg
    DSC02074.jpg
    56.8 KB · Views: 604
  • DSC02076.jpg
    DSC02076.jpg
    47 KB · Views: 642
A long time since posting.. hopefully with warmer months and more light at night I can get more done, once the little man has gone to bed! Haven't been able to do much due to travelling with work, looking after him in the evenings!

To keep myself busy(ish) I've started to try to work out where I want the switches etc.

Finally got a couple of hours in the garage this morning and got the rear bleed done to the Edelbrock.
 

Attachments

  • DSC02079.jpg
    DSC02079.jpg
    32 KB · Views: 502
  • DSC02078.jpg
    DSC02078.jpg
    46.1 KB · Views: 609
Pads arrieved today, so have just been out in the garage to put them, and, disaster.

It looks like the drivers side bell is interfering with the pad and not allowing it to go in properly, as I can't get the bridge bolt across. I hade the bells and mounting brackets made up some years ago by Roy and never put pads in until now. The left appears fine though the pad may be touching slightly, certtainly the bridge

Looks like I am going t have to take the assembly apart to measure against APs drawings. The worst thing is that the bells were anodised, so if they need machining slightly then I'll have to do it again. :thumbsdown:


On a brghter note, I also have 4 tyres sitting in the shed. I am now in week 6 since ordering from Image, so hopefully I should be able to get them altogether soon.
 
Donkey, or words similar to that effect. Just spent the last 45 mins taking the caliper off and the disc away from the bell.

I haven't got vernier calipers big enough to measure (must fix that); however, by my untrained eye and a simple ruler, it looks to me that the bells have a diameter of over 219mm. AP's digram for a CP3047-178/179 shows it need to be 218.42 ±0.25.

I guess I will have to take it into work to get it measured properly and see what the diameter really is. Whatever happens, looks like the bell will need machining, as the pad is definately hitting it.
 

Attachments

  • IMG_2908_small.JPG
    IMG_2908_small.JPG
    151.5 KB · Views: 345

Randy V

Moderator-Admin
Staff member
Admin
Lifetime Supporter
If I understand correctly - the rotor diameter is just a bit too large..
Should not be a problem at all for any shop with a brake lathe or a machine shop with a lathe..

edit - ahhh... I didn't read the part about the anodizing..

Well - you "could" resort to a high temp paint... or Clear Coating...
 
Shouldn't be a problemto fix Randy, just got to find the time to get to a machne shop when they are open... that is the problem! Well that and just the annoyance at having to take it all apart!
 
Aah the joy of designing & making parts yourself :laugh: At least it looks like they only need re-machining not starting again. Would you like to see my collection of wrong caliper mounting brackets!

At least your back working on the car

Regards
Andy
 
Aah the joy of designing & making parts yourself :laugh:

Andy,
The parts weren't designed by me. Someone else did them. All looked good until the pads went in last night, I've had them sitting in the garage too long to be able to go back and discuss it with them, so it will be up to me to fix. There is more than enough material before the bolts to machine down to make space. Off to prototype today to see if they can 'black market' a job for me...

Yes, slowly working on the car again, albeit slowly! Your's is looking awesome by the way.
 
Well, I've taken the bell down to protoype this morning and it looks like it has been made to 220.2mm. If you look at the attached from AP, then my interpretation is that is the measurement on the inside of the disc, where the bell attaches to is meant to be 218.42, nearly a difference of 2mm. Looks like I am having to find a machine shop, unless I can convince one of the people downstairs to do a private job.
 

Attachments

  • cp3047-178~9cd.pdf
    79.5 KB · Views: 432
Well what a weekend. Firstly, flight got cancelled to go to Detroit, which in itself is not a bad thing, as I didn't have to get up at 4 am on Sunday. However, I won't be able to go and have dinner with Fran now and also pick up my Summit order from a friend...

So, go and into the garage to cheer myself up and try and progress the car. Then I realise I have the issue with moutning the fuel pump in the sill, see another thread; get mad, have a cup of tea. Think about it a bit, decide to do something else.

Go to engine to put Rokcers on (been meaning to do it for ages). One rocker nut get stuck for some reason; try to undo it and it undoes the stud. Go to vice to clamp stud... stud sheers. These were the studs that came with the heads, I was in two minds to replace them with ARP studs... well now they are going to be.

Week 7 of waiting for my Image wheels to turn up. Hopefully they will and I can cheer myself up!
 
Hang in there Brett! Sometimes bad things happen for a good reason (rocker studs).
MUCH better than breaking one after all is up and running!
 
Thanks Molleur,
Much appreciated, words of encouragement from all forum members are more than their weight in Gold sometimes. I have been on such a journey with this over the past 5 years and it still continues!! Oh, to be a banker in the city some days so I wouldn't have to plan to be able to buy parts :tongue3:

Well on and off I started this journey 7 years ago... I knew I wanted to build a GT40 replica, and after much pi$$ taking from friends at Le Mans back in 2003, I decided to take the first steps. I bought an engine from a guy down in Ilford. The plan was to build it up and get a transaxle and then get the chassis etc. Well things never go according to plan, and one KVA chassis and now a modified Roy Smart GTD chassis later. I finally get to see what the engine will look like!

The new ARP studs came yesterday so I was in the garage until late last night getting all the valvetrain in, and thought, why not stay up a bit later and get the Valve covers on...

Well, once again plan aborted. The ARP bolts I have as part of a kit are only 1/2" long... even Tom Monroe's bok says they should be 5/8". Then add that to having aluminium covers that have a thicker rib, and I had to wait until after work today to stop by the eningeeering suppliers near me to get some 1/4UNC by 3/4" socket bolts. Hey presto, just resting the carb on top with the air filter and I am a very happy man :thumbsup:

Still have to finish it off, as the replacement alt bracket and the new plugs are coming via another employee in his suitcase next week on his way back from the US.

Now as for the brakes... well I was sort of right. The bells did need turning. However, I spoke to AP mid week and they told me that I needed to get a pad with the profile CP3125D46, not CP3215D50 as I had. A quick call to Tim Phillips at circuit supplies and I have some Ferrodo DS2500 pads that have turned up with the next door neighbour whilst I went out for tea tonight. Tim also supplied me some DS2500 pads for the Wilwood Powerlite handbrake caliper as well. So I am off to the garage again tonight to see if they fit!
 

Attachments

  • DSC02084.jpg
    DSC02084.jpg
    64.4 KB · Views: 494
Last edited:

Dave Bilyk

Dave Bilyk
Supporter
Brett,
if it's encouragement you want, well keep at it, for England and St George, we know you can do it:).
Is that a Machine Mart Engine stand I see there? I was quite pleased with mine, good quality, good price.

regards
Dave
 
Thanks Dave,
I'm more of a St Andrew and St David kind of guy, that with the family coming from the old country and the wife being Welsh LOL.

New issue tonight, will teach me to actually build the car and find out problems earlier.

It looks like there is movement in the front right hub, so that the disc is moving out of true. Anyone with any suggestions hot to find out whether its disc bell or hub?
 

Dave Bilyk

Dave Bilyk
Supporter
Brett,
Men of Harlech eh, well St Andrew or David will hit the spot for you:)
I love the song - 'Men of Harlech lie ye dreaming, see ye not their falcons gleaming, while their pennants gaily streaming flutter in the breeze' have embarrassed myself by singing it while under the influence, one of the great songs but not when sung by me.
see your other post for comments on the diisc issue:)

Dave
 
If you have shares in a company that makes Ibuprofen, buy some more, just spent the weekend getting my engine and gearbox in and my biceps and lower back are already feeling it :laugh:

Firstly, a big thank you to Simon Winter, for letting me use his engine crane, which I picked up Friday night. Didn't have a chance to use it until Sunday though after visiting friend had left... then bang, a greyhound couldn't have got to the garage any quicker!

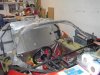
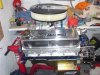
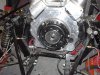
Engine in first, and I have to say I was a very happy bunny; then came putting the gearbox on.

For those of you who haven't followed the saga that has been my build... I decided in my wisdom that Renault boxes where becoming harder to find, and therefore in an effort to 'future proof' things, I decided that maybe I should try a newer Audi than the older 016.

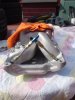
That in itself lead to another problem, no one made an adaptor; so a conversion from an existing adaptor was done. This was all enabled by Stu Birchall, who hasn't been on the forum for a while, borrowing the gearbox and getting a CAD file of an 016. He confirmed that they matched centre lines and bolt holes. So an 016 kit was ordered from Kennedy. Then once that arrived a new drive plate was made up by Helix Motorsport, along with a friend turning up a new spigot baring adaptor.

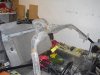
I'd previously confirmed that the box mounted up to the adaptor with the drive plate in, so I was pretty happy on Sunday night, and rather confident as well. Except, no, it didn't mate. However, by this time it was 10:30pm so I called it a night.

After doing Daddy duties this morning at the pool, I leapt back into it. Firstly, taking off the drive plate and then re-installing the box with the bearing adaptor in place. Yep everything fitted. So back on again. Still no good.

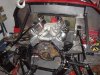
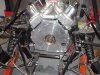
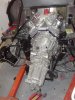
A friend came round to help, and we went over this process twice more, thing it looked like it was maybe an alignment of the drive plate issue. Still no luck, so we took the adaptor out. It hadn't appeared to go all the may in, so a little skim on the tolerance fit and back in again. Properly seated this time; and as Sir Fred of Flintstone would say "YABBA DABA DOO" All mated together :thumbsup:

With a put it into gear and turned the crank, just to confirm and the flanges turned. This is a real milestone for me! This will also allow me to start working out where all the wiring will run. Dave's an engine loom electrician at our Dagenham plant, so he's going to hep me. All heading the right way!
 

Attachments

  • DSC02085.jpg
    DSC02085.jpg
    64.2 KB · Views: 513
  • DSC02086.jpg
    DSC02086.jpg
    68.5 KB · Views: 498
  • DSC02087.jpg
    DSC02087.jpg
    63.4 KB · Views: 531
  • DSC02088.jpg
    DSC02088.jpg
    36.6 KB · Views: 565
Back
Top