

You are using an out of date browser. It may not display this or other websites correctly.
You should upgrade or use an alternative browser.
You should upgrade or use an alternative browser.
Build Diary - RCR Lola T70 Spider
- Thread starter Ron Earp
- Start date
Ron Earp
Admin
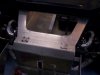
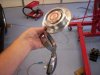
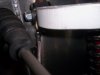
Fuel Gauge
In keeping with the "do more with less" or "simple is better" type idealism I installed a mechanical fuel gauge on the Lola. The fuel guage is really cool, and, the picture won't do it justice. The fuel gauge is simple and of the type Jac Mac pointed out on a thread some weeks ago:
http://www.aircraftspruce.com/catalog/inpages/mech_fuel_gauge.php
This thing is better than it seems although those pictures with it top mounted and 45 angle mounted in the link are sort of BS - it takes some re-working to make that happen.
There is NO mechanical connection between the needle and the float. How does it work? There is a magnet that is mechanically driven in the area behind the gauge face that drives the needle. As is travels up and down the tube, driven by the float, it causes the needle to move. Thus, when you install it there is only the hole into the tank for the float but that is it. The package comes with a drill jig and seal that is used for aircraft installation and is easily mounted.
The gauge is made to mount into the side of a tank such that if the tank was in front of you, like in some biplanes and older aircraft or home builts, then it'd read correctly and could be installed as is. I installed the unit on the top of the sill plate, or tank, and it required some bending of the float arm, shortening, and some drilling of the pinned gear drive parts to rotate them around 180 degrees. Easy to do though and you'll get it when you have one in front of you.
I took pictures of all that stuff, but, lost them when I formatted the SD card in the camera. So, all I have is the end result installed in the sill on the drivers' side of the car. Sorry about that.
Net result is a damn simple, pretty much fool proof gauge with no wires or fuss. About the only think I don't like is the "No Take Off" area at 1/4 tank, but, I can live with that can it could probably be repainted if I had a mind to. If some folks are looking for some simplicity in their build I'd highly recommend using one, or two. I'm using one as I'll just use a 1/2" ID balance tube between the tanks and eliminate the two gauge issue and feeds on the 40. My old Esprit had two tanks, and a balance tube, and seemed to work really well that way with one gauge and I think this will be the same.
Attachments

Lola Aero's
About the only think I don't like is the "No Take Off" area at 1/4 tank, but, I can live with that can it could probably be repainted if I had a mind to.
That sounds like a good reason to make sure that the tanks are always full, nothing like a little air under the tire's to get the adrenaline pumping, when the horizon disappears from the bottom of the w/screen you know you have problem's. Pushing on the steering wheel wont help!
Jac Mac
Ron Earp
Admin
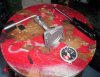
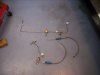
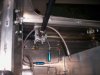
Fuel Sender Picture
Ah ha! I found the disassembled and modified picture. You can see how the gauge simply unscrews from the sending unit and does not connect to the float directly. The sending unit base seals well and I don't anticipate that we'll have any issues with fuel leakage etc.
The RCR top sills are 3/16" thick aluminum and are plenty thick enough to tap for a fine screw, in fact, a coarse thread screw can be tapped in there comfortably too.
Ron
Attachments
Ron Earp
Admin
We're not sure how much it'll weigh, but we think right under 2000 lbs empty. Maybe less. Fellow I know that has corner scales broke them, so they are off for repair. Hopefully I'll be able to weight it in a few weeks once he gets them fixed.
We're paying attention to what we're doing for weight - Fran is making us some spartan light weight aluminum seats with similarily spartan covers. Ally heads, ally tubing for coolant, light weight fans, etc. Do have a Sportsman block so we're giving up 75lbs to an ally block though. No tank switches, extra pumps, etc., just basic needs. It'll have lights, signals, etc. but the wiring harness for that is only 5 lbs, plus lights, it'll be under 15lbs for that stuff. Light makes right, and I think this car is going to be significantly lighter than the average 40, although I think RCR's in general will be lighter due to all ally chassis design including arms, uprights, etc.
Malcolm, those are Vintage Wheels which is who RCR uses. Bob's wheels are really nice looking and well done. And, not that expensive either for an entire wheel/adapter package. Hopefully, some Lola reproduction wheels will be available in the near future.
Friday had parts coming in, most of the mechanical gauges, and shipping info from a couple of sources. I hope next week all will arrive and we'll start making some serious progress on this thing.
R
Ron,
Even if you've formatted the card, the pictures may still be recoverable. My daughter formatted a CF card and I was able to recover the pictures using the free software from: http://www.z-a-recovery.com/digital-image-recovery.htm
Even if you've formatted the card, the pictures may still be recoverable. My daughter formatted a CF card and I was able to recover the pictures using the free software from: http://www.z-a-recovery.com/digital-image-recovery.htm
Ron Earp
Admin
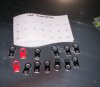
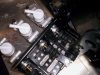
Thanks Pete, I tried but they were wiped. Got about 70% of the gauges in Friday, more coming, along with lots of other bits. We'll be forming up the dash this week I think. And, as such, here are some of the small tags I bought from Cowden Automotive (Jim C) for the switches. They have small pictograms on them for their use. Normally, I'd go with the black label maker stickers but I liked these a lot. His website doesn't work for me though so I don't know how many folks know he makes them, cool though and fit the standard switches I'm using throughout the car.
Attachments
Ron Earp
Admin
Duuhhhh.......
I got a bumch of parts the other day - all the KED stuff showed up and a few items from RCR - it was good day! I got so excited I went straight to work, mounting up the KED stuff on the engine and cutting some holes for gas caps.
However, in my excitement I forgot that critical RCR adapter plate - you know the one, the one that needs to go on BEFORE the flywheel and pressure plate. Don't know what I was thinking!!! Anyhow, I had to take the picture of shame on that one and I'll post that tomorrow, with some shots of the cool gas caps with interlocking cap and filler neck all in one.
The build offically begins now, after we finsihed our TR8 race car work and I did some buisiness travel in the NE and SW. We aim to do some serious damage over the next few weeks and I'll update frequently.
Best,
Ron
Ron, how can I get in touch with Cowden, I like those switch ID's
Ron Earp
Admin
Yep Malcolm, it is time to have a fun car to drive around! I came close to abandoning the whole "Race Car/Street Car" thing entirely when RF went down. But, RCR's little Lola was just the trick to keep me interested. The GT40 is planned for when I am 40, in 11 years. I figure if I save my dough I can just by a turn key and be done with it!  Won't be done in November, I doubt, since we have that 13 hour enduro coming up and Jeff/I will have to prep cars - lots of time there. Your ride in particular will get a good going over and we hope she'll make another round.
Chuck - www.mentalperformance.com.au, he is an advertiser and has a banner ad you can click on up top. And, [email protected].
Ron
Won't be done in November, I doubt, since we have that 13 hour enduro coming up and Jeff/I will have to prep cars - lots of time there. Your ride in particular will get a good going over and we hope she'll make another round. Chuck - www.mentalperformance.com.au, he is an advertiser and has a banner ad you can click on up top. And, [email protected].
Ron
Ron Earp
Admin
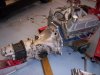
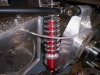
I've got the transmission mated up (decided not to post my "mistake" pictures and the KED stuff worked okay. I had to enlarge the pressure plate engagement holes a bit but other than that, perfect. Fran's plate worked as advertised and is a nice aluminum piece that fit with the KED bits, no issues.
The brake lines that RCR supplied are pre-bent, and are a complete no-brainer to install. I'm doing that right now and if it takes me more than two hours I'll be incredibly suprised. Nice SS lines, all bulkhead fittings, all bits contained and has 2psi pressure valves for the manual brakes. Also has a hydraulic pressure switch that I like a lot better than the pedal mounted electrical switches for operation of brake lights.
We also got the front clip primered properly and are starting some sanding on that too. Once the lines are in, in goes the engine for trial fittment of motor mounts, and once drilled, it is going in for good - we hope!
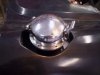
Also got some parts from Fran on Thursday with the KED stuff and the gas caps were there. I like these - built in flange for hose, and, locking key center piece underneth the flip door cap. Coupled with some SS line and good clamps it should be pretty secure feeding down into the tank. Good stuff.
Here are a few pictures:
The brake lines that RCR supplied are pre-bent, and are a complete no-brainer to install. I'm doing that right now and if it takes me more than two hours I'll be incredibly suprised. Nice SS lines, all bulkhead fittings, all bits contained and has 2psi pressure valves for the manual brakes. Also has a hydraulic pressure switch that I like a lot better than the pedal mounted electrical switches for operation of brake lights.
We also got the front clip primered properly and are starting some sanding on that too. Once the lines are in, in goes the engine for trial fittment of motor mounts, and once drilled, it is going in for good - we hope!
Also got some parts from Fran on Thursday with the KED stuff and the gas caps were there. I like these - built in flange for hose, and, locking key center piece underneth the flip door cap. Coupled with some SS line and good clamps it should be pretty secure feeding down into the tank. Good stuff.
Here are a few pictures:
Attachments
Ron Earp
Admin
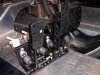
More progress....
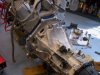
Making more progress. Brake and clutch lines took longer than 2 hours, but was a piece of cake and well put together from RCR. Basically get out a lot of pre-bent lines, drill bulk head holes, and be done with it. The result is nice and seemless with all lines internal to the car except for two that run along the bottom edge of the engine bay. The front brake lines just pop out at two bulkhead fittings so outside the car is it extremely clean. Here are some pictures:
Making more progress. Brake and clutch lines took longer than 2 hours, but was a piece of cake and well put together from RCR. Basically get out a lot of pre-bent lines, drill bulk head holes, and be done with it. The result is nice and seemless with all lines internal to the car except for two that run along the bottom edge of the engine bay. The front brake lines just pop out at two bulkhead fittings so outside the car is it extremely clean. Here are some pictures:
Attachments

Chris Kouba
Supporter
Ron-
Judging by the activities you're into already, you're not going to coat the chassis with anything (paintwise). Are you doing the bottom, wheel wells with anything or will you just leave it all alone?
Chris
Judging by the activities you're into already, you're not going to coat the chassis with anything (paintwise). Are you doing the bottom, wheel wells with anything or will you just leave it all alone?
Chris
Ron Earp
Admin
I'm leaving it alone. The car won't be driven in "henious" weather and being aluminum it really won't need a lot of upkeep. Scothbrite it with some WD40 on occasion and leave it be. We *might* put some bedliner stuff right in the back of the front wheel wells to catch tire buggers and stones, but that would be about it.
Lotus followed the same path on their Exige/Elise and they seem to be holding up well. My buddies Exige is a naked ally chassis and is doing fine despite being driven in all manner of weather and living a hard life outside. The RCR Lola will have a much happier existance in comparison.
R
Lotus followed the same path on their Exige/Elise and they seem to be holding up well. My buddies Exige is a naked ally chassis and is doing fine despite being driven in all manner of weather and living a hard life outside. The RCR Lola will have a much happier existance in comparison.
R
Ron Earp
Admin
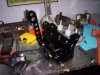
Pedals!
I think someone did PC it, but anodizing would take a big tank....I think you are right on the Lotus and clear anodizing, I'll check tomorrow when Jeff brings it over.
Here are a few pedal set pictures that I'm fixing to mount tomorrow. They are RCR design pedals with all Wilwood hardware and go together pretty nicely. I simply plainted them a semi-gloss black, nothing fancy. More details tomorrow when I get them all together and mounted. Good things happening down here, and more to come tomorrow with engine mock up and sanding!
Excuse the long division there on the sill panel, was trying to figure out where to center up that fuel gauge last week!
Attachments

Similar threads
- Replies
- 5
- Views
- 543
- Replies
- 5
- Views
- 689
- Replies
- 2
- Views
- 351
- Replies
- 24
- Views
- 3K