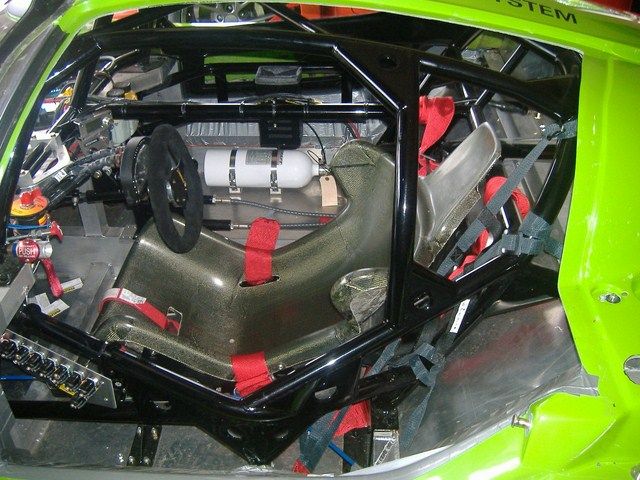
Dean's SLC build thread

From research when we were working with ISIS ...this is the number we were given...
DODGE Minivans 91-95 Dakota, '04-08, Ram 07-08
Part#: 42205
 

Ken Roberts

Supporter

Still confused Fran. I don't see the difference.... still looks like a traditional bolt although they look like the heads can be safety wired or a cotter pin through the threaded end.

He wanted to raise the nut above the recess for easier acess I'm assuming (thats what the spacer was for). How does using AN type of fastner help in this situation when running the bolt up from the bottom?

Thanks for the Pigtail part number!
 
The nuts to be used would be Jet nuts...the size of the nuts are much smaller and lighter...as used on aircraft/race machines alike.
 
Still confused Fran. I don't see the difference.... still looks like a traditional bolt although they look like the heads can be safety wired or a cotter pin through the threaded end.

He wanted to raise the nut above the recess for easier acess I'm assuming (thats what the spacer was for). How does using AN type of fastner help in this situation when running the bolt up from the bottom?

Thanks for the Pigtail part number!

The AN jetnuts use a smaller head for the same size bolt, and hence a smaller socket- one that can fit into the casting in the pedal assembly.

Since AN nuts are typically available in a limited size range- particularly the pitch- you need to be sure you have a matching bolt for the nut. Using AN for both makes it easy. And of course, they are pretty strong, and usually go through more QC since they are designed for aircraft use.

Edit: I see Fran beat me to the punch...
 
I have to ask so don't hold it against me but if you have a general question not related to this thread would you mid starting a new thread or sending Fran a PM. I want to keep the thread focused on this build.

Thanks

Back to the brakes.

I went through and checked all of the interior fittings to make sure they were all tight.

IMG_0415.jpg


I did make an adjustment that some of you might be interested in. I took apart the 2 psi residual valve and took out the check valve pieces.

IMG_0424.jpg


This will give the pedal more travel and it will feel less firm. I like it like this because I have a better feel with more pedal travel. The valve is not needed as long as your reservoirs are above the calibers. If not, you will have issues. My reservoirs will be on the dash so I will not need the valve. I will leave in in the system in case I want to change it later.

I wanted to get the first half of the steering assembled and installed before I put the pedals in. It gets pretty tight in there if you don't assemble all the pieces in order. (not that I ever know exactly what the order is).

IMG_0427.jpg
 
Last edited:
I've gone as far as I can with the brakes. I bolted the pedals in and connected the flex lines to the stainless on the inside.

IMG_0429.jpg


I took a few shots of the uprights when they were taken apart to replace the studs. These CNC parts are just beautiful!:thumbsup:

IMG_0423.jpg


IMG_0422.jpg


I am going to tackle the seat mounts in the morning. I will be able to locate the steering if I get the seats bolted in where I like them.
 
I worked on the seats a little bit last night and most of the day today. This was one of those jobs that looks like it would take a few minutes but ended up taking a ton of time. The first thing I did was figure out how to mount the seats to the cool RCR brackets. I had a stick of ABS plastic laying around and I thought that would make a good spacer. I made a rough cut then worked it down with a sander.

IMG_0436-1.jpg


The back bolts need a little attention too so I cut the heads off and welded a washer on at an angle to match the seat. That's not a good picture but you get the idea.

IMG_0437-1.jpg


This is it all bolted together.

IMG_0435-1.jpg


I used a little adhesive to hold the shim to the seat. After it was dry, I painted it to match.

IMG_0438-1.jpg


What do you think of the red seats?

IMG_0439.jpg
 
Great Question Yos,

I asked my wife to sacrifice her yoga mat for the good of the mission. Now, for those of you who haven't seen Lisa, she looks great doing Yoga!:thumbsup:

It was unfortunate that her mat was exactly the kind of foam I was looking for.

This is how it turned out.

IMG_0440.jpg


IMG_0441.jpg


The drivers seat is the "big man's" seat. My shoulders were to tight in the standard seat. I needed some way to make the lower half of the seat tighter so I added a inch foam block to each side of the seat. Now it fits a little tighter but I still have room for my shoulders.
 
I used the heavy duty spray adhesive from 3M that O'Rielly's sells. They had 2 types, one was $17.99 and one was $20.99. I got the $20 just because it said it was "heavy duty". I taped of the seat and sprayed the glue on the area that the mat would cover and sprayed a good coat on the mat, had a beer (just long enough for the glue to get tacky), then stuck it all together! It is really comfortable!
 
Thanks for the info. The seats are nice, but anything over an hour and it gets pretty hard. I know what I'm doing tomorrow.
 
Hi Dean

nice color choice on seats as well.

The seats look very high at the side and i doubt that the lap belt routing over the side is a good one, you probably can not tighten them correctly under your hip bones.
Also the seat front is to long to correctly fit a submarine belt.
For both you would need holes to run the belt through in the correct location.

Here is a pic of the very same seat in the masters himself race car.
Probably a bit more inclination in mounting, but still i think there is no way around.
DSCF3316640x480.jpg


Sorry but i think a repaint and another yoga mat is needed. Safety first.

TOM
 
Last edited:
Dang Dean looking nice. I think you might be the closest guy to me building A SL-C. It is still a 8 hour drive though. That is if your location is correct under your name. I will have to keep a eye on this build. Maybe once you get it done I will have to come down with a buddy to take a look at it. Shoot then I could kill two birds with one stone. I would be able to visit family on Chicago on my way back home.
 
Tom, Your right. I think I can cut the slots and keep the yaga mats in tact. The greater angle woud be a slight advantage because I will need to clear the mounting brackets. It can be done, it just would have been easier to do before the paint job.

Erik, how far are you from Road America? That's about 7 hours with a big trailer. Your are welcome any time.
 
I wanted to show how I finished the brake reservoir mounts. I had some nice 12 inch pieces of stainless steel tubing that I used to extent the brake lines. They are under no pressure so I'm sure it will be OK. Let me know what you think.

IMG_0445.jpg


I mounted my cans in a similar location to Fran's race car.

IMG_0444.jpg
 
Alright, no comments about the test dummy in the seat and I'm not drunk. My eyes are just tired. Anyway I had Lisa take some pictures of me in the seat. I think the belts are going to work over the shoulder and the lap belts might go right over the side. The sub will need a slot. Even if I need to slot the lap belt location, I think the seat will work well.

What do you guys think?

IMG_0448.jpg


IMG_0447.jpg


IMG_0446.jpg
 
Back
Top