Ians, SLC Beachfront Build

Mark B.

Supporter
Mark,
did you look at flipping them upside down so that the end is low not high?

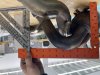
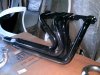
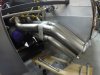
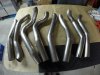
My thought is that if I take the LS7 headers I have and use them for the head side flange and adapt the tube shape to the c8 headers. The C8 headers, now upside down, would exit low with a slight up angle, much like I have see builders make for the exhaust adapter for the LS7 headers.

I am positive that there will be hiccups and issues, there always are lol. But that’s the fun right?!?

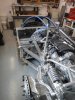
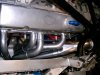
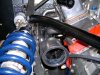
Yep flipping them upside-down is what I was thinking. I never got my hands on a set so was just going off internet pics as well. After changing the flange, the area I thought was going to be the problem is that the C8 headers stick out to the sides quite a bit. There's not that much clearance between the header flange on an LS/LT block and the frame (about 5.75"). Depending on the angles of the pipes / bends maybe it could be possible. I'd say if you can get your hands on a set to play with, go for it and let us know :D
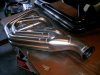
. I gave up thinking about it and decided to spend a few weekends redoing the rest of my exhaust instead.
 

Ian

Supporter
Mark,
The S2 build thread has a very timely post today that really show exactly what you are saying about the clearance between the heads and chassis rail. Looks like Scott even sectioned a bit of the chassis out for his headers. Looks like it will be a tight fit! Thankfully the C8 has been out long enough now that used stock headers are not that expensive (eBay). Mine should be here in a few days, I’ll start measuring things out and let ya know!
 

Ian

Supporter
Man these look sooooo good. Really is a shame that there are so many frame rails and body work in the way of running them like this.

IMG_4382.jpeg
IMG_4384.jpeg
 
Last edited:

Mark B.

Supporter
Thanks for the pics, Ian! Are you able to take a quick measurement of how far they stick out from the face of the gasket surface (to the side) without the heat shield?
 

Howard Jones

Supporter
Drop that into the chassis, place the bodywork on it, and see where you are. I think it is pretty sure they won't clear the rear clam, the down braces, and or the side/upper chassis rails without the heat shields and near zero with them.
 

Attachments

  • DSC05191.JPG
    DSC05191.JPG
    121.5 KB · Views: 99

Ian

Supporter
Drop that into the chassis, place the bodywork on it, and see where you are. I think it is pretty sure they won't clear the rear clam, the down braces, and or the side/upper chassis rails without the heat shields and near zero with them.

unfortunately you are 100% right, they just arrived and ive been having a bit of fun with them before putting them up…. It’s all I can do to pass the days before I have my car haha


Mark, looking at them now, will have some picks for you in just a few.
 

Ian

Supporter
INCOMING!!!!

IMG_0534.jpeg
IMG_0533.jpeg
IMG_4350.jpeg
img_4354-jpeg.133231

IMG_4362.jpeg

Not quite sure why that one is upside down, uploaded it 3 time, it’s normal in my picture library…. Anyways.

all of the bench top measurements have the flange level on the table top.

Mark, what do ya think?
tried to get them bolted on upside down but will have to cut the very end off as it tucks into the block. Don’t want to start cutting till I have the car in front of me.

Is there any way you can send me some measurements of the aluminum chassis member that runs along the heads? Just a Hight from the centerline of the engines crank shaft and distance from the front of the head and back of the head. Been looking at thousands of pictures to try and cobble together some orientation.


Anyone know of an available CAD file I can play with? Chassis / body, I’ll take anything lol.
THANKS ALL!!!
 

Attachments

  • IMG_4354.jpeg
    IMG_4354.jpeg
    335.3 KB · Views: 311
Ian,

I have a Solidworks model that is a "somewhat" accurate representation of the chassis. It has been move of a visual reference for me. I will send you what I have via Dropbox.
 

Mark B.

Supporter
Thanks Ian! It looks like the passenger-side header (which I guess will be the driver-side once it's fipped) doesn't stick out as much as the other one and may just clear as-is, at least on the sides. You might get lucky with the other one because of the angle of the primaries once you flip it, *may* fit under the frame. The collectors will have to be re-positioned either way I'm guessing, but that's minor.
I was able to get a few pics to show some of the dimensions -- not sure if these are helpful but let me know if you need any other angles. Hopefully there's not to much glare to read the numbers on the square!

20231013_153500.jpg

20231013_153607.jpg

20231013_153725.jpg

20231013_153836.jpg
 

Howard Jones

Supporter
I made these out of a pair of Shoenfield Sprint Car headers. I thought "What the hell they look close......right? Not even! There wasn't a single weld on the original header that wasn't cut. Not a single length of tubing was the correct length and not one bend turned the right way. Nothing Nada.

What I learned was you can make your own headers. Just start with a pre-made flange, collector, a box of 45 and 90-degree bends, and some straight tubing. Not with a pre-made set of headers that don't fit. It took me as long to cut them up as it did to weld it all back together.

My advice is to make your own. For what it costs to have them made professionally, you can buy a nice Tig machine and the pieces and learn how to tig weld steel tubing, then have them ceramic coated and get a free Tig machine in the process.

This is a very tight spot. They pretty much need to be custom-fit and built. Oh and down and then up will fit much easier than up and back, then down.

Lastly, Mild steel is easier than stainless and will last the life of the car as well as perform the same way. Cheaper too.
 

Attachments

  • 1014lls.gif
    1014lls.gif
    29.2 KB · Views: 61
  • HPIM1508.jpg
    HPIM1508.jpg
    183.2 KB · Views: 64
  • HPIM1515a.jpg
    HPIM1515a.jpg
    52.4 KB · Views: 63
  • HPIM1519.jpg
    HPIM1519.jpg
    168.1 KB · Views: 58
  • HPIM1517.jpg
    HPIM1517.jpg
    211.1 KB · Views: 67

Bill Kearley

Supporter
I spent a full day per pipe on a set I made for a 70 Boss 302 in a cobra, I couldn't find headers any where.
It's a lot of work. I fabbed up a cutting table and mounted it to chop saw table in order to always have cuts at 90 deg. to the pipe Start with a flange on the cyl head and jig up a collector as a target. Mistakes can be expensive
 

Attachments

  • GOPR1263.JPG
    GOPR1263.JPG
    307.9 KB · Views: 55
  • GOPR1265.JPG
    GOPR1265.JPG
    302.9 KB · Views: 59

Ian

Supporter
Thanks for the pictures Mark! These look great, no worries on the glare.
I'll let you know if I need something else, designing bits without the car is hard (headed) haha

Howard, GREAT advise. Thank you for sharing your experience, your headers turned out beautifully! The more I look at this the more I think I will just go ahead and fab up a set of custom headers once the car arrives.

Bill, Thank you for the setup advise and importance of 90 deg. cuts. I'm sure it is frustrating to get that bend just right only to have to pitch it in the scrap bucket due to a 85 deg cut!

I'm considering getting a set of header blocks to start playing with mock-ups, but they are a bit spendy and for the life of me I can not find a set of used on the web.

Thanks guys!
 
I'm considering getting a set of header blocks to start playing with mock-ups, but they are a bit spendy and for the life of me I can not find a set of used on the web.

Thanks guys!


Howard Jones

Supporter
I saw the guys who did my lawn irrigation system filling the PVC with sand and heating before bending. It didn't look like it took much heat. If it turns a darker color then that's too hot.

As far as a Tig machine goes. I think it needs to run off a 220VAC/50A breaker and put out a minimum of 200 amps. A max of 250A is fine. After that, it's all about the duty cycle. Unless you intend to do production work then you don't need more capability than this. Here is an example of a machine that has really good specs for a home shop. I have one and have used it so much I can't imagine not having it. They are not cheap but like I said, you get it for free if you make your own headers.


Buy an exchange gas tank from your local welding supply store. Get a size you can lift yourself at home. Ask me how I know....... Get a helmet that you can replace the battery in. The cheaper ones will not allow you to replace the battery. Ask me how I know.......
 
Last edited:

Bill Kearley

Supporter
Ian, a torch won't work. There are header companies that can supply you with plastic mock up fittings where you can fit up your entire bundle of snakes. You build with their mock up kit, send your pieces off to them and they will make it out of the steel of your choice.
 
Back
Top