Gallardo Mesh

You are a brave man.

Once you get them apart I cant help but think its just another car, nothing high tech.

The fire wall you cut out are you going to put back a strong structure to take its place.

Jim
 
Jim I could use this gallardo as Original but it's for me a project more than just a Lamborghini I am trying my best to reach at least 70% of what I am thinking

It's engine , transaxle , twin turbo , interior and exterior project

For the fire wall yes my friend it was 2 cm the part I cut and I bought 8 cm plate
By tomorrow I will upload how I close this part

Thanks
 
I started prepare the plate to close the firewall

I bought plate of aluminum 8 cm which is thicker than the
OEM ( only 2cm)


attachment.php


you can see how is thick than the original part


attachment.php


because is too thick I need to send the plate to special company with my measurement to do it fit the firewall


attachment.php
 

Attachments

  • 26x.jpg
    26x.jpg
    493.6 KB · Views: 927
  • 27x.jpg
    27x.jpg
    345.8 KB · Views: 895
  • 28x.jpg
    28x.jpg
    369.8 KB · Views: 903
we just set the plate to see how it will look like


attachment.php


I faced problem with the seat , it was touch the box from inside so I take the box and cut it again from the top , see the picture from inside


attachment.php


here is the free space I have after moving the firewall , its look good now for the engine to install


attachment.php
 

Attachments

  • 29x.jpg
    29x.jpg
    546.6 KB · Views: 921
  • 30x.jpg
    30x.jpg
    305.8 KB · Views: 912
  • 31x.jpg
    31x.jpg
    489.7 KB · Views: 887
I decide to do aluminum argon welding for the whole box with the body
for the tips and closing inside the box from out side and inside too


attachment.php


from the inside


attachment.php


also I will install roll cage but after I finish the engine and transaxle to start working for the interior
 

Attachments

  • 32x.jpg
    32x.jpg
    373.6 KB · Views: 897
  • 33x.jpg
    33x.jpg
    402 KB · Views: 870
David I was going to make a hatch but the Garag told me , after removing the 4wd shift

That's it can be easy to reach front of the engine from down we have free space , but honestly I am not sure because still didn't install the engine yet
 
after closing the firewall with thick aluminum I was thinking how to avoid the temperature , noise and the sound

I have no idea if the any of the three will reach the car from inside so I decide to have three layers to be sure that's the car from inside don't bather me specially I will have for street daily or three time a week

the first layer was 3M


attachment.php


from inside


attachment.php


the second layer is non-flammable and sound and temperature deeding pads


attachment.php


attachment.php


the last layer was he jacketing roll


attachment.php


those layer only will be for out side ( the engine side )
and I will have more from inside the car
 

Attachments

  • 34x.jpg
    34x.jpg
    395.6 KB · Views: 816
  • 35x.jpg
    35x.jpg
    508.8 KB · Views: 802
  • 36x.jpg
    36x.jpg
    51.6 KB · Views: 791
  • 37x.jpg
    37x.jpg
    78.7 KB · Views: 826
  • 38x.jpg
    38x.jpg
    81.3 KB · Views: 841
starting with the 3M layer pads


attachment.php


attachment.php


I did it just for the center but after that's I open the OEM pads from the two sides and have 3M one it , you can see it here


attachment.php
 

Attachments

  • 39x.jpg
    39x.jpg
    484.6 KB · Views: 819
  • 40x.jpg
    40x.jpg
    388.3 KB · Views: 834
  • 41x.jpg
    41x.jpg
    462.3 KB · Views: 838
continue with the pads

here is the second layer on top of the 3M pad


attachment.php


attachment.php


after finish the layer two pads I start wear the pads with the jacketing roll


attachment.php


attachment.php


that's it three layer of pads plus the two side OEM pads and I will have the OME parts for the gas tank after install the gas tank
 

Attachments

  • 41x.jpg
    41x.jpg
    528.7 KB · Views: 826
  • 42x.jpg
    42x.jpg
    490.1 KB · Views: 824
  • 43x.jpg
    43x.jpg
    436.1 KB · Views: 829
  • 44x.jpg
    44x.jpg
    432.1 KB · Views: 818
attachment.php
I added 3M paste for the tips over the jacketing roll so just incase I will not have any issue with water or any things else between the three layers


attachment.php


after that I wash the car with water pump and air pump plus ACDelco cleaner


attachment.php


attachment.php


you can see the different between the two pictures ( when I found the car and after )


attachment.php
 

Attachments

  • 46x.jpg
    46x.jpg
    88.2 KB · Views: 758
  • 48x.jpg
    48x.jpg
    380.8 KB · Views: 721
  • 49x.jpg
    49x.jpg
    503.5 KB · Views: 753
  • 50x.jpg
    50x.jpg
    461.4 KB · Views: 726
  • 51x.jpg
    51x.jpg
    585.4 KB · Views: 743
waiting for what is next !!


attachment.php


I received the transaxle harness from italianknightrider and it was with good condition and labeled ...... thanks


attachment.php


here is the engine harness I ordered from Painless with extra length


attachment.php


now I start thinking what color I will go with , I like the gallard super trofeo
color so I got the color code


attachment.php


attachment.php
 

Attachments

  • 52x.jpg
    52x.jpg
    485.7 KB · Views: 730
  • 53x.jpg
    53x.jpg
    84.1 KB · Views: 760
  • 54x.jpg
    54x.jpg
    91.7 KB · Views: 720
  • 55x.jpg
    55x.jpg
    194.9 KB · Views: 727
  • 56x.JPG
    56x.JPG
    46 KB · Views: 721
Great colour choice, and what an amazing difference a good clean makes it looks great... Will you be fully respraying including the engine bay etc?
 
Interesting project there. Looks like a good challenge.

If you don't mind me asking, why didn't you want to use the Gallardo engine?

That firewall looks like it's a pretty structural component of the chassis...considering the wall thickness. I can understand the desire to have access to the front of the engine without having to remove the engine....that just makes normal sense. Are you planning on making the part you removed a bolt-in/bolt-out access panel for ease of servicing?
 
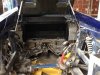
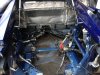
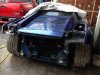
Paulbav .......this is what I am planning to do right now I don't want to respraying the whole body now because I am still working on engine and the body , on the other hand if I install the engine I will not be able to respraying the engine bay

I think I will just do the engine bay and install the engine with the transaxle then whenever I finish the body I am going to do the whole car


cliff beer ...... its more than one reason
here in my country only 5 or 6 garage can work properly with this kind
of car ( Gallardo engine ) moreover they are using this situation and its difficult to find used part we mostly ordering from the internet even the shipping is high cost for us , last thing I want to have the engine with twin turbo around 600-700 HP

this goal is cost me a lot with the original engine ( see the underground cars )
and who will do the programs for me ,I have to send my car to usa !!


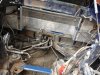
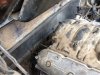
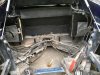
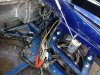
for the bolt-in/bolt-out yes I am planning but the garage guys told me wait until we install the engine then see , they believe that's we will be able to access the front engine from the down of the car ( where was the 4 wheel drive shift )
 
I really like the design of the this car but unfortunately I sent to them many emails without response , some one told me they close the company and they are not doing this kit any more :(

I contacted more than one person who work with 3d CNC one or two of them agree to do this kit but with high cost

finally I found one guy can do this rear view with good price


attachment.php


attachment.php


after deciding to go with this rear view I started looking for the equipment for it , I found this grill for sale
I bought the original grills because it so difficult to make it replica


attachment.php


here you can see how the grill has different size and not straight


attachment.php
 

Attachments

  • 57x.jpg
    57x.jpg
    314.9 KB · Views: 700
  • 58x.jpg
    58x.jpg
    258.5 KB · Views: 679
  • 59x.jpg
    59x.jpg
    369.5 KB · Views: 698
  • 60x.jpg
    60x.jpg
    78.9 KB · Views: 716
also I found the rear light with good price and good condition


attachment.php


by contacting one guy from different site , he was able to do the rear tip for the grills and the exhaust tip

exhaust tip was made by fiberglass with correct measurement and I have to take it to build it by steal whenever I receive it


attachment.php


the rear bumper still working on it plus I still waiting to receive the rear grill tip and exhaust tip to finish
 

Attachments

  • 61x.JPG
    61x.JPG
    50.1 KB · Views: 664
  • 62x.jpg
    62x.jpg
    114.3 KB · Views: 655
that's it , I am standing here right now

my project has big change , i have on of my friend want to buy the my transaxle with the harness and i decide to add twin turbo to my engine

so in this case i have to go with transaxle can handle my high HP

i ordered 01e transaxle from advanced automotion with some upgrade
i suppose receive the transaxle next 10 days

also i order the adopter with the cable shifter from Eric

so i have to wait until i get the items to start working again
 
Back
Top