

You are using an out of date browser. It may not display this or other websites correctly.
You should upgrade or use an alternative browser.
You should upgrade or use an alternative browser.
Gardner Douglas GD T70 Number 26 - Paul's Build Log
- Thread starter paulmartinjones
- Start date
good going paul,
you're further along the build then me it seems!
question, I have gotten 3 boxes of rivets from andy, 2 x 500 short ones and a box of longer ones, do you know which go where?
also the rinuts in the chassis for the engine compartment where allready fitted in my chassis when I collected it at GD's.....
Nice to see an actual build!
regards Thomas
you'll probably still have to drill and fit loads more rivnuts through the build, i did loads of them as once you start mounting other kit you'll need brackets/fixings etc. its all part of lightening the chassis tho with all the extra holes! :thumbsup:
Keep it up Paul, those rivits are never ending....
I made the decision not to use an air tool! The palms of my hand have just about recovered. It was 4 years ago now but it seems like yesterday.
Cheers,
David.
I made the decision not to use an air tool! The palms of my hand have just about recovered. It was 4 years ago now but it seems like yesterday.
Cheers,
David.
Attachments
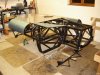
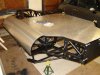
Some good progress today and over the last week or so.
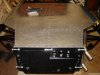
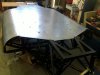
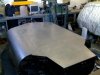
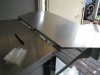
The under floor is now completely finished. All of the panels are fitted and today I polished the whole surface up to remove blemishes/stains/finger prints/etc and provide a nice period look. I know it’s the under floor and will never be seen, but it was a good place (in case I cocked it up!) to work out the best approach and I’m a bit of a perfectionist!
I polished up the floor using a random orbit sander (like the ones used for polishing car bodies) with Very Fine (Red) Scotchbrite pads. It only took a couple of hours (and a great deal of that was removing small blemishes by hand before breaking out the power tool) and produced a great 60s dull ally finish. Just like unpolished ally on a military aircraft. Just what I was after.
I gave it a good buffing using a liberal amount of WD40 afterwards and it has come up a treat, the WD40 leaving a nice protective coating.
I’m really chuffed with it!
The next step should be to panel and fit the front subframe, but it looks like there has been a minor manufacturing faff and it doesn’t fit. Back off to GD it needs to go so that Andy can either remanufacture it or just replace it. Only a minor niggle and Andy has been extremely helpful, as always.
Hopefully I’ll get the car turned the correct way up this week and resting on its wheeled construction frame.
Loving the build, still.
Cheers.
Paul
Attachments
good going on the panneling Paul.
I suppose I'll use up the short ones first and let the long ones till the body is here, maybe I can use the on that.
I have found a bigger problem btw which I suspect might also occur to you Paul,
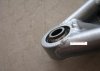
Yesterday I press fitted the minebea balljoints in the front top whishbones.
in the steel bushing you press them into a retaining groove for a cirlip is cut, when I try and fit the circlip the ears on it touch the ball of the bearing. see attached picture
How did you solve this Chris?
BTW pressing them in is quite scary as the bushing have ever so slightly disformed dureing welding, only couple of thou. but still be carfull not to press them in at an angle.
I finilised the fuel tank, expansion bottles, and catch tanks this weekend all in aluminium, they came out pretty nice. will try and make pictures tonight. (I'll try and make everything myself on this car) nest up is the panneling
regards Thomas
I suppose I'll use up the short ones first and let the long ones till the body is here, maybe I can use the on that.
I have found a bigger problem btw which I suspect might also occur to you Paul,
Yesterday I press fitted the minebea balljoints in the front top whishbones.
in the steel bushing you press them into a retaining groove for a cirlip is cut, when I try and fit the circlip the ears on it touch the ball of the bearing. see attached picture
How did you solve this Chris?
BTW pressing them in is quite scary as the bushing have ever so slightly disformed dureing welding, only couple of thou. but still be carfull not to press them in at an angle.
I finilised the fuel tank, expansion bottles, and catch tanks this weekend all in aluminium, they came out pretty nice. will try and make pictures tonight. (I'll try and make everything myself on this car) nest up is the panneling
regards Thomas
Attachments

Thomas,
I had the same situation as you. I ground down the "ears" that project in towards the center, where the pliers engage. It has no effect on the the circlips ability to retain, as the area engaging the slot is untouched. It will make the circlip slightly harder to remove, but I still don't anticipate any problems getting it out then time to replace the bearing.
Tom
Hi Tom,
I thought of grinding the ears also, but on a chassis this expensive I would appreciate everything to fit, I have brought the wishbones to the dutch GD agent Speedon, and he will take them to andy's next week. I think that if he claims them to fit he'd better fit them himself :shy: just joking, don't need the anytime soon.
still ,if it truns out not to be the wrong type circlip, I think this sort of flaw should be fixed by the man behind the lathe of man behind the CAD computer.
Grtz Thomas
hey paul,
my lower panel wasn't correct, was yours only the upper?
did your upper front subframe panel come folded of Andy's???
on the build pics you can see a hump in it where it jumps over the middle tube,(?) I would like to have that too but how to make it? my bending brake is 7cm too small to fit it...
do you have a picture of your front subframe?
I'm also super short on rivets allready Andy gave me 1500 of which 500 are to long, the 12mm ones don't clench the pannels near as tight as i like. so waiting for another 500box of 8mm ones to arive, I suspect to top the 1800 in total.
have you started on the interiour panels allready?
I do like the scotschbrite and WD40 tip, the WD40 trick really makes a nice colour on the pannaling, it looks older yet very new, thanx for that one!
regards thomas
Hi Thomas,
I had problems with the fit of the subframe to the chassis which was the major issue. It needed some gentle persuasion. Now ok.
I also had problems with both the upper and lower subframe ally panels. The bottom one had a fold where it shouldn’t have had one and the top one didn’t have the four folds to make the hump over the centre transverse tube. Andy swapped them for me. I really didn’t fancy trying to bend that hump in the upper panel - it would have annoyed me if I got it wrong.
The front subframe actually takes much longer to panel than I thought it would. Still on going as time has been short - especially now that the racing season has started again. I’ll tackle the interior panelling after the subframe is done. I’ll pop some pics on once there is something to see.
Glad you agree on the scotchbrite and WD40 trick. I think it makes it look like a WWII aircraft skin.")
Cheers.
Paul
I had problems with the fit of the subframe to the chassis which was the major issue. It needed some gentle persuasion. Now ok.
I also had problems with both the upper and lower subframe ally panels. The bottom one had a fold where it shouldn’t have had one and the top one didn’t have the four folds to make the hump over the centre transverse tube. Andy swapped them for me. I really didn’t fancy trying to bend that hump in the upper panel - it would have annoyed me if I got it wrong.
The front subframe actually takes much longer to panel than I thought it would. Still on going as time has been short - especially now that the racing season has started again. I’ll tackle the interior panelling after the subframe is done. I’ll pop some pics on once there is something to see.
Glad you agree on the scotchbrite and WD40 trick. I think it makes it look like a WWII aircraft skin.
Cheers.
Paul
hey paul,
my front upper panel didn't have the hump either, andy replaced mine too,
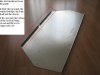
looking at pictures in the build log I told andy I had a wrong bottom pannel aswell thes a 90 degree bend in it which in my perspective should not be there, I suspect the same as yours, however Andy said that this was normal and needed to acces the bolts retaining the subframe to the chassis....
I do not have a fully closed bottom anymore, when I fit it like this, the will be a gap +/- 1" wide between the panel on the subframe and the main bottom chassis panel.
I think this is when the language barrier hits me.
do you agree with me that my panel is also wrong? I think the floor of the car should be continuously flat from nose to gearbox.....
regards Thomas
my front upper panel didn't have the hump either, andy replaced mine too,
looking at pictures in the build log I told andy I had a wrong bottom pannel aswell thes a 90 degree bend in it which in my perspective should not be there, I suspect the same as yours, however Andy said that this was normal and needed to acces the bolts retaining the subframe to the chassis....
I do not have a fully closed bottom anymore, when I fit it like this, the will be a gap +/- 1" wide between the panel on the subframe and the main bottom chassis panel.
I think this is when the language barrier hits me.
do you agree with me that my panel is also wrong? I think the floor of the car should be continuously flat from nose to gearbox.....
regards Thomas
Thomas,
Next time I have a look at the car I’ll take some photos so you can see what I have. I can’t remember off the top of my head.
However, Andy did point out that there is a need to get to the sub frame bolts from either the top or the bottom. Clearly, he is correct, but I would rather have a flat floor and access from the top.
I’ll have a look and let you know.
Cheers.
Paul
My top panel indeed gives boltacces from the top, I would also like to have a flat bottom as in my opinion is how it is supposed to be.
Speedon my dutch GD agent told me the same story as you did, ´andy saying it has to do with acces to the bolts`
however I don´t agree completly with them, you can acces the bolts from the top anyway so the bottom can be closed, being closed it also prevents water and crap getting into the battery area and pedal box-mastercylinder area etc etc.
It seems like a simple mistake, if I measure the upright piece after the fold, it is exactly the hight of the gap it makes.... no fold meening the bottom pannels would be flush against eachother.
having a bending brake a shear combo in le-garage makes all this panneling mucht easier.
anyway, how many 3.3mm drills did you ruin before you where finnished panneling? I'm 80 percent done and am deeply ashamed! :embarassed:
grtz Thomas
Attachments
Thomas,
I have had a look at the bits that Andy gave me and I now have:
A lower panel with a 90 degree bend at the front and no bend at the rear so it runs in line with the main floor of the car and has a minimal gap.
An upper panel that bends down at the rear to allow access to the retaining bolts.
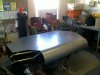
I panelled the sub frame last night and I’ll take some photos at the weekend and post them here.
That was only my second panelling job after the underside of the car and it was a much trickier job. Done now though and once the sealant has dried I’ll be polishing it up with the scotchbrite/sander/WD40 combo.
Chipping away…….
The next step is fitting the inner cockpit sides. I have already established that the laser cut panels that Andy now supplies (I think I have the first set) don’t quite fit…….. Nothing is ever easy. :thumbsdown:
Never mind - they will once I take the jig-saw to them. :thumbsup:
What have you guys found to be the best thing for cutting ally panels - just a jig saw with an ally blade? Or do you recommend a nibbler or similar?
Cheers.
Paul
I have had a look at the bits that Andy gave me and I now have:
A lower panel with a 90 degree bend at the front and no bend at the rear so it runs in line with the main floor of the car and has a minimal gap.
An upper panel that bends down at the rear to allow access to the retaining bolts.
I panelled the sub frame last night and I’ll take some photos at the weekend and post them here.
That was only my second panelling job after the underside of the car and it was a much trickier job. Done now though and once the sealant has dried I’ll be polishing it up with the scotchbrite/sander/WD40 combo.
Chipping away…….
The next step is fitting the inner cockpit sides. I have already established that the laser cut panels that Andy now supplies (I think I have the first set) don’t quite fit…….. Nothing is ever easy. :thumbsdown:
Never mind - they will once I take the jig-saw to them. :thumbsup:
What have you guys found to be the best thing for cutting ally panels - just a jig saw with an ally blade? Or do you recommend a nibbler or similar?
Cheers.
Paul
Similar threads
- Replies
- 18
- Views
- 937
- Replies
- 3
- Views
- 310
- Replies
- 0
- Views
- 149
- Replies
- 13
- Views
- 1K