Gibbo's TS40, formaly of the home of the originals

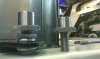
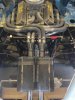
Re: With the right Engine mounts, the motor fits!!!!!!!

What mounts did you end up using?
I have just come across the same problem. I bought a pair of Lakewood Muscle Motor Mounts p/n LAK-24094 from summit but they don't fit!

I'll try again, the reply this morning failed when i pressed the post button.

I bought mine from Roadcraft Repower suppliers of American engine parts from Edelbrock for Ford and Chevrolet V8 engines and Tremec transmissions, stocknumber RUKMNT04.

The RealSteel Catalogue has them listed as the following (but they were outof stock hence i went to roadcraft.

BY2257​
Left & Right Price: £11.59ea

289 engine:​
1966-68 Falcon, 1964-67 Fairlane, march 1966-68 Mustang,
1968 Torino.

302 engine:​
1968-70 Falcon, 1968-70 Fairlane, 1968-72 Mustang Coupe,
1968-72 Mustang convertible
LH only, 1968-73 Mustang convertible RH

only, 1970-71 Cobra, 1968-71 Torino.​
351 engine:​
1969-72 Mustang coupe, 1969-70 Mustang convertible, 1969-71
Torino, 1970-71 Cobra.

Hope this helps, the taller ones I sold on Ebay and got full price, so i didn't end up out of pocket....

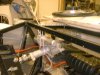
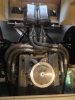
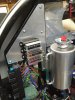
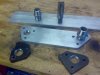
Watch this space for pictures of adaptors plates i have fabricated to allow me to plumb in water hoses to the timing chain cover.​


Right then, i really should update this more often.

  • Mini Mill has been bought and played with (getting better and its loads of fun!!!!)
  • Engine and gearbox fitted including all the other bits, clutch, drive shafts
  • Water inlets completed a second time (2nd times the charm and the Mill/Drill helped!!!)
  • Radiator bought waiting to fit
  • bulk head window bought waiting to fit
  • Electric power steering column FINALLY fitted and all connected (plus a first attempt at a steering wheel hub)
Need to order some more stuff, fuel tanks, AC unit (vintage Air mini unit i think) and sort out ancillary brackets then i can mount the body
 

Attachments

  • Steering Column1.jpg
    Steering Column1.jpg
    54.9 KB · Views: 664
  • Steering column 2.jpg
    Steering column 2.jpg
    56.2 KB · Views: 694
  • Water Inlet Adaptors.jpg
    Water Inlet Adaptors.jpg
    37.8 KB · Views: 732
  • Engine and Gearbox1.jpg
    Engine and Gearbox1.jpg
    53.5 KB · Views: 796
must eat ice cream, how else can i collect containers to keep stuff in, clean stuff in and annoy SWMBO by never throwing stuff away 'coz it might be useful one day'
 
Ok, its been a while again.

Radiator is fitted and plumbed with electric water pump

Whilst on a business trip to the states, found an AutoZone...couldn't believe the prices!!!!! So i helped with the credit crunch and bought oild filters, ignition leads and a shiney Edelbrock Carb
 

Attachments

  • Radiator 003.jpg
    Radiator 003.jpg
    39.5 KB · Views: 607
  • Carb 01.jpg
    Carb 01.jpg
    39 KB · Views: 614
Hi Ant
some good looking work there, keep it up
Which electric PAS have used, as I'm considering fitting one to mine. Was there any installation issues
Regards
Andy
 
Mine is from a Vauxhaul Corsa C but i would recommend a Corsa B due to the better availability of steering wheel hubs (they actually exist in a deformable format, I cobbled mine together). When i bought mine from the Bay of E, it came with a little black box that provides 'road speed' data in a format the Steering ECU expects. This basically allows you to dial in the amount of assistance, full on for parking, fully off for motorway/trackday.

There are companies that sell the whole setup complete. I am told a lot of the Escort Mk1/2 Rally chaps do this mod hence the cost of steering columns.

The 2 main stubling blocks were fabricating brackets whilst making sure everything is in the right place and comfortable and the other was the steering coupler from the end of the column to the ford rack. My column came with the vauxhaul link which had a Doudle D/oval end which needed to be adapted to a standard ford spline. i used parts from a Ford steering knuckle, you know the part with the .5 inch rubber spacer and had a plate welded to the Corsa coupler which bolted to a splined bit. Oh and then it all has to be put together, making sure it all fits and and then the brackets finalised. Always chicken and the egg......

Some mock up shots and a final shot. The bulkhead hole was tidied up!!! and i made a weather gasket from an old wetsuit.
 

Attachments

  • Steering 02.jpg
    Steering 02.jpg
    41.9 KB · Views: 524
  • Steering 03.jpg
    Steering 03.jpg
    45 KB · Views: 478
  • Steering 04.jpg
    Steering 04.jpg
    33.7 KB · Views: 540
  • EPAS.jpg
    EPAS.jpg
    54.9 KB · Views: 524
Its been a while, so here goes with a little catchup..

I have fabricated a front anti-roll bar from components from 'Rally Design'.
Anti-Roll Bar Front 012.jpg
Anti-Roll Bar Front 013.jpg

Droplinks made from tube and inserts which needed turning down a little
Anti-Roll Bar Front 011.jpg

Droplink mounts, machined from steel bar
Anti-Roll Bar Front 003.jpg

Machine matched mounting block
Anti-Roll Bar Front 007.jpg
Anti-Roll Bar Front 010.jpg
 
It really has been too long, but progress has been made.


  • spider rear legs are fixed
  • front and rear clam fittedwith homemade hinges
  • door hinges farication in progress, well actually we are onto mkII
  • tyres fitted to rims
lost all my fabrication photos of the clam hinges but will do some soon of them in place. Door hinges i think i am happy with, you may have seen some photos on another thread, Norfolk Tornado i think, well i have now made one piece versions means one less lock nut and taught myself knurling, more for ease of adjust than looks but i will need to knurl something in plan sight soon so thought had better start.

3 weeks in India didn't help with the build this year so far, but business has picked so i can spend some money, next are a set of gaguges i think so i can determine the fuel sender to use and that means i can sort the fuel tanks.....its all chicken and the egg it seems. and before Scott and Andy say i can buy it all from Tornado, I know i can but making stuff is half the fun, sorry.
 

Attachments

  • Door hinge 01.jpg
    Door hinge 01.jpg
    30.2 KB · Views: 471
Right, i think after a couple of years (nearly sold it twice!!!), its about time i updated this thread.
- Body work all in position, just front of spider to fix
- door tongues fabricated and fitted
- Mini door catches
- fabricated clam locaters and fastening points
- Exhaust fitted!!!!! A Tony Law (great service and fit!!!!)
- Fuel tank drawings with fabricator
- door handles (inner and outer) work in progress

Pictures later as dinner is ready....
 
So, some pictures

I would say it's just an exhaust, but it's MINE!!!!!

it's really given me a buzz and enthusiasm to crack on.

Next big job are the fuel tanks, the plans are with my mate to build up and TIG and then i think the Dash can go in.

Also will start the AC pump brackets, i have a picture from this forum of a nice setup so i will attempt to copy that ( i will 'big up' the original poster of the bracket once i remember who it was, or they can remind me)

So hopefully some more pictures soon and more frequent updates
 

Attachments

  • 2013-10-05 15.13.41.jpg
    2013-10-05 15.13.41.jpg
    96.8 KB · Views: 463
  • 2013-10-05 15.13.58.jpg
    2013-10-05 15.13.58.jpg
    91.8 KB · Views: 424
Finally an update. Pictures and Videos to follow.
Bodywork mounted, front of the spider needs proper fixing but need to fettle the doors a bit more first.
Tony Law exhaust fitted
Cooling system all plumbed and bled.

do you see where this is leading?

Solenoid mounted
alternator and AC pump mounted and fan belts fitted

Guessed it yet?

Fuel pump mounted and temp electrics run
Temporary dashboard constructed from Ice Cream container
Bare Minimum wiring completed

YES, YOU MAY HAVE GUESSED IT, THE ENGINE DOES FIRE!!!!!
 
https://youtu.be/v_eifj-pRQ4

Should get you to the video.

Yes i know it is running rough but i was pleased at the time!!!!

So the story of the day. It would not fire...assumed firing order was wrong. The engine was bought as an HO so the firing order should have been
1-3-7-2-6-5-4-8 but that didn't fire up. However the non-HO fired 1-5-4-2-6-3-7-8, all be it rough to my ears but not the others. so we reached the end of the day and we put it all away.

Thursday night, we decided to check it all out from first principals and discovered 2 things. the firing order is definitely HO (watched the inlet valves open in the HO sequence) and what we thought was TDC compression on #1 was actually TDC exhaust!! and therefore the plug leads were 180deg out!!!!

Made the changes and it fired up and purred so much better!!!!!

So we learnt that a Ford 302 with HO cam will fire up and run with the if you use non-HO order and move the leads around 180deg.

Video of it running smoother will be posted tonight. Leaving work early so i can fire it up again and rev it more this time, it was a little too late last night to give it any beans!!!!
 
So an update. Fuel lines run from Carb back to the fuel tank switch valve (via filters and pump). new water pump ready to fit, EWP150 with digital controller (anybody want a EWP80 and controller???).

Dash gauges are sitting ready for fitting, Smiths Flight. Wiring of switch illumination sorted to achieve the required result (light up full when 'on' and dim with side lights).

Internal door lock designed on paper and now need incorporating with external door locks.

lots of little jobs really. Watch this space for next engine run with new water pump and final fit fuel assembly (no tanks yet though)
 
Posted else where but also looking for Stratos/X19 rear light cluster bulb holders. On another note, anybody know if the Hella mix and match outer ring (tail and stop) incorporates a reflector? i can't tell from inter web pictures.

Oh and wiring loom ordered!!!!!
 
Really too long again. Started wiring and dashboard stuff in the last few months.

Halfway through a rad fan shroud too!!!!
 

Attachments

  • IMG_0416.jpg
    IMG_0416.jpg
    113.7 KB · Views: 354
  • IMG_0452.jpg
    IMG_0452.jpg
    229.6 KB · Views: 318
Back
Top