GT40 Australia #32 - Time for Rebuild

Dave Bilyk

Dave Bilyk
Supporter
No Keith, that's not wicking damage, it's 'wacking' that causes that kind of damage. /ubbthreads/images/graemlins/grin.gif /ubbthreads/images/graemlins/grin.gif
Pete, does this mean that us Pommy B******s can call you an 'Osmotic Aussie'?? /ubbthreads/images/graemlins/grin.gif /ubbthreads/images/graemlins/grin.gif
 
Long time since an update. Things have been moving slower than expected due to being sick for past few months. Things are looking up now though...I've also been distracted by something else, I'll pst more info in the off topic forum.

Got car to painter this morning, well fibreglass guy actually. /ubbthreads/images/graemlins/smile.gif So pretty happy it's progressing. Getting a lot of body work done, filling in holes where I have relocated body fittings. Fitted an extended inner bonnet skin, just need it tidied up. Changing shape of guards also getting some panel alignment fine tuning done.

It will be away for approx. 2 months. No problem though as I have lots of work I can do to some of the stuff I've pulled off/fitting. So lots to keep me occupied.

I'll see if I can grab some photo's.
 
Overdue for another update.

Car is still with fibreglass guy, but is progressing...where it made sense, I have helped or done the work.

List of jobs completed:
Panel Alignment - spent lots of time of this, a little more involved than I thought, lots of grinding & filling.
Gulf flares on the rear
Deep bonnet nostrils
MKIII style side windows
High-mount door mirrors
Move/remove lights
Cut out napa ducts
Fitted Spigots to exactly locate front/rear clips - how factory does it.
Fixed all defects - spider cracks, stress cracks etc etc.

Jobs to be done:
Get the thing straight
Make glass ducting for napa ducts
Brake duct housings
Bunch of other stuff I will think of...

Got plenty of photos, but not sure how interesting they are...this is what it currently looks like though. /ubbthreads/images/graemlins/smile.gif
 
As it looked on the weekend...
 

Attachments

  • 59574-IMG_8853_2.jpg
    59574-IMG_8853_2.jpg
    40.3 KB · Views: 611
MKIII side window inserts...just got to find somewhere to put the pull-out main windows. Looks like I may be able to hinge the existing door trims and fit them in the doors like most people do.
 

Attachments

  • 59576-IMG_8861_2.jpg
    59576-IMG_8861_2.jpg
    59.9 KB · Views: 592
Work on rear clip - gulf flares(photo has made them look a bit weird), heat cracks, lots of work to front edge to get gap right.

Stuff you can't see - removed flanges off side intakes, filled reverse light holes, filled number plate holes, spigots, tidy up of rear vent holes.
 

Attachments

  • 59579-IMG_8856_2.jpg
    59579-IMG_8856_2.jpg
    33.8 KB · Views: 571
I have plenty of updates to do, just got to get opportunity to take photos...Been down at the paint shop nearly everyday for last week...getting all those odd jobs finished before the body is painted next week.

Been doing more work to the front & rear clip...with the help of fibreglass guy. Well ok, he did most of the work. /ubbthreads/images/graemlins/smile.gif

Seems like I've spent most of my time there sanding, cleaning up the underneath of front & rear clip and also had the fun job of cutting off the old front indicator housings from behind the front brake duct holes...ready for real brake ducts.

Opened up the napa ducts on the front clip and fibreglasses in some housings for them. Idea being that opened up napa ducts look great, enclosing them will stop road grime being thrown out of them by front tyres. It also allows me to utilise the side ones at a later date if I need to as I can hook up to them under the guard and out of sight from the front opening. /ubbthreads/images/graemlins/grin.gif

Photo of napa ducts from underneath the front clip.
 

Attachments

  • 62191-underneathnapa.jpg
    62191-underneathnapa.jpg
    94 KB · Views: 562
Photo of napa ducts from top side. Still need to tidy up the shape of the holes, but makes a huge difference to look of the car. Gives the front so much more depth, photos don't do it justice. /ubbthreads/images/graemlins/smile.gif
 

Attachments

  • 62192-topnapaducts.jpg
    62192-topnapaducts.jpg
    70.1 KB · Views: 585
Photo of finished MKIII side window inserts. This will give me side windows that can either pop out at the rear. Once popped out, they can be simply lifted upwards and removed completely, so I can enjoy that beautiful exhaust note. /ubbthreads/images/graemlins/grin.gif
 

Attachments

  • 62193-sidewindows.jpg
    62193-sidewindows.jpg
    61.1 KB · Views: 568
Photo of sample of front duct were are adding to front clip. Borrowed moulds for it from local brake place. Just need to cut the front to match the shape of GT40 and voila instant brake ducts. Takes a 3" hose. I'll post a photo when the ducts are glassed in.
 

Attachments

  • 62194-frontduct.jpg
    62194-frontduct.jpg
    28 KB · Views: 568
Also added some spigots to front & rear clip to help with alignment. Slides into plastic sleeve inserted into clip. Gives guaranteed alignment everytime and also correct gap. Will also continue to use the original DRB type alignment bracket as well.
 

Attachments

  • 62195-spigot.jpg
    62195-spigot.jpg
    37 KB · Views: 569
Last post for now...Just a photo of paint colours. Straight out of the tin with no clear over these base colours, but gives you an idea. Blue is main colour and plain white for stripes.

Blue is Subaru WR Blue Perl Mica - paint code 02C
White is Subaru Pure White - paint code 8J5
 

Attachments

  • 62196-paint.jpg
    62196-paint.jpg
    37.5 KB · Views: 574

Peter Delaney

GT40s Supporter
Craig - I love the blue colour - if it looks that good as a base coat, just imagine what it will look like with the clear !

As to the "test part" for painting - I knew that some owners have gone overboard with stereos & all other manner of creature comforts - but a toilet seat !!!!!!

Kind Regards,

Peter D.
 
Thanks Peter, actually very similiar to your colour, probably a touch lighter. Your car certainly helped sway me towards that shade of blue. Yours looks absolutely fantastic.

Have you done anything about stripes or sill decals? Are they on the cards?

Hey, the toilet seat is for passengers for when they crap themselves. /ubbthreads/images/graemlins/shocked.gif I'll leave it up to you whether you think it's a result of the awesome performance of the car or from my scary driving. /ubbthreads/images/graemlins/grin.gif

I've actually been quite sick of late, so paint has been on the back burner. Now I'm busting my guts as there are so many little body jobs I've got to do, that I don't want to distract the professional with. I'll be working on the body all day Saturday and if I can get access Sunday as well. Don't want to hold up the paint process. /ubbthreads/images/graemlins/smile.gif

Boy it's really hard work to turn an ordinary body, into a great body. Plus it doesn't help with all the body mods I have performed. /ubbthreads/images/graemlins/grin.gif
 

Pete McCluskey.

Lifetime Supporter
Craig, the colours look Fantastic. If your car is like my home make sure you leave the toilet seat down, or you will get into all sorts of sh*t. /ubbthreads/images/graemlins/blush.gif /ubbthreads/images/graemlins/grin.gif Pre paint preparation is everything in turning a good body into an awesome one, so don't rush it. The more time spent now the better it will be. Then, I have been trying to turn my ordinary body into a great one for 60 years.. Its not working /ubbthreads/images/graemlins/frown.gif /ubbthreads/images/graemlins/frown.gif /ubbthreads/images/graemlins/grin.gif
 
[ QUOTE ]
Pre paint preparation is everything in turning a good body into an awesome one, so don't rush it. The more time spent now the better it will be.

[/ QUOTE ]

Thanks for the words of encouragement, I need all the help I can get at the moment. And I'm only doing the easy stuff, leaving all the tough jobs to the professional. The painter is getting itchy to get it painted, considering it's been down at his shop for 4-1/2 months now.

Having been married now for 4 months...I am now toilet trained. 33 years of bachelor life down the toilet...so to speak. /ubbthreads/images/graemlins/grin.gif
 

Pete McCluskey.

Lifetime Supporter
Funny thing about women and toilet seats. They need it down
and we need it up.If we leave it up they go berserk /ubbthreads/images/graemlins/mad.gif
If they leave it down all we do is lift it up. /ubbthreads/images/graemlins/laugh.gif You would think they would get over it. /ubbthreads/images/graemlins/laugh.gif
Married four Months Craig, congratulations. Do you know what stops a women from enjoying sex?......................


That first bite of wedding cake. /ubbthreads/images/graemlins/grin.gif /ubbthreads/images/graemlins/grin.gif
 
Actually it's called an "innoculation", which has to be repeated in one year's time(re-innoculation). This makes it permanant /ubbthreads/images/graemlins/shocked.gif /ubbthreads/images/graemlins/shocked.gif

Bill
 
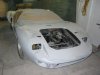
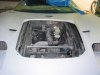
May seem strange since the GT40 is actually at a paint shop, but got an air conditioning pro to have a look at aircon system. His shed was next door, so quite convenient. The air con still worked, not amazingly cold, I was hopefuly of better and some of the flexible hose work looked dodgey. I won't go into all the details, but flexible hosework was terrible, it had rub throughs, twists in hoses and just butt ugly at the most obvious places.

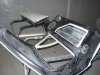
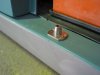
So it was no surprise to me that 3 x flexible hoses had to be replaced. Plus to connect onto the Low Pressure access port required removing lead from No.1 cylinder...argh, now that was a surprise...luckily on a flexible hose that was being replaced, so easily fixed. And another surprise, the dryer receiver was also missing an o-ring and the system only contained roughly 10% of required gas. /ubbthreads/images/graemlins/shocked.gif

AU$407 later and I had a much better aircon system. At idle it puts out a freezing cold -3 degree C(20 degrees ambient outside) and has a nice 12 month warranty, free check-up and special dye, so leak detection is easy with right gear. /ubbthreads/images/graemlins/smile.gif How quick the money goes. /ubbthreads/images/graemlins/frown.gif

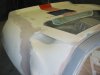
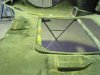
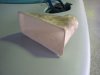
It was also recommended to me to rubber mount the condenser. It mounts directly to the body and not to the radiator, so rubber mounting it is probably not a bad idea.
 
Here some better shots of my widened rear guards. These have been custom made using photos and measurements as a guide. I didn't do these myself, enlisted the services of a professional.

I reckon they look a lot better in person, at least photos give you an idea.

Might need some wider tyres. /ubbthreads/images/graemlins/grin.gif Got plenty of room to fit in my 335/30ZR18 tyres in now. /ubbthreads/images/graemlins/smirk.gif
 

Attachments

  • 62687-IMG_9126(Small).JPG
    62687-IMG_9126(Small).JPG
    24.3 KB · Views: 609
Back
Top