
Looking good Phil. I always enjoy studying your build details. Keep up the good work.

You are using an out of date browser. It may not display this or other websites correctly.
You should upgrade or use an alternative browser.
You should upgrade or use an alternative browser.
My Scratch Built Project
- Thread starter Phil
- Start date
Russ
Thanks for the input.
I wish I could stay on the project like you and LIm do..this thing called making a living keeps getting in the way.
I am in the process of getting a bellhousing for my ZF, and need to fit that up, and as I mentioned the rear deck is close to completion so hopefully more to come.
Cheers
Phil
Hi Phil,
I have a question for you if you don't mind..
I'm just starting of building a space frame from drawings supplied by Mike Osborne, have you heard of these drawings??
The drawings have no exact measurements for the exact suspention mounting positions, my question is do i weld up all the suspention so it works correctly and then fit the body around the wheels or do i fit the body and then weld up the suspention mounting points so the wheels are located correctly iside the wheel arches, obivously making sure all geometry etc is correct.
If you could help me i would be very grateful!
Thanks
Tom
Darnell :
Hope you are doing well.
I have made some progress recently and right now am waiting on a bellhousing to mount my ZF. I recently totally crashed my laptop with all photos and hopefully the hard drive can be restored or at least get my data back.
I will post those photos or take some new ones asap.
I have most of the dash work done, steering column, most gauges mounted, switches and indicator lamps. All wheels and tires mounted and a preliminary alignment and check of the geometry all looks good. I got the rear setup with almost zero bump; steer, and the front is good also.
Fabbed a new gas pedal and re-set brake and clutch pedals to more accommodate my driving position, starting to panel the interior now.
I will post photos asap...thanks for all of the interest, I have a new item I will post in the next day or so that may interest some of you guys.
Cheers
Phil
Hi Phil,
The same thing just happened to me. Try these guys.
Data Recovery Services, Software, Solutions - Ontrack Data Recovery
I just got my data back. The company is Kroll, a large security outfit. They do good work. I had to get my data recovered, my tube frame GT40 design was on my harddrive! Oh, yeah, there was work on it, too. I learned my lesson, will always back up everything!
Darnel
Well: Got most of my data back, laptop is working...I hate these things. A few new photos and more to come when I get all of my files transferred from my desktop.
I have been working on the dash and interior, have most of my gauges, still waiting for an oil temp gauge, some indicator lamps mounted in dash and also switches. I ordered control knobs with controls for Heater, wiper, and dash lamps dimming. Dash is a bit rough now, need to complete all component mounting and then off to be finished after removing everything.
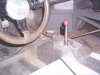
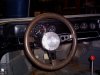
Steer column is installed, and wheel with quick disconnect, nice unit made by NRG, it always finds the same location when mounted and zero play.
Made a cover tube for the column with a turn sig/hi beam flasher switch that hides the wiring and is mostly a convenience I wanted.
Shifter and linkage fabbed and installed, linkage goes thru bulkhead with a spherical bearing mounted in a sleeve that protrudes thru, I left room for a small boot to isolate the interior from engine bay.
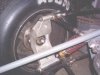
Rear uprights are complete except for caliper mounts, zero play in upright mounting but suspension travel (About 5") is super smooth. As I said in previous post the rear has almost zero toe steer, The uprights are set at 5 deg. pos. caster, with 1/2 deg. negative camber and everything is on rod ends or spherical bearings.
Tires on rear are Avons 27.5 X 12.5 X 15, although they actually show 25.5" diameter. Wheels are 14 X 15 Pin drive with 6 pin setup, I will take photos of the wheel snout and nut soon.
Overall width is just inside my bodywork and I will also post photos as I mount that.
Have some photos of the front setup, and I will get those up as I soon as I can.
Cheers
Phil
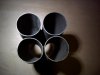
Almost forgot: I included some photos here of a new item, maybe some of you guys might be interested in these collectors.
I have been working on the dash and interior, have most of my gauges, still waiting for an oil temp gauge, some indicator lamps mounted in dash and also switches. I ordered control knobs with controls for Heater, wiper, and dash lamps dimming. Dash is a bit rough now, need to complete all component mounting and then off to be finished after removing everything.
Steer column is installed, and wheel with quick disconnect, nice unit made by NRG, it always finds the same location when mounted and zero play.
Made a cover tube for the column with a turn sig/hi beam flasher switch that hides the wiring and is mostly a convenience I wanted.
Shifter and linkage fabbed and installed, linkage goes thru bulkhead with a spherical bearing mounted in a sleeve that protrudes thru, I left room for a small boot to isolate the interior from engine bay.
Rear uprights are complete except for caliper mounts, zero play in upright mounting but suspension travel (About 5") is super smooth. As I said in previous post the rear has almost zero toe steer, The uprights are set at 5 deg. pos. caster, with 1/2 deg. negative camber and everything is on rod ends or spherical bearings.
Tires on rear are Avons 27.5 X 12.5 X 15, although they actually show 25.5" diameter. Wheels are 14 X 15 Pin drive with 6 pin setup, I will take photos of the wheel snout and nut soon.
Overall width is just inside my bodywork and I will also post photos as I mount that.
Have some photos of the front setup, and I will get those up as I soon as I can.
Cheers
Phil
Almost forgot: I included some photos here of a new item, maybe some of you guys might be interested in these collectors.
Attachments


Phil,
We need some pics of the entire shifter mechanism. I was interested long ago of a rod shift through the center console but gave up due to to many lines on both sides of the motor and no room due to the frame layout. Which trans are you running or planing to run.
Bill
We need some pics of the entire shifter mechanism. I was interested long ago of a rod shift through the center console but gave up due to to many lines on both sides of the motor and no room due to the frame layout. Which trans are you running or planing to run.
Bill
Bill:
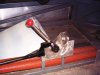
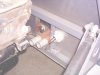
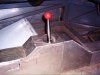
The shifter came out really good, I was surprised at how smooth it is, I will post some photos tommorrow (Monday). I am usimg a ZF box, The shifter unit comes out of the pass. side of the gearbox at the bottom. I cheated and used a little room from the passenger seat area to make the rod come out to the right of the tunnel, but this was to eliminate one u-joint, it am sure it would still function well if centered. The biggest problem was getting enough articulation in the shifter, (left to right and fore and aft) to move the rod at the gearbox sufficiently. I think the photos will be self-explanatory.
Cheers
Phil
The ZF seems to work out better. I have seen only one similar to yours. Tried to work it out for the Porsche but it just wouldn't work. Too many angles and U joints
Bill
Bill
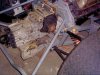
Took some photos of the shifter mechanism, not great but you may get the idea.
The rod is designed to rotate at the center point of the bottom joint to get a minimum of lateral travel.
The small channel attached to the center tunnel cover is where the rod lives, it takes up about 1" of space in the passenger seat, mostly at the rearmost point.
The thru bearing will allow me to put a boot on the rod to isolate it from the cabin.
Cheers
Phil
Attachments
Terry Oxandale
Skinny Man
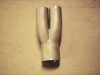
Nice collectors. Did you fabricate them yourself?
Ox
Ox
Thanks Terry.
Yes I make those collectors, I didn't have any in stainless to take photos but they look the best.
I am using that style collector for all of the header jobs I do. I also do 3 into 1 and 2 into one. The three into one are pretty popular for MG's and Ford Flathead motors, V-6 Etc.
Have a Happy Thanksgiving
Phil
Busy week:
Seems like everyone wants their stuff finished before Christmas, a lot of my work is repairs and the snow plow guys are all gearing up here all at the last minute of course. I had to put a water pump on my truck working outside...its all getting in the way of the important stuff....working on my GT.
There is always a good side though, and my little shop companion Billy had a trip to the Vet this past week which blew all the cash saved up for my bellhousing.
Billy is OK now, and this past week a group of my customers/friends showed up rather suspisciously with a large box with a bow on top, and of course a few beers.
Turns out that they all pitched in and got the bellhousing for me...things have a way of working out. Thanks to Frank, Dennis, Chris, Warren, Kurt, and Tom for the thought and great gift right before Christmas.
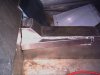
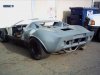
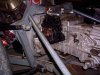
Meanwhile another step forward as my original rear bodywork finally arrived and we had to try-fit it of course....this has been an up and down week.
Next is fitting up my motor for final mounting position, and start on fabbing the headers.
Some photos of the rear deck and rockers trial fitted on the chassis....Billy had to get in there also...he keeps the mice off my computer and welding equipment and takes care of customer relations, he's especially fond of the ladies.
I will post photos of the gearbox and motor fit-up as I get to that.
Cheers
Phil
Seems like everyone wants their stuff finished before Christmas, a lot of my work is repairs and the snow plow guys are all gearing up here all at the last minute of course. I had to put a water pump on my truck working outside...its all getting in the way of the important stuff....working on my GT.
There is always a good side though, and my little shop companion Billy had a trip to the Vet this past week which blew all the cash saved up for my bellhousing.
Billy is OK now, and this past week a group of my customers/friends showed up rather suspisciously with a large box with a bow on top, and of course a few beers.
Turns out that they all pitched in and got the bellhousing for me...things have a way of working out. Thanks to Frank, Dennis, Chris, Warren, Kurt, and Tom for the thought and great gift right before Christmas.
Meanwhile another step forward as my original rear bodywork finally arrived and we had to try-fit it of course....this has been an up and down week.
Next is fitting up my motor for final mounting position, and start on fabbing the headers.
Some photos of the rear deck and rockers trial fitted on the chassis....Billy had to get in there also...he keeps the mice off my computer and welding equipment and takes care of customer relations, he's especially fond of the ladies.
I will post photos of the gearbox and motor fit-up as I get to that.
Cheers
Phil
Attachments

Thanks Darnel:
That rear decklid is an original piece, it has all of the brake and oil cooler ducting inside, and I paid dearly for it. The opportunity came up and it was time to bite the bullet or lose it. When I got the piece it was untrimmed from the mold, and still had stickers on it from the builder in the UK, I think I still have it somewhere.
Meanwhile I was busy today re-setting the motor and gearbox, and I got close to done before it got really crappy outside, and it looks like we are getting some substantial snow until Sunday morning so I guess its on hold a day or so.
I will post some photos of the motor/gearbox fit up next week and I also need to fit the decklid a little around the spider and fit the rockers a little better, but all the pieces initially fit surprisingly well.
More to come:
Phil
Randy:
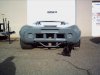
Your post popped up while I was replying to Darnel, Yes I love those flares. I fit the nose previously and I don't think I need to flare it. The rear bodywork was flared like that when I got it although a bit rough. The bodywork is 80" wide at the flares, and you don't really appreciate it until the car is viewed from the front, I need to take a few more photos and I will include one of those.
Thanks for the positive reply, I always appreciate you guys giving input as I am building the car to my desires but it is always nice to have some input especially in the plus column. As soon as I re-set the motor I can start with the headers and I will really start to see progress.
Cheers
Phil
Hi Phil,
Boy - at 80" wide, I wonder if that would even tit inside my trailer! :stunned:
I do believe that the original Gulf-Wide body cars had wider flares on the front as well which was why I asked..
You're doing a great job on this car and I'm glad to hear your side-kick Billy is still keeping the shop in order!")
Boy - at 80" wide, I wonder if that would even tit inside my trailer! :stunned:
I do believe that the original Gulf-Wide body cars had wider flares on the front as well which was why I asked..
You're doing a great job on this car and I'm glad to hear your side-kick Billy is still keeping the shop in order!
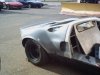
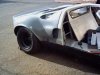
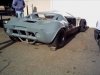
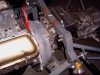
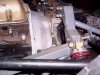
Test fit on gearbox today.
Originally I had intended on a G50 box and since I have acquired a ZF its necessary to re-arrange things a bit.
The whole package fits well, and is level both ways. The motor sits very low in the chassis, and as I had thought I probably need to trim some off the bottom of the bellhousing.
The motor mounts need to come forward a bit, and I may lower the whole package at the rear a degree or two but it looks about right.
Once that is all set I can proceed with the final mounting and start fabbing the headers and associated parts (collectors, muffler, bracketry etc.).
I have one halfshaft made up and it fits really well so the other side can be done now.
Thats all for now.
Will post more as I make progress.
Cheers
Phil
Attachments
Similar threads
- Replies
- 14
- Views
- 1K
- Replies
- 1
- Views
- 411
- Replies
- 18
- Views
- 2K