

You are using an out of date browser. It may not display this or other websites correctly.
You should upgrade or use an alternative browser.
You should upgrade or use an alternative browser.
PW Tornado Build pics
- Thread starter PDub
- Start date
flatchat(Chris)
Supporter
Yeeah! nice avitar-- looks just like my step daughter- she's in London at the moment /ubbthreads/images/graemlins/grin.gif
Keep up the good work /ubbthreads/images/graemlins/wink.gif
Keep up the good work /ubbthreads/images/graemlins/wink.gif
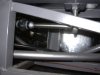
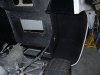
I've had quite a few people emailing me about the rollbar and where I had it made. It was made by Henry @ HCA fabrications and he had the car for 2 days to fit it and it cost £561 inc. vat. Included in that price is a box section welded in at 45 degrees to the side rails that go above the petrol tanks to help in the event of a side impact and also reinforce the flat cill tops. Henry used to assemble the safir monocoques so knows a thing or two about these cars. He is based by High Wycombe and his number is 01628-891-932.
Attachments
paul did you use tornados gear linkage or have you made your own and did you fabricate the gearbox mounting brackets as well looking good
Hi Chris,
The gearbox mounts and gearlinkage are both made by myself supplying drawings to a local machine shop. For the mounts I used Triumph herald bushes that I got at stoneleigh last year ! The gearlinkage is totally out of stainless steel - a combination of tube and solid. The rod ends and clevis were from rally design, the 2 UJ's from car build solutions. The rubber boots on the UJ's are from RS components.
The gearbox mounts and gearlinkage are both made by myself supplying drawings to a local machine shop. For the mounts I used Triumph herald bushes that I got at stoneleigh last year ! The gearlinkage is totally out of stainless steel - a combination of tube and solid. The rod ends and clevis were from rally design, the 2 UJ's from car build solutions. The rubber boots on the UJ's are from RS components.
Hi Paul,
Just looking over your build pics and I'm very impressed. I almost bought a Tornado, but unfortunately, he didn't offer LHD with central shift. I noticed the steering wheels going to be on the wrong side of the car. Ha Ha. I'll tell you something that I really notice, it how much variation there is in the front and rear suspensions between the Tornado, RF, and MDA. I mean, basiclly they should all be the same, but I can see subtle difference in all. Interesting to say the least. I really envy you. I'm just getting ready to fire up my build. I hope it goes as smoothly as your. Keep up the good work.
Just looking over your build pics and I'm very impressed. I almost bought a Tornado, but unfortunately, he didn't offer LHD with central shift. I noticed the steering wheels going to be on the wrong side of the car. Ha Ha. I'll tell you something that I really notice, it how much variation there is in the front and rear suspensions between the Tornado, RF, and MDA. I mean, basiclly they should all be the same, but I can see subtle difference in all. Interesting to say the least. I really envy you. I'm just getting ready to fire up my build. I hope it goes as smoothly as your. Keep up the good work.
Hi Dave,
O.K. the Tornado chassis has several 5/8" unf nuts welded to the chassis for the gearlinkage so you need 2 x 5/8" rodends to go in them. The gearstick has a circlip top and bottom of the rodend to hold it in place. I have had a clevis pin welded on the end of my gearstick to connect to the main shaft.
The end of the main shaft has a tooth welded on so it fits in the clevis pin.
Attachments
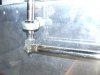
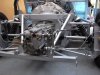
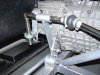
The main shaft passes through the bulkhead and through the next rod end that fits in a nut welded to the chassis - just to hold the shaft. I then have my first Uj that is under the black rubber boot. This then connects to the angled bit of bar onto the second UJ you can see just before the bracket on the gearbox.
Attachments
After the bracket that I have bolted to the gearbox mount the bar just has piece of bar welded at 90 degrees straight down. This passes through the rod end mounted on the gearbox arm. The arm I had made is just using a bolt tightened against the shaft of the gearbox which allows a bit of adjustment.
Once I have settled on the feel of the gearstick I will drill through the gearbox selector shaft and run a bolt through - just so it can't work loose.
Once I have settled on the feel of the gearstick I will drill through the gearbox selector shaft and run a bolt through - just so it can't work loose.
Attachments


Paul,
Just one question..... Do you ever sleep?
Your progress is amazing!
Your work is equally impressive!
Bill
Just one question..... Do you ever sleep?
Your progress is amazing!
Your work is equally impressive!
Bill
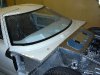
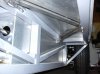
Doors are finally hung - wasn't as bad as I thought it would be. I just have to struggle to get in and out of the car now as I can't open the doors enough !
I may be extending the garage a few feet to accomodate as this is as far as the door opens !
I may be extending the garage a few feet to accomodate as this is as far as the door opens !
Attachments

Similar threads
- Replies
- 12
- Views
- 3K
- Replies
- 0
- Views
- 344
- Replies
- 2
- Views
- 550