

You are using an out of date browser. It may not display this or other websites correctly.
You should upgrade or use an alternative browser.
You should upgrade or use an alternative browser.
Show me your emergency / hand brake calipers
- Thread starter weisserheilbronn
- Start date
I checked mine and fixed them up as per Jack's suggestion. I was glad I did... the left side was almost ready to fall off! Glad it didn't on the front straight at Road America...
As for Jack's '30 minutes per side'... uhhh, I suppose so. But of course, he didn't take into account the 'Kirby Factor' which says that all allen head screws that are on his car have a 50% chance of stripping out the hex when trying to remove them. That's with new, quality allen keys. I've had that happen too many times... the screws that they use are really soft.
So last night I managed to get the stripped one out (the large one that holds the brake rotor onto the hub), I bought new bolts today and finished both of them up tonight in about 2 hours. The extra time was due to taking the time to cleaning up the wheels and suspension while I was there.
Thanks to Markus for bringing this to our attention! I'm glad I caught mine before things went south.
FWIW,
Kirby
I apologize, its an allen head screw not philips, not sure why I had that embedded in my brain. Here are the pictures and my fix, I had some mil spec bolts and nylocks that fit perfect so I used them. When I removed the guides for the expandable E brake shoe I put locktite on the small allen screws also. From start to finish it only take 30 minute per wheel. Worth the time to check these items and put locktite or something like I did. Ian I did all this before reading your post, sorry.
Uh....I'm thinkin' it's time to pull her apart and check things out. Figuring in the "dufus factor" I'll set aside a day for the job!
I checked mine and fixed them up as per Jack's suggestion. I was glad I did... the left side was almost ready to fall off! Glad it didn't on the front straight at Road America...
As for Jack's '30 minutes per side'... uhhh, I suppose so. But of course, he didn't take into account the 'Kirby Factor' which says that all allen head screws that are on his car have a 50% chance of stripping out the hex when trying to remove them. That's with new, quality allen keys. I've had that happen too many times... the screws that they use are really soft.
So last night I managed to get the stripped one out (the large one that holds the brake rotor onto the hub), I bought new bolts today and finished both of them up tonight in about 2 hours. The extra time was due to taking the time to cleaning up the wheels and suspension while I was there.
Thanks to Markus for bringing this to our attention! I'm glad I caught mine before things went south.
FWIW,
Kirby
Jack Houpe
GT40s Supporter
Someone should chop this thread up and put it in the "how to" forum. Jack, you might want to let Lance know aswell. He seemed very interested in fixes for some of the quirks we've found in our cars.
Rich.
Rich, I should have taken better pictures. If it was not for Markus I would not have checked the side I had not done. I really think this should be a mandatory check and refit by SPF or at least have them supply the correct parts, I would think they would be happy to supply some bolts and backing plates. Ian's idea of steel backing up the aluminum is the best one. This could be a major catastrophic failure at 150+MPH and cause serious injury.
Kirby my friend you got me laughing. :lol:
Something else to place on my TO DO list. Should this thread also be duplicated in the 'HOW TO HEADING'. I find myself copying to WORD and saving text under a named heading. It makes it easier to find the info.
Has anyone seen on the new cars the molded foam block SP is now using to seal the door where the A pillar meets the quarter panel? Using my finger for a ruler, I measure 3"L by 1 1/2" . I'm trying to duplicate with a die cut foam block when I get the profile around the lower door gasket. The bulb on the lower door sill could be "fatter" also. More later...
Grady
Jack Houpe
GT40s Supporter
Has anyone seen on the new cars the molded foam block SP is now using to seal the door where the A pillar meets the quarter panel? Using my finger for a ruler, I measure 3"L by 1 1/2" . I'm trying to duplicate with a die cut foam block when I get the profile around the lower door gasket. The bulb on the lower door sill could be "fatter" also. More later...
Grady
Heck no, got any pictures Grady?
Heck no, got any pictures Grady?
No, I didn't take a camera, but it is simple enough. I got some foam today to play with this weekend when I have time to make a template. I may have punches enough at work/home, but it would work better if I cut the part all at one time with a steel rule die.
I'm also working (in my head) to fab the aluminum part that goes down the sides and below the radiator that the bonnet would rest upon. This would close the gap and keep the 180 degree heat that isn't expelled over the bonnet from entering the area in front of the tub. And there is always the door seal, but I'm close on that....I just don't need 2,000 feet of the extrusion.
Grady
Seymour Snerd
Lifetime Supporter
P2160 hand brake a lot worse than I expected
Now that I've got one side I apart I certainly agree with Jack. I have all the problems that are fundamental to the way SPF did this, but in addition my upright isn't machined in back so I can't even use through bolts.
But here's what really irks me. Take a look at my actuator, and how it's been ground all to hell. As with Jack's, look how little steel is left around the screw holes. At some level of thread inserts, backing nuts, etc. what's left of the actuator mounting ears becomes the weak link. Interestingly, when I look at Markus' pictures I see that his actuator has not been so severly violated. I bet the OEM (PBR?) would be horrified if they saw what SPF is doing with their part.
Ian suggests this is a pretty standard part.
Anyone know where I can get an original actuator that hasn't been ground on by our friends at SPF (Sorry, I refuse to refer to this as "Hi-tech")?


... I really think this should be a mandatory check and refit by SPF or at least have them supply the correct parts, I would think they would be happy to supply some bolts and backing plates. Ian's idea of steel backing up the aluminum is the best one. This could be a major catastrophic failure at 150+MPH and cause serious injury.
Now that I've got one side I apart I certainly agree with Jack. I have all the problems that are fundamental to the way SPF did this, but in addition my upright isn't machined in back so I can't even use through bolts.
But here's what really irks me. Take a look at my actuator, and how it's been ground all to hell. As with Jack's, look how little steel is left around the screw holes. At some level of thread inserts, backing nuts, etc. what's left of the actuator mounting ears becomes the weak link. Interestingly, when I look at Markus' pictures I see that his actuator has not been so severly violated. I bet the OEM (PBR?) would be horrified if they saw what SPF is doing with their part.
Ian suggests this is a pretty standard part.
Anyone know where I can get an original actuator that hasn't been ground on by our friends at SPF (Sorry, I refuse to refer to this as "Hi-tech")?
I made my own handbrake using local parts PBR( it is a Pontiac gto in your part of the world)The OZY car.
I was going suggest that you drill the upright threads out. Tap an M8 thread or similar into the anchor ,then the bolts are going into steel and they are easy to get at for inspection, but looking at that anchor that option has gone out the door.
Jim
I was going suggest that you drill the upright threads out. Tap an M8 thread or similar into the anchor ,then the bolts are going into steel and they are easy to get at for inspection, but looking at that anchor that option has gone out the door.
Jim
alan, that was the part that broke on me a 70 plus mph, it then jammed the parking brake and the rotor would not turn
I don't understand why Alan's actuator has been ground up.
I recently had my emerg brake assy apart as part of the Olthoff brake duct kit install (see pics in recent post under "Upgrades to P2125") and the actuators did not exhibit this condition.
No indication of any problems with the assemblies after 3,000 miles.
I did clean all parts, reset clearances, drilled and tapped full length into the uprights and installed full length bolts with locktite.
Steve P2125
Seymour Snerd
Lifetime Supporter
more semi-symmetrical handbrake horrors
Let's be clear, it's not just mine: take a close look at the other two owner's parts earlier in this thread.
The reason is obvious when you're holding the part in your hand near the upright: the original unmolested part simply will not fit (eg clear the hub) without having material removed. Since I wrote the original post I took the other side apart, and that one was similarly ground, athough not as close to the mounting holes so it doesn't look quite as ridiculous as the first one. I'm convinced that one can do a responsible job of modifying the part; it's a question of taking a little care in removing material.
As for yours, Steve, I really wish I could see a clear picture of them. Perhaps yours were more neatly done or had not rusted where ground. I have to admit I didn't really notice it until after I had handled and looked a the part several times.
Also the flash + closeup photography makes it more obvious. And remember how small the actuator is (the body is only about 1" long). You might not have noticed, unless you looked closely. Anyway, next time you're tightening those 6 mm screws take a *really* close look at what's behind them and at the underside of the actuator body that faces the hub.
BTW a couple related notes from P2160: unlike the RH side, my LH upright *is* machined in back and has caliper holes on the unused front lug (as if to make the upright ambidextrous). This is all starting to feel like my late unlamented '69 Lamborghini, where (as the semi-joke went) how your car was built depended on how much wine Luigi had for lunch and for example whether he felt like putting Miura shocks on instead of 400 GT shocks (whichever cart was closest that day). Sigh... I thought I was past all that..... and the irony (or is it justice?) that the only really crude thing I've found is a "modern" addition the original car didn't have or need....
The other irony is that on the LH side the two mounting screws were seized so I had to drill them out.
Moral: Be aware of this if you think yours are "tight;" they might just be stuck.
I don't understand why Alan's actuator has been ground up.
[my] actuators did not exhibit this condition.
Steve P2125
Let's be clear, it's not just mine: take a close look at the other two owner's parts earlier in this thread.
The reason is obvious when you're holding the part in your hand near the upright: the original unmolested part simply will not fit (eg clear the hub) without having material removed. Since I wrote the original post I took the other side apart, and that one was similarly ground, athough not as close to the mounting holes so it doesn't look quite as ridiculous as the first one. I'm convinced that one can do a responsible job of modifying the part; it's a question of taking a little care in removing material.
As for yours, Steve, I really wish I could see a clear picture of them. Perhaps yours were more neatly done or had not rusted where ground. I have to admit I didn't really notice it until after I had handled and looked a the part several times.
Also the flash + closeup photography makes it more obvious. And remember how small the actuator is (the body is only about 1" long). You might not have noticed, unless you looked closely. Anyway, next time you're tightening those 6 mm screws take a *really* close look at what's behind them and at the underside of the actuator body that faces the hub.
BTW a couple related notes from P2160: unlike the RH side, my LH upright *is* machined in back and has caliper holes on the unused front lug (as if to make the upright ambidextrous). This is all starting to feel like my late unlamented '69 Lamborghini, where (as the semi-joke went) how your car was built depended on how much wine Luigi had for lunch and for example whether he felt like putting Miura shocks on instead of 400 GT shocks (whichever cart was closest that day). Sigh... I thought I was past all that..... and the irony (or is it justice?) that the only really crude thing I've found is a "modern" addition the original car didn't have or need....
The other irony is that on the LH side the two mounting screws were seized so I had to drill them out.
Moral: Be aware of this if you think yours are "tight;" they might just be stuck.
Last edited:
Seymour Snerd
Lifetime Supporter
Why not use the components in the anchor/ actuator but make the block and mount.
Jim --
Now that I've acquired an original PBR brake and can see what SPF/HT started with and how little is left when thwy are done machining, I agree completely with your solution. It's not even that complicated a part: essentially just a hollow cylinder on a rectangular plate. It just needs to be long enough to use the spare caliper mounting holes already present in the upright. The unmodified PBR part has a relatively massive lug extending toward the axle that is threaded 8 mm twice. However, in order to fit the part between the upright's bearing cylinder on the inside and the brake drum on the outside, SPF/HT have an impossible problem (given the decision to modify the original part rather than make a new one). By the time they've cut away all the steel that's in the way they are left with only the ~1/2" ears on each side of the cylinder that barely overlap the upright lugs. Those little ears just need to be made about an inch longer and a half inch taller and we'd have an emergency brake that could actually be used in an emergency.
There are a couple other things SPF/HT gave away with their solution that I'm not happy about:
1. The rubber seal/cover that keeps water and grit from getting inside the mechanism.
2. The detent on the adjusting nut. Now the brake is free to adjust itself anyway it pleases.
These issues as well could both be addressed with a new part rather than the amputated PBR part.
Last edited:
Seymour Snerd
Lifetime Supporter
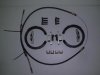
On the off-chance anyone else is still interested in this whole hand brake actuator thing, here is a reminder picture of what's left of it after SPF/HT has had their way with it followed by three pictures of the unmolested part. Basically they slice off the bottom third of it, in the process replacing two thick 8 mm threaded holes with two dainty 5 mm countersunk ones.


Last edited:
I have a question...
I'm getting a clicking sound from my left rear wheel. One click per rotation. I took the wheel all apart (even the e-brake) and everything look right. The bolts were all tight.
Thinking... maybe it was hitting an edge on the e-brake pad, I sanded it down. I put everything back together (using loc-tite) and I still have the clicking sound. It's really annoying. (The car has 300 miles on it.)
Anyone have the same problem? Anyone have the simple fix? Thanks.
~ Randy
Seymour Snerd
Lifetime Supporter
>>>I'm getting a clicking sound from my left rear wheel. One click per rotation.
I'll mention a couple things but I give them low chances of helping:
1. The e-brake shoe is guided/retained by a couple small (~10 mm long) slotted aluminum blocks that are attached to the upright with one screw. On the LHS, the lower of those two blocks sits right next to a protruding thread insert (for the "spare" caliper mounting holes). On my car the guide is "too close" to the thread insert, which kept it from being positioned purely radially, which prevented the shoe from retracting far enough not to rub on the drum. Since the drum's not perfectly round it would "catch" once every revolution. Fixed it by relieving the guide block a little and repositioning it. But I didn't ask the obvious question: does it click when you rotate the axle by hand with and without the wheel mounted (i.e. on jack stands)?
2. My general automotive experience with one-click per rev wheel noises is that it's often something quite non-obvious and essentially invisible, for example, a wheel that isn't really completely centered and tightened so that it "creaks" if you rotate the wheel under load *really* slowly, but in normal ops it sounds like a click. Or something loose in a hub cap (remember hub caps?). Or a creaky (dry/rusty) brake shoe return spring that is getting dragged on once/rev. Etc. Etc. So it pays to rotate the wheel very very slowly and listen very carefully to the exact nature and location of the sound. Mechanic's stethoscope might help localize. Having a helper is good so you can get on hands and needs while he/she pushes car back and forth. (OK I hear the jokes coming).
Randy,
Did you check wheel bearing. Shouldn't be any or very little play play (wheel off ground rock in and out @ 12 & 6). I dont think it's a wheel bearing but, might as well check.
Could be a CV but, don't think so either (with both wheels off the ground and in neutral rotate the wheels and listen close to the CV's).
Could also be the ZF. As I recall When new 2125 had a clicking too and I think Dennis told me to add some friction modifier. I did but also adjusted the emergency brakes about same time so not sure if the modifier stopped the click or "tuning " the E brake but, clicking is gone.
I do think it probably is the E brake. Shoes should be away from drum (with wheel off look through the disc as it rotates and insure there is no grab and release) The way I set mine was with the adjuster all the way in and make sure the shoes are free to move in the 2 "keepers ( I had to relieve the keeper slots a bit) then adjust hand lever pull by means of the cable adjustment nuts on the upright.
Any help?
Steve P2125 (clicking gone)
Similar threads
- Replies
- 18
- Views
- 1K
- Replies
- 357
- Views
- 63K
- Replies
- 15
- Views
- 13K
- Replies
- 17
- Views
- 9K