SLC 24 Howard Jones

Howard Jones

Supporter
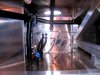
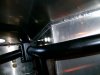
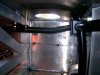
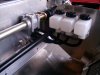
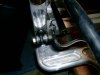
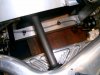
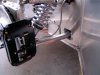
No complaints Fran, All of the parts were new in the box. It's just a matter of working with different manufacturers and not letting tolerances compound each other. I had the same issues with all of the different parts that went into my motor. Scat rotating assemble, Brodix heads, and complete comp cams valve train put into a 30 year old block. Just a matter of measuring things and doing whats necessary to make it as close to perfect as I can be the first time. This is the real way to save money. Do it once and do it right.

I have a email in the works for you Fran. Sent late last night.
 

Howard Jones

Supporter
Here's what I've been doing the last couple of weeks. The brake system is now in place (dry). The only things left to so is fill/bleed system, install brake pads, and mount peddle box onto floor when I know where it needs to be located.

The fluid will wait until the car in virtually complete. There's no point in letting good brake fluid sit and accumulate water. I will have to make a guess on brake pads for the first set but maybe by then some of the other SLC guys will have some setup data and I can go with what works for at least someone else. I still need make mounts for the seat so I can figure out where the peddles go.

The only real issue was that the prototype roll cage interferes with the pipe that goes to the front brakes. I had to re bend a couple to fit.This is the kind of thing that is par for the course when building a first of breed version. The front set of pipes are in the foot box inside the car unlike the rears that have the "T" and the two side pipes in the radiator area. If I had to do it again I would put the front "T" and the associated L and R pipes up there also. It would take a couple of through bulkhead fittings but I think it would be easier and cleaner. The rest of the brake pipe kit for the car fit fine.

I made the little tabs to mount the hose fittings at the rear and I still need to figure out how to secure the clutch fitting at the rear of the car. More than likely just another little tab made out of aluminum.

I also cut a nice big hole through the foot box and made a feed through plate for the remote master reservoirs hoses. This makes it very easy to change so that additional feel troughs can be added later.

Otherwise all went fine and here's some pictures so the next guy will have something to start with.
 

Attachments

  • HPIM0702.jpg
    HPIM0702.jpg
    165.3 KB · Views: 935
  • HPIM0703.jpg
    HPIM0703.jpg
    143 KB · Views: 800
  • HPIM0704.jpg
    HPIM0704.jpg
    144.4 KB · Views: 759
  • HPIM0705.jpg
    HPIM0705.jpg
    157 KB · Views: 858
  • HPIM0706.jpg
    HPIM0706.jpg
    157.3 KB · Views: 805
  • HPIM0707.jpg
    HPIM0707.jpg
    155.8 KB · Views: 759
  • HPIM0709.jpg
    HPIM0709.jpg
    158.1 KB · Views: 804
  • HPIM0710.jpg
    HPIM0710.jpg
    178.1 KB · Views: 769
  • HPIM0711.jpg
    HPIM0711.jpg
    130.3 KB · Views: 759
  • HPIM0712.jpg
    HPIM0712.jpg
    150.5 KB · Views: 761
  • HPIM0713.jpg
    HPIM0713.jpg
    157.7 KB · Views: 756
  • HPIM0714.jpg
    HPIM0714.jpg
    140 KB · Views: 669
  • HPIM0715.jpg
    HPIM0715.jpg
    147.6 KB · Views: 705
  • HPIM0716.jpg
    HPIM0716.jpg
    175 KB · Views: 770
  • HPIM0718.jpg
    HPIM0718.jpg
    141.1 KB · Views: 697
  • HPIM0719.jpg
    HPIM0719.jpg
    141.9 KB · Views: 724
  • HPIM0720.jpg
    HPIM0720.jpg
    176.7 KB · Views: 960
Last edited:
Looking good Howard.
I'm sure all those pics will come in handy as a reference for some of us when the time comes.
 

Howard Jones

Supporter
I have the body work off so that I can get ready to do the water pipes and while she's naked I installed the alum panel behind the cockpit. The piece that came with the car didn't have the two outboard tabs with the two bolts that secure the roll cage that you can see it the third picture. I think that they lend a little rigidity to the panel so I made another one. I also sealed the bottom with a 1/4" X 1" thick alum bar (second pic) so that in event of a engine room fire it will keep the heat off the back of my neck.

You can also see the heat barrier material I added to the panel. It comes from Racer parts Wholesale Racer Parts Wholesale - Award Winning Online Catalog For Real Racers. I used this stuff on the rear clip and elsewhere on my GT40. It works and holds up very well and I had some left over so I used it here.

I am going to panel in the fuel tank area behind the seats the same way sooner or later.
 

Attachments

  • HPIM0721.jpg
    HPIM0721.jpg
    208.8 KB · Views: 904
  • HPIM0722.jpg
    HPIM0722.jpg
    151.1 KB · Views: 742
  • HPIM0723.jpg
    HPIM0723.jpg
    188.9 KB · Views: 774
Last edited:

Randy V

Moderator-Admin
Staff member
Admin
Lifetime Supporter
Howard - Looking good there...

She appears to be a tad bit tight to get at those water pump pulley bolts or to put on a belt eh?
 

Dave Bilyk

Dave Bilyk
Supporter
Nice job Howard,
how much clearance at the pulley? I hope the motor is mounted stiffly enough to prevent contact.
My dax has a cheapo but light fibreglass bulkhead with a removable bump that covers the pulley. Some time ago I kept hearing strange noises, and discovered it was when I leaned back, the seat deformed the bulkhead and it hit the pulley. Had me worried for a short time:laugh:
I can see that you wont have this particular problem though.

regards
Dave
 

Howard Jones

Supporter
I gave up a long time ago with working on the engine in the car. I nearly always pull my 302 from my GT40 to do much more than oil changes and plugs. It's just easier for me. I like to work on things in a nice comfortable position. I really don't care how long it takes. It's really about how easy it is that counts for me.

As far as the water-pump goes. I can't even get the pulley off with the engine in the car. And we'll see if it makes contact with the chassis after I have it running. The fix wouldn't be all that difficult if it does. A notch welded into the chassis to add clearance right in front of the pulley would do it. I'm gonna wait until the times comes and go from there. I could try a different pulley even. We'll see.

By the way the engine is solid mounted and I don't expect much movement.
 

Howard Jones

Supporter
So, as you can see from the date of the last posting it's been a while. I have very busy at work and just haven't had the ability to focus on the hot rod. Anyway job done and back at it.

The SLC comes with enough straight 1.5" tubing to construct a coolant system but it would require a lot of 90 and 45 degree hose connections along with a few that just are not standard and would have to be hunted down from OEM type hoses and cut out of them. In the end it would cost nearly the same as buying stainless elbows and welding one up. At it turns out a stainless elbow is about the same cost as a silicon hose piece and two clamps so why not leave out all the connections and weld up a system using the straight pieces that Fran supplies along with some custom cut stainless elbows. We used 180's because it's just easier to make your own 45s and 90s and you still have the ability to make any angle you need otherwise.

I got the stainless from UPS.Stainless Headers Mfg., Inc. fabricates custom stainless and mild steel headers. They are in stock and I had them in less than a week via ground

By the way check out their header fabrication service. The lady told we that a simple 4 into 1 SBC stainless set with the "standard collectors" would be "about" $1500. Not bad really. They charge you a 500 dollar deposit for the jig and then credit your header cost when they get it back.

Here's some pictures of my friend helping me with the coolant system tubing fabrication. I'm just not a good enough welder to do this myself so I farmed it out. Ray came to my house with all his stuff and did it right in place on my car. I did the thinking and he did the cutting and welding.

I'll post more when it's all complete.
 

Attachments

  • HPIM0728.jpg
    HPIM0728.jpg
    211.3 KB · Views: 745
  • HPIM0729.jpg
    HPIM0729.jpg
    213.3 KB · Views: 752
  • HPIM0730.jpg
    HPIM0730.jpg
    210.7 KB · Views: 746
  • HPIM0733.jpg
    HPIM0733.jpg
    152.9 KB · Views: 803
  • HPIM0734.jpg
    HPIM0734.jpg
    205.5 KB · Views: 815
  • HPIM0735.jpg
    HPIM0735.jpg
    157.9 KB · Views: 782
Last edited:

Dave Lindemann

Lifetime Supporter
Very nice Howard - I particularly like the idea of minimizing the number of hose connection joints. Much less chance of having a coolant leak. Are you considering any kind of protection for the pipe running through the wheel well area?

Regards,
Dave L
 
Howard,

"They charge you a 500 dollar deposit for the jig and then credit your header cost when they get it back."

Are they using the ICE Engineworks jig for header mock-up?

Very nice job on the water lines BTW. Your build is top-notch all the way.
 

Howard Jones

Supporter
1. Since the tubing is stainless and pretty heavy wall thickness I think it will be OK as is, at least on the track and the limited miles run thereon. This stuff is very strong and would be very hard to collapse. The piece that is in the wheel-well is one of three on each side and therefor could be replaced without opening up the side-pod or changed any of the rest. It wouldn't be much more than a couple of hundred dollars to do. Material and labor. I also have enough leftover material to make another "nose-piece" should I need to.

2. They use the jig that is portrayed on their website under the custom tab I believe. The thing to do is give them a call and have them fill you in.

3. I used the tightest bend they had in 1.5 inch ID 180s.
 
Last edited:

Howard Jones

Supporter
Here's the final coolant system pictures. All of the coolant piping is installed and all I have left is to go and get some Adel clamps and snug it all down. I think it came out real nice.

The first picture is the drain that I installed in the low point in the RF wheel well. It will make it very easy to drain the coolant from the system. The other fitting in the second picture is for expansion and goes to the expansion tank.
 

Attachments

  • HPIM0739.jpg
    HPIM0739.jpg
    96.6 KB · Views: 707
  • HPIM0744.jpg
    HPIM0744.jpg
    160.2 KB · Views: 746
  • HPIM0740.jpg
    HPIM0740.jpg
    150.5 KB · Views: 682
  • HPIM0741.jpg
    HPIM0741.jpg
    225.1 KB · Views: 705
  • HPIM0742.jpg
    HPIM0742.jpg
    175.3 KB · Views: 712
  • HPIM0743.jpg
    HPIM0743.jpg
    142.8 KB · Views: 656
  • HPIM0745.jpg
    HPIM0745.jpg
    171.2 KB · Views: 674
  • HPIM0746.jpg
    HPIM0746.jpg
    128.4 KB · Views: 599
  • HPIM0747.jpg
    HPIM0747.jpg
    156.5 KB · Views: 652
  • HPIM0748.jpg
    HPIM0748.jpg
    177 KB · Views: 704

Dave Lindemann

Lifetime Supporter
Howard -

Very nicely done! Thank you for posting the detailed photos - they will help those of use who will be following in your footsteps on the coolant pipes. I just wish I could weld like that!

Dave L
 
Nice job Howard. Question about that plubing in the front wheel well....is there any danger of contact during full droop of the suspenion? Knowing your attention to detail I am certain no it just looks possible from the photo
 

Howard Jones

Supporter
We took the shock/spring off and jacked the suspension through it's complete travel and then some from lock to lock. At least 2 inchs throughout. The only way that the tire will get into the waterpipes is if the suspension breaks. Thanks for asking.
 
Back
Top