SLC 24 Howard Jones

Howard Jones

Supporter
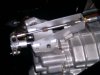
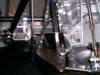
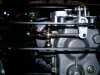
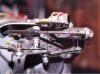
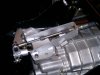
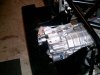
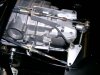
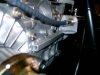
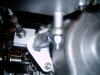
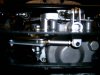
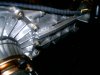
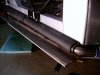
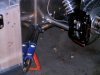
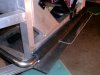
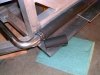
Here's why I was asking for pictures of G50 shifters. I took many ideas and put them together to come up with this. The basis issue is that with the diffuser in place it restricts the room for the shifter linkages. The standard kit issued stuff no doubt would work but it requires cutting holes in the diffuser panels. I figured that if I was going to use the diffuser then why cut it up.

So the cables need to run parallel to the gearbox to clear the diffuser on the L/H side. I got the idea for a bell-crank system from somebody here, thanks! I also didn't like the way the big cable on top was attached to the shifter rod so I made a completely different mount and rod attachment part.

I'm about half done in these pictures. The big cable pieces are complete and I beginning to make the mounts for the little one. The painted stuff is done. The bare pieces aren't.

I'm also working on my welding so be kind. Some of it isn't pretty but it won't break, it's all 4130 CM.

These pics didn't come out very well. When this project is complete I'll post some better ones of the whole system.
 

Attachments

  • HPIM0749.jpg
    HPIM0749.jpg
    94.1 KB · Views: 574
  • HPIM0750.jpg
    HPIM0750.jpg
    102.6 KB · Views: 597
  • HPIM0751.jpg
    HPIM0751.jpg
    130.6 KB · Views: 594
  • HPIM0754.jpg
    HPIM0754.jpg
    129.9 KB · Views: 585

Dave Lindemann

Lifetime Supporter
Great work Howard! I look forward to seeing the finished product. I have a G50 for my SLC - would you be willing to share the details of your design?

Thanks!
Dave L
 
I too like your solution! Add me to your list if you publish schematics/assembly instructions. You are moving along nicely with your build, Howard.
 
I'm wondering if you calculated the rocker ratio as it is obviously not 1:1 and if so, how you came up with the ratio that you did.
 

Howard Jones

Supporter
Here's the finished (for now) product. I made this out of leftover 4130 CM and some tubing I had laying around. The rod ends are cheepo's I had in the box under the work bench. The idea was to make something that was functional and strong so that when I was able to give it a tryout it would be reliable. It is not however how it will eventually turn out. I already have a different idea instead of the square tubing. I think a nice piece of heavy wall round tubing would be better. Just pick out the right ID and thread it to suit the rod end.

Anyway it does what I wanted it to do. 1. Fit in between the diffuser vertical plate and the LH side of the gearbox. 2. Use existing mounting points, no new holes in my nice new gearbox or, 3. no cutting up the diffuser. 4. must not use mounting points on the RH side of the gearbox because the oil return port in there. 5. must function as well or better than the provided parts.

Again this is my first use of a tig machine and I have already gotten a lot better. Please be kind. All the welds have good penetration, properly cooled and stress relieved, and won't fail but my hand is still a little shaky. The next one will look good as well as work good. At least I hope it works. It feels like it does, just going through the gears dry.
 

Attachments

  • HPIM0756.jpg
    HPIM0756.jpg
    126.6 KB · Views: 443
  • HPIM0755.jpg
    HPIM0755.jpg
    151.6 KB · Views: 451
  • HPIM0757.jpg
    HPIM0757.jpg
    147.1 KB · Views: 481
  • HPIM0760.jpg
    HPIM0760.jpg
    124.2 KB · Views: 425
  • HPIM0763.jpg
    HPIM0763.jpg
    102.6 KB · Views: 426
  • HPIM0761.jpg
    HPIM0761.jpg
    117.2 KB · Views: 404
  • HPIM0759.jpg
    HPIM0759.jpg
    108.4 KB · Views: 440
Last edited:

Dave Lindemann

Lifetime Supporter
Hmmmm - I don't know Howard - looks pretty good to me! As long as the box shifts the way it is supposed to I'd say you're good to go!

Dave L
 

Howard Jones

Supporter
Hey Dave, Other SLC people, how do you route the cables into the cockpit? I haven't even taken off the fuel tank cover yet. They must go through there right? Anybody? How about pictures of the cables going through the fuel tank area and on to the shifter. What about the way you other guys mounted the shifter.

Pictures really help, everybody, thanks in advance.
 
It will be obvious to you once you remove the fuel tank cover. There is a passage through the middle of the fuel cell.

Nice work and thanks for taking the time to post all the detailed pics and the schematic with dimensions.
 

Howard Jones

Supporter
A couple of things to note. The tail cover is the one with the 4 bolt mount on it and not the big donut one. And the other is the tail shift rod has been shortened, or at least it would need to be if it came from a big donut tail cover G50.
Zoom Zoom Dave, drop by anytime and we'll take it all off the car and you can measure and photograph as much as you like.
 

Howard Jones

Supporter
Just a little progress of late. I ran my GT40 at the track and that always takes a couple of weeks of prep and return to street mode. Anyway I found some good pipe insulation at Lowes. It's made of black neoprene material (like a wet suit) and that's what I used on My GT40 8 years ago. The stuff is still in good shape so used it again here.

By the way they only had the 1 inch ID stuff so I tried it. It went on tight but with a little stretching to fit, it came out OK. My water pipes are 1.5" OD.

You can also see the clamps I found at Aircraft Spruce. Perfect fit.
 

Attachments

  • HPIM0823.jpg
    HPIM0823.jpg
    174.7 KB · Views: 614
  • HPIM0824.jpg
    HPIM0824.jpg
    160.5 KB · Views: 595
  • HPIM0825.jpg
    HPIM0825.jpg
    152.9 KB · Views: 561
  • HPIM0826.jpg
    HPIM0826.jpg
    156 KB · Views: 571
  • HPIM0827.jpg
    HPIM0827.jpg
    176 KB · Views: 544
Nice. I've been looking for 1.5" insulated clamps. I couldn't find them at Aircraft Spruce. do you know what they called them?
Also where are you getting you 1.5" blue Silicone couplings?
 
Alex,

The car comes with SS 1.5" OD bead-ended tubing. You would need short lengths and elbows of rubber/silicone tubing to finish, plus sundry clamps. It appears that the majority of builders are fabricating bent SS or Aluminum tubing to make the majority of the curves along the sides.
 
Back
Top