GT40s.com
MK-I  MK-II  MK-III  MK-IV  GULF  MIRAGE  J-CAR  LOLA
GT40s.com
Home Forum Gallery Support GT40s.com  
Register FAQ Advertisers Search Today's Posts Mark Forums Read

Go Back   GT40s.com > GT40 Technical Forums > GT40 Tech - Powertrain/Transaxles


GT40 Tech - Powertrain/Transaxles Transaxles and driveline - don't dare post engine things here!

Reply
 
LinkBack Thread Tools Display Modes
Old 02-01-09, 12:32 PM   #1 (permalink)
LastPago
Bronze Supporter
France
 
Join Date: Jun 2007
Location: France
GT40: TS40
Posts: 71
UN1 Rebuild

Hi,

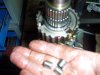
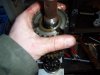
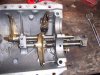
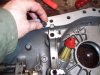
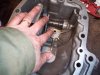
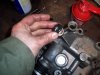
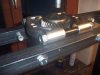
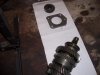
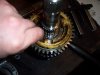
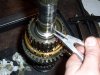
I finally decided to start my UN1-13 rebuild.

I got it from a R21 turbo 2L 1988-1989.The price was good (225 euros) and the gearbox didn't look too bad when I was under the car in the junkyard working to remove it.

Let's have a look.

(BTW, I am french so excuse my poor english and my lack of vocabulary for mechanicals words.)
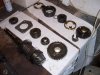
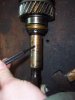
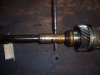
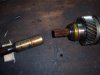
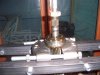
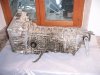
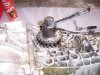
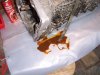
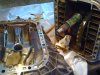
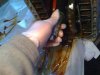
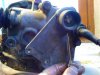
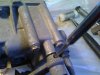
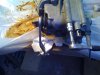
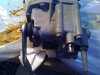
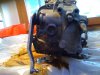
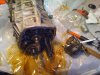
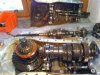
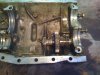
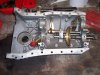
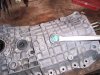
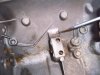
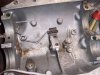
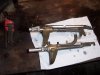
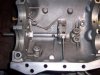
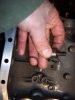
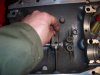
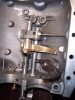
Here it is :
Attached Thumbnails
Click image for larger version

Name:	UN 1 (Small).JPG
Views:	337
Size:	54.5 KB
ID:	35899  
LastPago is offline  
Digg this Post!Add Post to del.icio.usBookmark Post in TechnoratiFurl this Post!
Reply With Quote
Old 02-01-09, 12:37 PM   #2 (permalink)
LastPago
Bronze Supporter
France
 
Join Date: Jun 2007
Location: France
GT40: TS40
Posts: 71
Re: UN1 Rebuild

A broken teeth indicates that the box has been previously opened- might be a good or bad news - I think bad as a broken teeth means that the guy that has done this work didn't had the right tools....

I marked the nut with the box, unsrewed the locker, and (using the right tool) loosen the nut.
Attached Thumbnails
Click image for larger version

Name:	UN 2 (Small).JPG
Views:	259
Size:	60.5 KB
ID:	35900   Click image for larger version

Name:	UN 3 (Small).JPG
Views:	208
Size:	60.1 KB
ID:	35901   Click image for larger version

Name:	UN 4 (Small).JPG
Views:	201
Size:	67.0 KB
ID:	35902   Click image for larger version

Name:	UN 5 (Small).JPG
Views:	238
Size:	67.0 KB
ID:	35903  
LastPago is offline  
Digg this Post!Add Post to del.icio.usBookmark Post in TechnoratiFurl this Post!
Reply With Quote
Old 02-01-09, 12:50 PM   #3 (permalink)
LastPago
Bronze Supporter
France
 
Join Date: Jun 2007
Location: France
GT40: TS40
Posts: 71
Re: UN1 Rebuild

Oil and water newer mix.... this rusted colour indicates that water entered in the box...normal I gave it a karcher wash few weeks ago.

So next move is to remove the bellhousing, not difficult, just few bolts to remove. The crown looks ok , no rust. Then, I removed the tube over the primeshaft.

Then, let's go at the back of the box, remove the sleeve that maintain the arm and unscrew the allen (take care of the screw and spring). The ball remains inside, I will get it later.

So, remove all bolts retaining the back side and remove the back (it comes easily).
Attached Thumbnails
Click image for larger version

Name:	UN 6 (Small).JPG
Views:	192
Size:	54.2 KB
ID:	35907   Click image for larger version

Name:	UN 7 (Small).jpg
Views:	187
Size:	69.1 KB
ID:	35908   Click image for larger version

Name:	UN 7B (Small).jpg
Views:	157
Size:	44.4 KB
ID:	35909   Click image for larger version

Name:	UN 8 (Small).jpg
Views:	164
Size:	51.0 KB
ID:	35910   Click image for larger version

Name:	UN 8B (Small).jpg
Views:	147
Size:	48.3 KB
ID:	35911  

Click image for larger version

Name:	UN 9 (Small).jpg
Views:	117
Size:	51.7 KB
ID:	35912   Click image for larger version

Name:	UN 9A (Small).jpg
Views:	113
Size:	50.0 KB
ID:	35913   Click image for larger version

Name:	UN 9B (Small).jpg
Views:	147
Size:	57.1 KB
ID:	35914   Click image for larger version

Name:	UN 9C (Small).jpg
Views:	119
Size:	51.9 KB
ID:	35915   Click image for larger version

Name:	UN 9D (Small).jpg
Views:	119
Size:	41.8 KB
ID:	35916  

Click image for larger version

Name:	UN 9E (Small).jpg
Views:	121
Size:	38.5 KB
ID:	35917   Click image for larger version

Name:	UN 10 (Small).jpg
Views:	199
Size:	52.5 KB
ID:	35918  
LastPago is offline  
Digg this Post!Add Post to del.icio.usBookmark Post in TechnoratiFurl this Post!
Reply With Quote
Old 02-01-09, 12:59 PM   #4 (permalink)
LastPago
Bronze Supporter
France
 
Join Date: Jun 2007
Location: France
GT40: TS40
Posts: 71
Re: UN1 Rebuild

Using an extractor, then I removed the fifth gear.

Then , just engage 2 gears (rear and drive) to block the shafts to allow the bolts for primeshaft and secondary shaft to be removed.

Then, unscrew the 3 bolts around the pinion on the secondary. It is important, not doing it will not allow to separate the housings.

Then unbolt all bolts from both side of the housings (do not forget the 4 big ones that came across the housings) and separate the housings.

Ok this sounds nice, the box is opened. I removed the reverse shaft.

Now it is time for a big cleaning of the housings and shafts to be in position to begin the serious work.

To be continued
Attached Thumbnails
Click image for larger version

Name:	UN 11 (Small).jpg
Views:	160
Size:	53.3 KB
ID:	35921   Click image for larger version

Name:	UN 12 (Small).jpg
Views:	154
Size:	64.7 KB
ID:	35922   Click image for larger version

Name:	UN 13 (Small).jpg
Views:	173
Size:	61.5 KB
ID:	35923   Click image for larger version

Name:	UN 14 (Small).jpg
Views:	140
Size:	63.8 KB
ID:	35924   Click image for larger version

Name:	UN 15 (Small).jpg
Views:	151
Size:	63.0 KB
ID:	35925  

Click image for larger version

Name:	UN 16 (Small).jpg
Views:	217
Size:	68.2 KB
ID:	35926   Click image for larger version

Name:	UN 17 (Small).jpg
Views:	173
Size:	61.3 KB
ID:	35927  
LastPago is offline  
Digg this Post!Add Post to del.icio.usBookmark Post in TechnoratiFurl this Post!
Reply With Quote
Old 02-01-09, 04:02 PM   #5 (permalink)
IanAnderson's Avatar
IanAnderson
Gold Supporter
United Kingdom
 
Join Date: Nov 2003
Location: Heathrow, Londo
GT40: Dax 40 Mk1 (Rov
Posts: 1,827
Re: UN1 Rebuild

Great step by step guide on how to work on a UNi

I'm not sure I would have the confidence to do the same

Ian
__________________
DAX GT40. Rover 3.9 EFi, Worked by John Eales.
Renault Box, Always makes me smile!
IanAnderson is offline  
Digg this Post!Add Post to del.icio.usBookmark Post in TechnoratiFurl this Post!
Reply With Quote
Old 02-01-09, 05:08 PM   #6 (permalink)
toker
Rookie
Sweden
 
Join Date: Mar 2007
Location: Sweden
Posts: 30
Re: UN1 Rebuild

great thread.... I wan´t to see more!!!
toker is offline  
Digg this Post!Add Post to del.icio.usBookmark Post in TechnoratiFurl this Post!
Reply With Quote
Old 02-01-09, 05:41 PM   #7 (permalink)
Phil's Avatar
Phil
5 Tenths
United States
 
Join Date: Feb 2004
Location: New Jersey
GT40: scratch built Mk1
Posts: 568
Re: UN1 Rebuild

Good thread, keep up the photos. I think your English is fine, and if thats any measure the rebuild should come out O.K. too.
Cheers
Phil
__________________
Scratch Built Spaceframe, 289, Pin Drives, ZF Box
Phil is offline  
Digg this Post!Add Post to del.icio.usBookmark Post in TechnoratiFurl this Post!
Reply With Quote
Old 02-05-09, 04:20 AM   #8 (permalink)
skeleton's Avatar
skeleton
Rookie
Germany
 
Join Date: Aug 2008
Location: Gemany
Posts: 44
Re: UN1 Rebuild

very cool, keep on going
skeleton is offline  
Digg this Post!Add Post to del.icio.usBookmark Post in TechnoratiFurl this Post!
Reply With Quote
Old 02-06-09, 11:53 AM   #9 (permalink)
LastPago
Bronze Supporter
France
 
Join Date: Jun 2007
Location: France
GT40: TS40
Posts: 71
Re: UN1 Rebuild

To go on...

Done some cleaning to the housings, a lot of dirt and old grease removed.

Some superficial rust because metal was hardly cleaned, nothing of importance.

Work on this housing :

Cleaned all axles and forks,
Replaced locking balls and springs by new ones,
Replaced gear selector washer.

How to do :

Remove the reverse gear contactor, remove the sleeve of the 3/4 fork and remove the fork, then pull the axle out.

Be carefull to the locking balls that will came out, use a magnet finger to take the locking ball.

Remove the sleeves of the 1/2 fork, then pull the axle out.

Unscrew the screw of the reverse gear selector the remove it.
Attached Thumbnails
Click image for larger version

Name:	UN 18 (Small).JPG
Views:	170
Size:	64.1 KB
ID:	36081   Click image for larger version

Name:	UN 19 (Small).JPG
Views:	132
Size:	71.7 KB
ID:	36082   Click image for larger version

Name:	UN 20 (Small).JPG
Views:	126
Size:	68.5 KB
ID:	36083   Click image for larger version

Name:	UN 21 (Small).JPG
Views:	149
Size:	65.7 KB
ID:	36084   Click image for larger version

Name:	UN 22 (Small).JPG
Views:	124
Size:	63.6 KB
ID:	36085  

Click image for larger version

Name:	UN 23 (Small).JPG
Views:	102
Size:	57.2 KB
ID:	36086   Click image for larger version

Name:	UN 24 (Small).JPG
Views:	108
Size:	64.9 KB
ID:	36087   Click image for larger version

Name:	UN 25 (Small).JPG
Views:	112
Size:	52.2 KB
ID:	36088   Click image for larger version

Name:	UN 26 (Small).JPG
Views:	113
Size:	51.2 KB
ID:	36089   Click image for larger version

Name:	UN 27 (Small).JPG
Views:	125
Size:	46.6 KB
ID:	36090  

Click image for larger version

Name:	UN 28 (Small).JPG
Views:	105
Size:	33.3 KB
ID:	36091   Click image for larger version

Name:	UN 29 (Small).JPG
Views:	135
Size:	61.4 KB
ID:	36092  
LastPago is offline  
Digg this Post!Add Post to del.icio.usBookmark Post in TechnoratiFurl this Post!
Reply With Quote
Old 02-06-09, 12:01 PM   #10 (permalink)
LastPago
Bronze Supporter
France
 
Join Date: Jun 2007
Location: France
GT40: TS40
Posts: 71
Re: UN1 Rebuild

Then,

Using a tool to be stolen to your dentist (a good reason to give him a visit), remove the springs of the locking balls.

Give a good cleaning to the axles and fork.

With a soft file, gently adjust the forks and selectors side to remove any diseases.

Remove the magnet to have it cleaned.

Give a final clean to the housings, dry it carefully and spray some WD40.
Attached Thumbnails
Click image for larger version

Name:	UN 30 (Small).JPG
Views:	140
Size:	51.2 KB
ID:	36094   Click image for larger version

Name:	UN 31 (Small).JPG
Views:	124
Size:	61.8 KB
ID:	36095   Click image for larger version

Name:	UN 32 (Small).JPG
Views:	102
Size:	58.1 KB
ID:	36096   Click image for larger version

Name:	UN 33 (Small).JPG
Views:	111
Size:	29.4 KB
ID:	36097   Click image for larger version

Name:	UN 34 (Small).JPG
Views:	113
Size:	46.8 KB
ID:	36098  

Click image for larger version

Name:	UN 35 (Small).JPG
Views:	118
Size:	59.4 KB
ID:	36099   Click image for larger version

Name:	UN 36 (Small).JPG
Views:	111
Size:	35.7 KB
ID:	36100   Click image for larger version

Name:	UN 37 (Small).JPG
Views:	138
Size:	59.5 KB
ID:	36101  
LastPago is offline  
Digg this Post!Add Post to del.icio.usBookmark Post in TechnoratiFurl this Post!
Reply With Quote
Old 02-06-09, 12:11 PM   #11 (permalink)
LastPago
Bronze Supporter
France
 
Join Date: Jun 2007
Location: France
GT40: TS40
Posts: 71
Re: UN1 Rebuild

So,

Engage the reverse gear axle, place the selctor with a new washer.

Place the new spring of 1/2 the axle, place a new locking ball, push down the locking ball and push the axle to put him in place.

Do the same for the 3/4 axle : new spring, new locking ball.

Put all sleeves in place with a special attention to the sleeves that come on the 1/2 axle. The head of the sleeve MUST not be higher than the thickness of the spring. Not doing so will make your sleeve to touch the pinion teeth.

Don't forget to place the magnet.

The reverse selector screw must be coated with loctite and screwed with a 3 nm torque.

To be continued.

Ps : If I am posting too much pics, let me know.

Cheers

Stephane
Attached Thumbnails
Click image for larger version

Name:	UN 38 (Small).JPG
Views:	106
Size:	51.7 KB
ID:	36102   Click image for larger version

Name:	UN 39 (Small).JPG
Views:	106
Size:	25.9 KB
ID:	36103   Click image for larger version

Name:	UN 40 (Small).JPG
Views:	110
Size:	42.2 KB
ID:	36104   Click image for larger version

Name:	UN 41 (Small).JPG
Views:	112
Size:	34.1 KB
ID:	36105   Click image for larger version

Name:	UN 42 (Small).JPG
Views:	116
Size:	58.9 KB
ID:	36106  

Click image for larger version

Name:	UN 43 (Small).JPG
Views:	137
Size:	59.8 KB
ID:	36107  
LastPago is offline  
Digg this Post!Add Post to del.icio.usBookmark Post in TechnoratiFurl this Post!
Reply With Quote
Old 02-06-09, 01:43 PM   #12 (permalink)
MGNut's Avatar
MGNut
Bronze Supporter
United Kingdom
 
Join Date: Nov 2003
Location: Tavistock,Devon
GT40: Sold
Posts: 451
Re: UN1 Rebuild

Stephane,
this is an excellent blow by blow account of the rebuild, very informative and I am saving all the pictures to help me with a possible rebuild of my spare gearbox. Cannot have too many pictures. Well done and thank you.
__________________
Turncoat !?
MGNut is offline  
Digg this Post!Add Post to del.icio.usBookmark Post in TechnoratiFurl this Post!
Reply With Quote
Old 02-06-09, 07:20 PM   #13 (permalink)
Faili F's Avatar
Faili F
7 Tenths
Mexico
 
Join Date: Aug 2002
Location: Axis Of Evil
GT40: A Fake one
Posts: 749
Smile Re: UN1 Rebuild

VIV LA FRANCE!!!!

Excellent!!!!!
Faili F is offline  
Digg this Post!Add Post to del.icio.usBookmark Post in TechnoratiFurl this Post!
Reply With Quote
Old 02-07-09, 01:42 AM   #14 (permalink)
skeleton's Avatar
skeleton
Rookie
Germany
 
Join Date: Aug 2008
Location: Gemany
Posts: 44
Re: UN1 Rebuild

This looks great. Too many pictures, are you nuts man ? more more more ;-)

Question, do you have a list of replacement parts? I know every gearbox needs different care as they have undergone different usage and wear-out, but can you provide us a list of things always to replace?
This would be a great help while shopping around for the parts
skeleton is offline  
Digg this Post!Add Post to del.icio.usBookmark Post in TechnoratiFurl this Post!
Reply With Quote
Old 02-07-09, 07:50 AM   #15 (permalink)
LastPago
Bronze Supporter
France
 
Join Date: Jun 2007
Location: France
GT40: TS40
Posts: 71
Re: UN1 Rebuild

Carlos,

I have a permanent access to renault references. I will try to edit screencaptures or will export them in an excel sheet. For sure, it is better to have the renault references of the parts needed if you want to stay in a friendly relation with your local renault shop : they don't like to spend hours to find what could be the reference of a locking ball wich will be invoiced few cents...

But the parts to be replaced may change from a gearbox to an other, it all depends of the work you want to be done : Repairing, refurbishing or rebuilding.

In my case, I am doing a full rebuild for this one, this will include changing all bearings and syncromesh for example. BTW, this is why, on the last pic I posted, you see a big hole in the housing, (I removed the differential locking bolt) as I have no more use to keep track of the previous settings : New bearings mean new settings.

Maybe the good way would be to realize a full renault UN excel with all references and maybe parts description as some can be sourced elsewhere with better prices.

Cheers

Stephane
LastPago is offline  
Digg this Post!Add Post to del.icio.usBookmark Post in TechnoratiFurl this Post!
Reply With Quote
Old 02-07-09, 12:45 PM   #16 (permalink)
LastPago
Bronze Supporter
France
 
Join Date: Jun 2007
Location: France
GT40: TS40
Posts: 71
Re: UN1 Rebuild

Done some work on the rear housing :

Cleaned the cast,
Changed spring
Changed shells
Changed O Ring seals
Changed lip seal

It may sound easy and quick, in fact it is not...

How to do :

Unscrew the rear gear unlocking cable, pull the rocker. It would come not easily, if you don't succeed by hand, you can softly tap on its axle from the back of the housing.

The rocker axle has 2 O rings that need to be changed.

Then chase the selector's sleeve.

Using a metal fork, compress the spring and remove every half shell (4).

Then pull out the selector shaft.

Be carefull to the rubber boot, it costs 50 eur...Renault really sucks on this...

Remove the lip seal (selector shaft).

The housing is now ready for a final cleaning bath.

Dry it carefully.

On pic 53, these are the parts that need to be chnaged on the selector shaft.

Place the spring and the selector and engage the shaft (do not forget the rubber boot). Oil the back of the shells, compress the spring using the fork and place all shells one by one.

Place the big sleeve then place a second one in the big one.

Change the O rings on the rocker shaft.

Oil the shaft and oil the guide tubes (not sure of the name...:-(....

Oil the selector shaft.

Fill the sputting tube with oil and press on it, oil must get out and must be clean, fill in and press i until oil gets out really clean.

Place a new ring at the back of the rocker shaft.

To be continued.

Cheers

Stephane
Attached Thumbnails
Click image for larger version

Name:	UN 44 (Small).JPG
Views:	91
Size:	36.4 KB
ID:	36109   Click image for larger version

Name:	UN 46 (Small).JPG
Views:	93
Size:	26.6 KB
ID:	36110   Click image for larger version

Name:	UN 47 (Small).JPG
Views:	100
Size:	28.1 KB
ID:	36111   Click image for larger version

Name:	UN 45 (Small).JPG
Views:	90
Size:	41.1 KB
ID:	36112   Click image for larger version

Name:	UN 48 (Small).JPG
Views:	94
Size:	33.1 KB
ID:	36113  

Click image for larger version

Name:	UN 49 (Small).JPG
Views:	86
Size:	25.4 KB
ID:	36114   Click image for larger version

Name:	UN 50 (Small).JPG
Views:	86
Size:	61.0 KB
ID:	36115   Click image for larger version

Name:	UN 51 (Small).JPG
Views:	78
Size:	26.1 KB
ID:	36116   Click image for larger version

Name:	UN 52 (Small).JPG
Views:	86
Size:	52.3 KB
ID:	36117   Click image for larger version

Name:	UN 53 (Small).JPG
Views:	100
Size:	33.3 KB
ID:	36118  

Click image for larger version

Name:	UN 55 (Small).JPG
Views:	85
Size:	32.8 KB
ID:	36119   Click image for larger version

Name:	UN 56 (Small).JPG
Views:	75
Size:	37.3 KB
ID:	36120   Click image for larger version

Name:	UN 57 (Small).JPG
Views:	83
Size:	36.4 KB
ID:	36121   Click image for larger version

Name:	UN 58 (Small).JPG
Views:	79
Size:	21.7 KB
ID:	36122   Click image for larger version

Name:	UN 59 (Small).JPG
Views:	90
Size:	47.6 KB
ID:	36123  

Click image for larger version

Name:	UN 60 (Small).JPG
Views:	76
Size:	32.6 KB
ID:	36124   Click image for larger version

Name:	UN 61 (Small).JPG
Views:	83
Size:	28.7 KB
ID:	36125   Click image for larger version

Name:	UN 62 (Small).JPG
Views:	77
Size:	35.4 KB
ID:	36126   Click image for larger version

Name:	UN 63 (Small).JPG
Views:	82
Size:	31.8 KB
ID:	36127   Click image for larger version

Name:	UN 64 (Small).JPG
Views:	94
Size:	42.9 KB
ID:	36128  

Click image for larger version

Name:	UN 65 (Small).JPG
Views:	87
Size:	50.7 KB
ID:	36129   Click image for larger version

Name:	UN 66 (Small).JPG
Views:	103
Size:	60.2 KB
ID:	36130   Click image for larger version

Name:	UN 67 (Small).JPG
Views:	95
Size:	47.2 KB
ID:	36131   Click image for larger version

Name:	UN 68 (Small).JPG
Views:	106
Size:	46.5 KB
ID:	36132  
LastPago is offline  
Digg this Post!Add Post to del.icio.usBookmark Post in TechnoratiFurl this Post!
Reply With Quote
Old 02-12-09, 02:30 AM   #17 (permalink)
LastPago
Bronze Supporter
France
 
Join Date: Jun 2007
Location: France
GT40: TS40
Posts: 71
Re: UN1 Rebuild

Hello,

Didn't had too much time to post...Sorry.

Now, dismantling the secondary shaft.

How to do :

Using a press remove the 5th gear pinion.

Remove the big roller bearing, it would come by hand but the use of an extractor tool can be of help (I had to do).

Then remove the big wheel (it comes by hand) and it is the 1st gear pinion.

Then remove its synchro (comes by hand too).

Place a mark on the 2 parts of the hub to allow it to be replaced in the same position and remove it.

Then remove the locking clip. The tool I use on the pic is not the correct one, there is a special tool for this kind of clip but at the pics moment, I was unable to find it in my drawers....I will try to post a pic of the correct tool.

Place the shaft on its second gear pinion and apply pressure on the shaft (do not forget to protect the shaft). If you use a bigger press, place an horizontal extractor under the second gear pinion instead of a direct contact to press support.

Pics :
Attached Thumbnails
Click image for larger version

Name:	UN 69 (Small).JPG
Views:	104
Size:	38.5 KB
ID:	36248   Click image for larger version

Name:	UN 70 (Small).JPG
Views:	84
Size:	41.1 KB
ID:	36249   Click image for larger version

Name:	UN 71 (Small).JPG
Views:	79
Size:	44.7 KB
ID:	36250   Click image for larger version

Name:	UN 72 (Small).JPG
Views:	72
Size:	44.1 KB
ID:	36251   Click image for larger version

Name:	UN 73 (Small).JPG
Views:	76
Size:	61.3 KB
ID:	36252  

Click image for larger version

Name:	UN 74 (Small).JPG
Views:	78
Size:	69.4 KB
ID:	36253   Click image for larger version

Name:	UN 75 (Small).JPG
Views:	81
Size:	35.8 KB
ID:	36254   Click image for larger version

Name:	UN 76 (Small).JPG
Views:	73
Size:	32.5 KB
ID:	36255   Click image for larger version

Name:	UN 77 (Small).JPG
Views:	79
Size:	65.6 KB
ID:	36256   Click image for larger version

Name:	UN 78 (Small).JPG
Views:	84
Size:	48.9 KB
ID:	36257  

Click image for larger version

Name:	UN 79 (Small).JPG
Views:	77
Size:	44.0 KB
ID:	36258   Click image for larger version

Name:	UN 80 (Small).JPG
Views:	84
Size:	50.4 KB
ID:	36259   Click image for larger version

Name:	UN 81 (Small).JPG
Views:	73
Size:	56.8 KB
ID:	36260   Click image for larger version

Name:	UN 82 (Small).JPG
Views:	83
Size:	46.7 KB
ID:	36261   Click image for larger version

Name:	UN 83 (Small).JPG
Views:	82
Size:	51.2 KB
ID:	36262  

Click image for larger version

Name:	UN 84 (Small).JPG
Views:	75
Size:	40.3 KB
ID:	36263   Click image for larger version

Name:	UN 85 (Small).JPG
Views:	76
Size:	47.0 KB
ID:	36264   Click image for larger version

Name:	UN 87 (Small).JPG
Views:	85
Size:	56.8 KB
ID:	36265  
LastPago is offline  
Digg this Post!Add Post to del.icio.usBookmark Post in TechnoratiFurl this Post!
Reply With Quote
Old 02-12-09, 02:45 AM   #18 (permalink)
LastPago
Bronze Supporter
France
 
Join Date: Jun 2007
Location: France
GT40: TS40
Posts: 71
Re: UN1 Rebuild

Now the primary shaft.

Remove the sleeve of the motion shaft.

Then separate them...some rust here...

Remove the seal.

Remove the locking clip (using the right tool not this one, see previous post).

Place a support under the 4th gear pinion (just under the big teeth not the little ones) and apply pressure on the shaft.

Then remove the synchro (comes by hand),

Mark the 2 parts of the hub to allow them to be replaced in the same position, then remove it (comes by hand too).

Remove the spring with the cylinders (3). I am sorry I don't know the name of this part in english...

Remove the washer (comes by hand),

Remove the locking clip,

Remove the hub internal (don't know the name in english too)

Remove the synchro

Remove the 3rd gear pinion,

Place the shaft in the press and remove the roller bearing on the reard side of the shaft.

Ok, now its time to wash all these parts and to make a diagnose.

To be continued

Pics :
Attached Thumbnails
Click image for larger version

Name:	UN 88 (Small).JPG
Views:	69
Size:	55.7 KB
ID:	36266   Click image for larger version

Name:	UN 89 (Small).JPG
Views:	73
Size:	25.8 KB
ID:	36267   Click image for larger version

Name:	UN 90 (Small).JPG
Views:	76
Size:	43.9 KB
ID:	36268   Click image for larger version

Name:	UN 91 (Small).JPG
Views:	71
Size:	39.6 KB
ID:	36269   Click image for larger version

Name:	UN 92 (Small).JPG
Views:	74
Size:	44.6 KB
ID:	36270  

Click image for larger version

Name:	UN 93 (Small).JPG
Views:	71
Size:	60.3 KB
ID:	36271   Click image for larger version

Name:	UN 94 (Small).JPG
Views:	73
Size:	46.7 KB
ID:	36272   Click image for larger version

Name:	UN 95 (Small).JPG
Views:	73
Size:	36.9 KB
ID:	36273   Click image for larger version

Name:	UN 96 (Small).JPG
Views:	74
Size:	26.1 KB
ID:	36274   Click image for larger version

Name:	UN 97 (Small).JPG
Views:	81
Size:	48.5 KB
ID:	36275  

Click image for larger version

Name:	UN 98 (Small).JPG
Views:	67
Size:	42.1 KB
ID:	36276   Click image for larger version

Name:	UN 99 (Small).JPG
Views:	80
Size:	25.1 KB
ID:	36277   Click image for larger version

Name:	UN 100 (Small).JPG
Views:	74
Size:	38.0 KB
ID:	36278   Click image for larger version

Name:	UN 101 (Small).JPG
Views:	78
Size:	40.6 KB
ID:	36279   Click image for larger version

Name:	UN 102 (Small).JPG
Views:	75
Size:	39.3 KB
ID:	36280  

Click image for larger version

Name:	UN 103 (Small).JPG
Views:	74
Size:	40.1 KB
ID:	36281   Click image for larger version

Name:	UN 104 (Small).JPG
Views:	67
Size:	38.9 KB
ID:	36282   Click image for larger version

Name:	UN 105 (Small).JPG
Views:	70
Size:	36.7 KB
ID:	36283   Click image for larger version

Name:	UN 106 (Small).JPG
Views:	66
Size:	44.4 KB
ID:	36284   Click image for larger version

Name:	UN 107 (Small).JPG
Views:	78
Size:	41.2 KB
ID:	36285  

Click image for larger version

Name:	UN 108 (Small).JPG
Views:	70
Size:	34.2 KB
ID:	36286   Click image for larger version

Name:	UN 109 (Small).JPG
Views:	82
Size:	47.0 KB
ID:	36287  
LastPago is offline  
Digg this Post!Add Post to del.icio.usBookmark Post in TechnoratiFurl this Post!
Reply With Quote
Old 02-12-09, 02:53 AM   #19 (permalink)
LastPago
Bronze Supporter
France
 
Join Date: Jun 2007
Location: France
GT40: TS40
Posts: 71
Re: UN1 Rebuild

To allow a better understanding of the dismantling sequences, please find attached a drawing view of the shafts.
Attached Thumbnails
Click image for larger version

Name:	SP32-20090212-084017.jpg
Views:	148
Size:	32.6 KB
ID:	36288   Click image for larger version

Name:	SP32-20090212-084022.jpg
Views:	122
Size:	29.9 KB
ID:	36289  
LastPago is offline  
Digg this Post!Add Post to del.icio.usBookmark Post in TechnoratiFurl this Post!
Reply With Quote
Old 02-12-09, 03:27 PM   #20 (permalink)
LastPago
Bronze Supporter
France
 
Join Date: Jun 2007
Location: France
GT40: TS40
Posts: 71
Re: UN1 Rebuild

Just wanted to calculate what was the impact of fitting a 0.76 ratio 5th gear instead of the original 0.82.

In a theorical world, this would allow an 8.5% increase for max speed and a 8.5% torque decrease (5th gear) wich seems to be good as the weakness of the UN1 is the primary shaft 5th gear side...no talking about the speed increase....

I post my calculations.

Cheers

Stephane
Attached Thumbnails
Click image for larger version

Name:	SP32-20090212-211257.jpg
Views:	145
Size:	46.2 KB
ID:	36305  
LastPago is offline  
Digg this Post!Add Post to del.icio.usBookmark Post in TechnoratiFurl this Post!
Reply With Quote
Reply


Currently Active Users Viewing This Thread: 1 (0 members and 1 guests)
 
Thread Tools
Display Modes

 
Posting Rules
You may not post new threads
You may not post replies
You may not post attachments
You may not edit your posts

BB code is On
Smilies are On
[IMG] code is On
HTML code is On
Trackbacks are On
Pingbacks are On
Refbacks are On


Similar Threads
Thread Thread Starter Forum Replies Last Post
Weber rebuild brianstewart GT40 Tech - Engines/Induction/Exhaust 0 07-25-07 05:51 PM
weber rebuild in the UK? jpc_bate GT40 Tech - Engines/Induction/Exhaust 2 07-09-07 02:11 AM
G50/01 rebuild? Topcat GT40 Tech - Powertrain/Transaxles 11 03-07-07 06:38 PM
SBF 302s for rebuild (UK) llarsen The World Market 0 12-23-06 10:40 AM
289 Rebuild Space Monkey GT40 Tech - Engines/Induction/Exhaust 4 05-04-04 03:44 PM


All times are GMT -4. The time now is 05:50 AM.