

You are using an out of date browser. It may not display this or other websites correctly.
You should upgrade or use an alternative browser.
You should upgrade or use an alternative browser.
1st MDA to Canada
- Thread starter ChrisMartino
- Start date
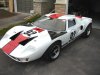
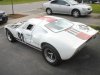
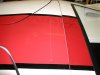
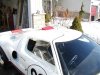
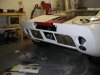
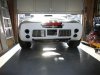
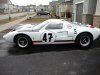
Well, Carlisle damage aside, the car still manages to look OK - getting closer - headlights, fog's, signals, number roundels, door windows, body latches installed. Just need to fit the door catches/locks, small door window, mirrors, headlights and spot covers.
Cheers-
Chris
Cheers-
Chris
Attachments
Last edited:
Brutal - been way too long between posts - time management gone bad!
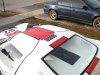
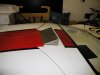
First up, my never ending body work via Essex Wire 1010 - roof vent:
1) Measure location
2) Cut hole
3) Insert louvers
4) Clean up and paint
5) Fabricate vent cover
6) Attach to roof
7) Add stripes to roof is next
First up, my never ending body work via Essex Wire 1010 - roof vent:
1) Measure location
2) Cut hole
3) Insert louvers
4) Clean up and paint
5) Fabricate vent cover
6) Attach to roof
7) Add stripes to roof is next
Attachments
-
 Essex Wire Roof Vent_01a.jpg36 KB · Views: 947
 -
 Marking the Location_01.jpg24.5 KB · Views: 935
 -
 Essex Wire Roof Vent_02.jpg50.2 KB · Views: 976
 -
 Essex Wire Roof Vent_03.jpg23.6 KB · Views: 956
 -
 Roof Vent Complete.jpg29.2 KB · Views: 1,026
 -
 Roof Vent Fab_01.jpg26.6 KB · Views: 932
 -
 Roof Vent Fab_03.jpg27.1 KB · Views: 935
 -
 P2280035.jpg37.5 KB · Views: 950
 -
 Roof Vent Complete1.jpg55.3 KB · Views: 949
Sure looks good Chris. It's been so long, I thought maybe we lost you in all that snow. 
Surely you've done more than the roof vent and the spoiler since last summer? Are you holding back? I guess after last year you're not planning to go to Carlisle again. Do give me a call if you head near here this summer.
Surely you've done more than the roof vent and the spoiler since last summer? Are you holding back? I guess after last year you're not planning to go to Carlisle again. Do give me a call if you head near here this summer.
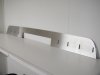
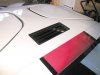
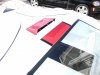
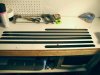
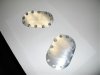
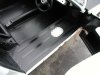
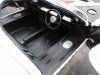
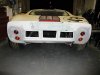
Next - faux sill 'beads' and tank access cover.
1) Aluminum strips used, not accurate to original but you get the point'
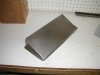
2) Tank cover - aluminum plate cut to approx size and shot with clear coat
3) Nylon screws cut at the head, painted and epoxy'd into position
Everything trial fitted into position, will epoxy all onto sill next-
Chris
1) Aluminum strips used, not accurate to original but you get the point'
2) Tank cover - aluminum plate cut to approx size and shot with clear coat
3) Nylon screws cut at the head, painted and epoxy'd into position
Everything trial fitted into position, will epoxy all onto sill next-
Chris
Attachments
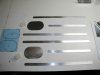
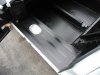
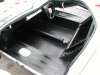
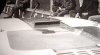
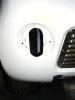
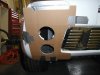
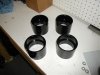
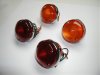
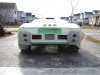
Next - the fun part (really it was!) early rear tail light conversion and license plate recess removal-
1) Mark the holes
2) Make a 1:1 template for positioning
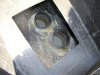
3) Cut upper and lower holes
4) Create sockets
4) Fiberglass sockets into place
5) Fill and sand out sockets
6) Create back plate for lights to mount to
7) Trial fit lights
7) Epoxy back plates
8) Fit lights
9) Fill in license plate recess
10) Sand and prime all for paint of rear light panel next
1) Mark the holes
2) Make a 1:1 template for positioning
3) Cut upper and lower holes
4) Create sockets
4) Fiberglass sockets into place
5) Fill and sand out sockets
6) Create back plate for lights to mount to
7) Trial fit lights
7) Epoxy back plates
8) Fit lights
9) Fill in license plate recess
10) Sand and prime all for paint of rear light panel next
Attachments
-
 Top Hole Location_01.jpg14 KB · Views: 944
 -
 LT Light Socket Cutouts_01.jpg38.7 KB · Views: 974
 -
 RT Light Socket Cutouts_01.jpg38.5 KB · Views: 955
 -
 Socket Cutouts Done_01.jpg43 KB · Views: 942
 -
 Sockets_01.jpg32.6 KB · Views: 922
 -
 Rear Lights_01.jpg28.9 KB · Views: 971
 -
 Sockets_04.jpg60.1 KB · Views: 931
 -
 Sockets_05.jpg62.8 KB · Views: 910
 -
 Rear Lights_00.jpg45.7 KB · Views: 927
 -
 Light Sockets Sanded & Primed_01.jpg48.6 KB · Views: 997
 -
 Lights In - Plate Filled_01.jpg39.5 KB · Views: 979
OK, can I delete my previous post? Wow, you have been busy. I like the light conversion—much more unique.
Hey Mark,
Good to hear from you - might have to make a road trip up that way if the Sen's go deep in the playoff's!
I'd take the 40 but it would be Flintstone power only
More of my projects to come shortly-
Chris
Good to hear from you - might have to make a road trip up that way if the Sen's go deep in the playoff's!
I'd take the 40 but it would be Flintstone power only
More of my projects to come shortly-
Chris
reading now all the building saga Chris,
U are doing a wonderful job...go on go on and make me dream!epper:
U are doing a wonderful job...go on go on and make me dream!
epper:Hey Chris
You bringing her back to Carlisle this year ?
Love to see it again.
MikeD
You bringing her back to Carlisle this year ?
Love to see it again.
MikeD
Thanks guys - I can't attend Carlisle this year, maybe next. I'll almost certainly have the car on the road by then if not sooner.
I will have mechanical progress to post next, I took on more bodywork projects than I planned for. The snow is gone - time to get going now!
Thanks Bill - I hold your car in high regard as well, you've done a hell of a job. Can't wait to see it painted, the scheme is one I very seriously considered at one point - good to be unique!
Chris
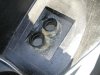
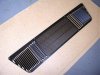
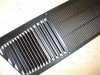
Just received the new MDA de-mister dash vent, I had to wait awhile for this part but it was worth it. Great detail, very well made.
Others have inquired about these, I was lucky to get this one as the first batch went quickly but I am told many more are now being made.
Chris
Others have inquired about these, I was lucky to get this one as the first batch went quickly but I am told many more are now being made.
Chris
Attachments
Hi Bill,
My dash is still loose so I pulled it out of the car first but yes, I would have had to use a stubby screwdriver for sure. I believe they are making them available to anyone, next batch is currently being made but I don't know how many or when they will be ready.
You have a PM.
Chris
My dash is still loose so I pulled it out of the car first but yes, I would have had to use a stubby screwdriver for sure. I believe they are making them available to anyone, next batch is currently being made but I don't know how many or when they will be ready.
You have a PM.
Chris
Chris
The grille is just like my Ford original that has not the clip under.
I am going to fix a clip/peg to each of the front screws that point forward; then make locating holes in the dash opening. Then just locate the front edge and screw down with the ones that can be easily reached on the inside edge.
Steve
Congrats Chris,what a beaut.Whats the motor and box going to be?What side of Toronto,I`m in beamsville ont.
Similar threads
- Replies
- 8
- Views
- 750
- Replies
- 9
- Views
- 1K
- Replies
- 42
- Views
- 4K
- Replies
- 7
- Views
- 835