
Spoke to the chief engeneer of the RTA today regarding the emissions to register a GT40 being half of the emissions that were relevent three years ago, and he said thats BS. All we need to pass is 79/01 (Euro 3), which are the current standards. I've been led to believe that 79/02 (Euro 4) is being introduced in January 08.

You are using an out of date browser. It may not display this or other websites correctly.
You should upgrade or use an alternative browser.
You should upgrade or use an alternative browser.
1UZFE for Superlite Coupe - Ideas?
- Thread starter dlindemann
- Start date
The regs for Australia vary by state a LOT particularly for emissions.
Anyway this is a thread hijack, I think an Aussie engine rego thread in the right forum might be in order. And a 1UFE engine thread in general I'd suggest, but I'm new here")
Anyway this is a thread hijack, I think an Aussie engine rego thread in the right forum might be in order. And a 1UFE engine thread in general I'd suggest, but I'm new here
Dave Lindemann
Lifetime Supporter
Stopped by the Minnesota DMV this week and found that registering the car should be easy - as far as the person at the counter was able to tell me. No emisions requirements, just need a MSO (manufacturers statement of origin), pictures, major components used with receipts and of course all of my details. Sounds straight forward enough.
I've also been trying to educate myself on turbocharging. I found a handy tool that allows you to enter the type of engine (diesel or gas), number of turbos, whether its intercooled, engine capacity, maximum rpm and boost setting. The result is a specification for a Garrett turbo and estimated HP with a given air flow. The site is here:
Ray Hall Turbocharging - Main Page
I used 6000 rpm (probably conservative for the 1UZFE) and tubo boost of 8 psi - it looks like with twin GT25 turbos (full ball bearing) about 415 hp is possible. The interesting thing is to play with some of the numbers. With 7000 rpm and 10 psi of boost the power jumps to 524 hp. I don't know how accurate this tool is but try it out.
Dave L
I'm hoping to register my GT40 as a 1965 GT40-MK1 2dr Coupe. That's what the MSO will state and hopefully the state will work with me on this.
Turbos on that engine would be awesome. You can still have a very docile engine but make it meaner than a junk-yard dog at the flip of a switch...
Turbos on that engine would be awesome. You can still have a very docile engine but make it meaner than a junk-yard dog at the flip of a switch...
Dave, here's a few pics of my 1UZ which I've just now finished (mechanically). The Holley carburetor is a little 390 CFM unit, and is on there only for the break in of the motor on an engine dyno. Obviously, the fuel/air distribution isn't going to be optimum with this supercharger manifold, adapted for a carburetor, but then I'm not going to be doing any WOT, high rpm runs with it, either. Once the motor is broken in, the Holley will come off and an Opcon-Autorotor twinscrew SC will go on, along with full EFI and EMS.
I built the front of this Lexus 1UZ-FE motor using Toyota 2UZ-FE parts, ie oil pump, water pump, timing tensioner, timing idler, serp tensioner, and serp idler bracket. The 2UZ parts fit fine, eliminated the hokey and expensive hydraulic pump fan drive, and cost less than half what the comparable Lexus 1UZ parts would have cost.
I did the final assembly using stainless fasteners, which in most cases were socket head cap screws, but also a few studs and flange nuts. I'm not big on having lots of flashy chrome on a motor, but I do like the look of clean aluminum and stainless steel.
The distributors have been pulled off, and I'll be using a standalone crank triggered ignition system, based on the Ford EDIS8. It'll also have individual COP's (Coils on Plug), probably Toyota Supra units with extender boots. This engine is amazingly easy to convert to a crank triggered ignition setup, because the OEM setup already has a 12 tooth trigger wheel for the fuel injection. If you look below, and to the left of those blue oil pump fittings, you'll see the crank trigger pickup, mounted in the original OEM bracket. For my application, using the standalone Ford EDIS8 ignition, we simply had some 36-1 tooth trigger wheels made up in a group buy on Lexus-Toyota V8 Performance Forum, and voila.
The oil filter bracket has been modified and (2) -10AN weld fittings were added for a remote oil filter/cooler setup. On the other side of the motor I've added a -8AN fitting connected to a 2nd oil pickup in the sump for my prelube system. My cars sit for 4-6 weeks and sometimes longer between starts, so with this system I can prelube the engine to avoid cranking it dry.
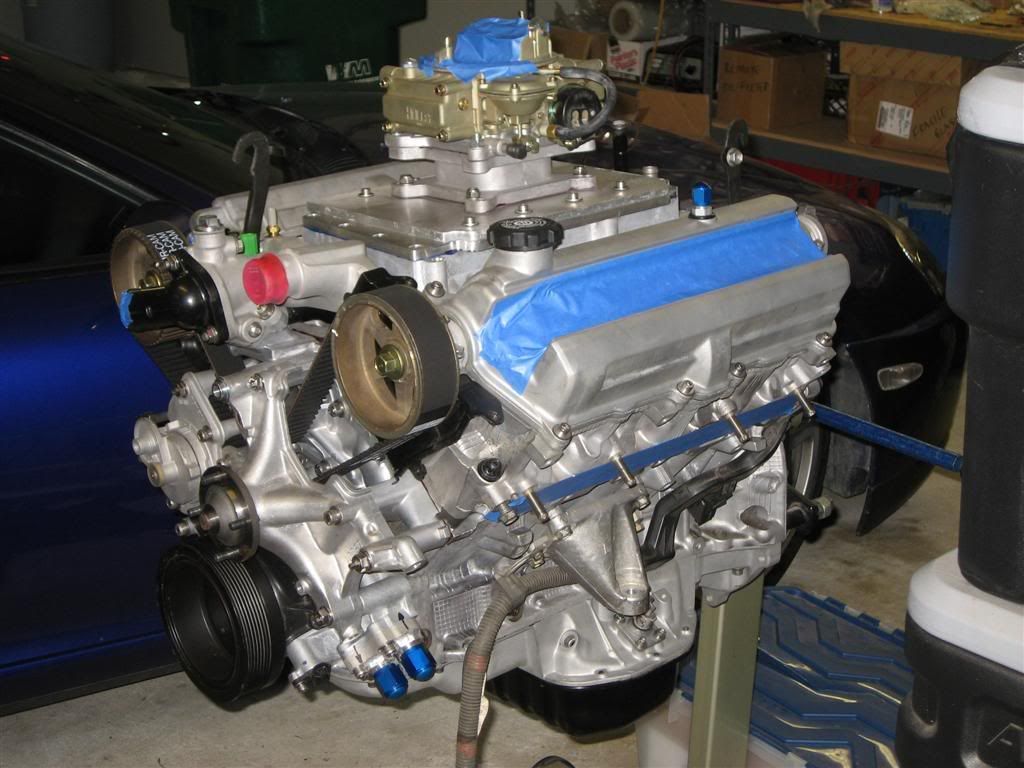
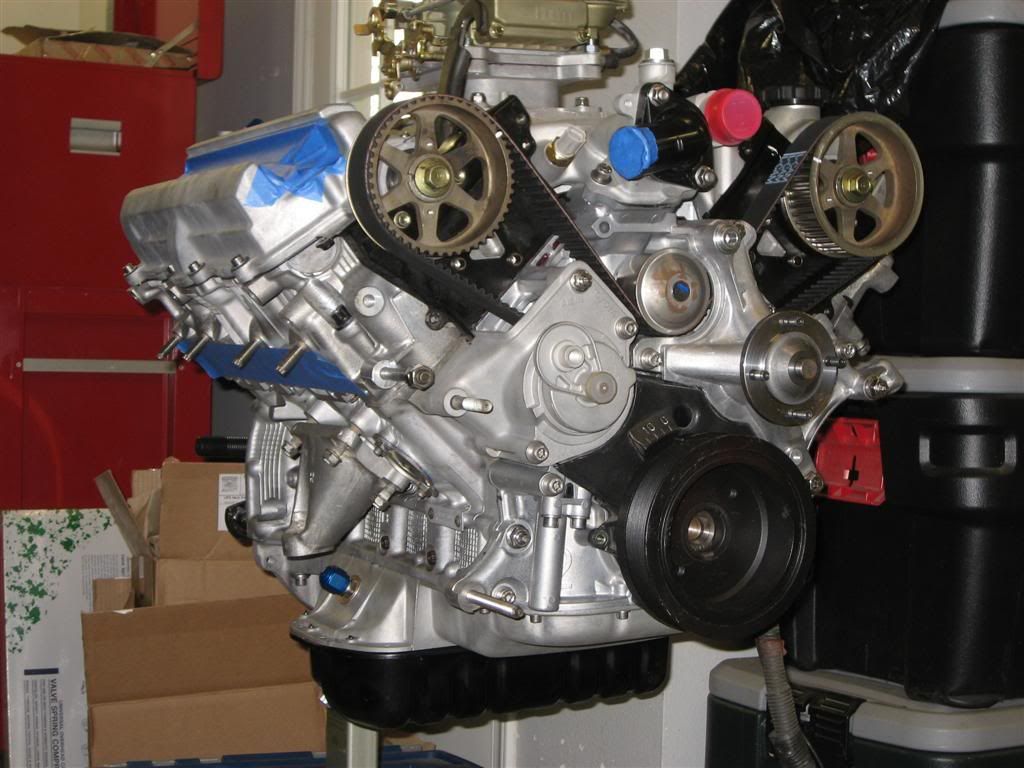
The rest of the accessories (alternator, P/S pump, A/C compressor) aren't mounted yet, as they won't be necessary for the breakin of the motor. Next step is to mount & wire the coils to the EDIS8 module.
I built the front of this Lexus 1UZ-FE motor using Toyota 2UZ-FE parts, ie oil pump, water pump, timing tensioner, timing idler, serp tensioner, and serp idler bracket. The 2UZ parts fit fine, eliminated the hokey and expensive hydraulic pump fan drive, and cost less than half what the comparable Lexus 1UZ parts would have cost.
I did the final assembly using stainless fasteners, which in most cases were socket head cap screws, but also a few studs and flange nuts. I'm not big on having lots of flashy chrome on a motor, but I do like the look of clean aluminum and stainless steel.
The distributors have been pulled off, and I'll be using a standalone crank triggered ignition system, based on the Ford EDIS8. It'll also have individual COP's (Coils on Plug), probably Toyota Supra units with extender boots. This engine is amazingly easy to convert to a crank triggered ignition setup, because the OEM setup already has a 12 tooth trigger wheel for the fuel injection. If you look below, and to the left of those blue oil pump fittings, you'll see the crank trigger pickup, mounted in the original OEM bracket. For my application, using the standalone Ford EDIS8 ignition, we simply had some 36-1 tooth trigger wheels made up in a group buy on Lexus-Toyota V8 Performance Forum, and voila.
The oil filter bracket has been modified and (2) -10AN weld fittings were added for a remote oil filter/cooler setup. On the other side of the motor I've added a -8AN fitting connected to a 2nd oil pickup in the sump for my prelube system. My cars sit for 4-6 weeks and sometimes longer between starts, so with this system I can prelube the engine to avoid cranking it dry.
The rest of the accessories (alternator, P/S pump, A/C compressor) aren't mounted yet, as they won't be necessary for the breakin of the motor. Next step is to mount & wire the coils to the EDIS8 module.
Last edited:
Brian Hamilton
I'm on the verge of touching myself inappropriatel
^^^^^
VERY NICE!!!!!!!!!!!!
Look like you have been working extremely hard and it's showing!! Great looking engine, it should make some killer power. Can't wait to see numbers.
VERY NICE!!!!!!!!!!!!
Look like you have been working extremely hard and it's showing!! Great looking engine, it should make some killer power. Can't wait to see numbers.
Dave Lindemann
Lifetime Supporter
Hi John -
Sorry, somehow I missed this when you first posted it. The engine looks great! I'm curious, I've read about the hydraulic pump fan drive - was this unique to the LS400 application or was it common on all applications? My engine is out of a SC400. Also, will you run your engine with the cam sprockets exposed? Out of curiosity, what did you use to clean up all of the aluminum? It looks great!
Regards,
Dave L
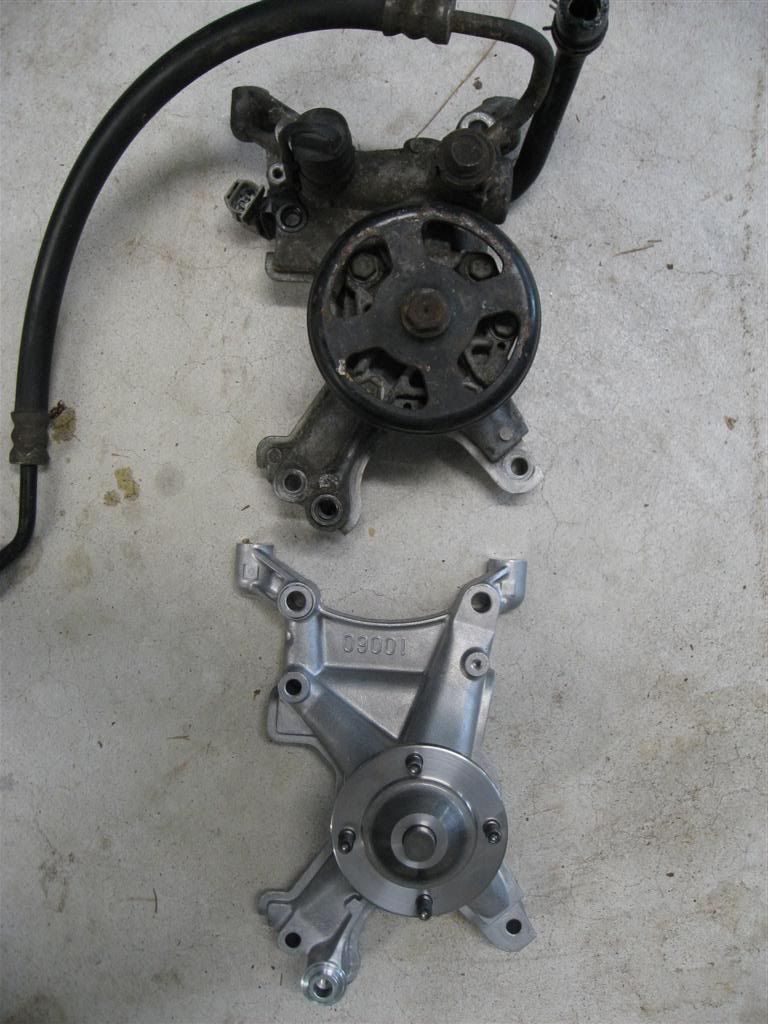
Dave, my motor is from an SC400 also; Lexus used the hydraulic pump fan drive on all the early 1UZ motors until their "new generation" VVTi came out in '98 or so. Toyota OTOH, chose not to use the hydraulic pump for their 2UZ, and installed a conventional fan drive with viscous clutch, so it's a doddle to get the fan drive from a 2UZ and install it in the place of the hydraulic pump. Here's a photo of the two pieces:
I'm debating about leaving the cam sprockets exposed - I don't really want to leave them open to the elements, and/or possibly injuring someone, however I don't really care for the look of the Lexus' plastic covers either. The 2UZ has some nice meaty metal covers, which I may try to adapt.
Most of the exposed aluminum is either new, or was vat dipped then glass bead blasted, however my cleaning skills pale in comparison to those of a Lextreme member named Smitherz. His aluminum actually looks freshly cast when he's through with it. If I had just bought a Lexus motor, I would consider sending the block, heads, valve covers, and other cast pieces to him for cleaning.
Alternately, bringing the pieces, or the whole motor to a high pressure hot water carwash, gunking it down well, and then scrubbing it down with a long bristle, stiff brush, and hosing it off should get the heavy stuff off.
I also used an etching type "mag" wheel cleaner to brighten up the dull bits in places, but have had mixed results with it on pieces that were already bead blasted. For example, instead of brightening the valve covers, it turned them a darker shade of gray than they already were. Think its effectiveness must depend on the aluminum's composition.
Dave Lindemann
Lifetime Supporter
John -
Thanks for clarifying - and for posting the pictures - that helps a lot. What will you be doing about the power steering pump or will you be using it? I don't need it but eliminating it would mean installing a "dummy" pulley to take its place. Is there anything available that allows one to eliminate the PS pump?
Thanks!
Dave L
Dave, I'll be using the P/S pump, as well as the rest of the accessories. The first pic below shows how we do a S/C drive with the 1UZ, using a timing belt idler (smaller diameter than the normal serp idler so it allows the serp belt to pass around it backwards) on that bracket that I showed in the previous post. The 2nd pic shows the standard serp belt routing.
If you were supercharging instead of turbocharging, you could eliminate the P/S pump, then the belt could pass directly from the alternator to the SC, and then after the SC, the belt would pass under the idler, then go to the A/C compressor. That's not the way it's shown in these pics, but I think you can visualise it? There might be some issues with the coolant inlet/outlet connections, but nothing a good welder couldn't sort out.
If you were supercharging instead of turbocharging, you could eliminate the P/S pump, then the belt could pass directly from the alternator to the SC, and then after the SC, the belt would pass under the idler, then go to the A/C compressor. That's not the way it's shown in these pics, but I think you can visualise it? There might be some issues with the coolant inlet/outlet connections, but nothing a good welder couldn't sort out.
Attachments
My plan is to relocate the belt idler pulley in between the crank and AC pulleys to get enough belt angle on the crank and then use the adjustment on the generator to adjust the belt.
I've no idea what parts I'm going to use, I expect I'll have to make them. It'll be some months before I get around to this part of the project so hopefully another neat solution will rear its head by then.
I've no idea what parts I'm going to use, I expect I'll have to make them. It'll be some months before I get around to this part of the project so hopefully another neat solution will rear its head by then.
Here's an alternative that another Lextreme member Cobber is using to drive his alternator without the P/S pump, and retaining the tensioner in the stock location. Makes the right side of the motor a bit fatter, however (pics may not be visible to non members of Lextreme.com, so I've provided links to them):

Some have also removed the A/C compressor and put the alternator in that location:

And finally, if you have space in front of the motor, you can reverse mount the alternator, but it makes the motor longer:
Lexus-Toyota alternator relocation, 1 2 3uzfe alternator relocation, lexus alternation relocation
Some have also removed the A/C compressor and put the alternator in that location:
And finally, if you have space in front of the motor, you can reverse mount the alternator, but it makes the motor longer:
Lexus-Toyota alternator relocation, 1 2 3uzfe alternator relocation, lexus alternation relocation
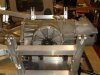
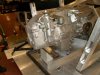
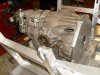
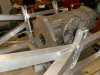
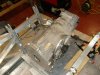
I finally got my hands on the new Ford GT transaxle....for fitment into the Superlite...
Four new units are on order from Ford racing..
The trans is a large beast to say the least but as the chassis was designed to accept a trans of this magnitude it will not be a problem...
Here are a couple of pics ...as you can see we have mapped out a trans plate and we can now finalise the engine to trans adaptation...
The first car using the GT box will be a Big Block Chevy and the next pair will be LS7 powered .....
Attachments
-
 ford gt transaxle 001 (Small).jpg50.4 KB · Views: 1,139
 -
 ford gt transaxle 002 (Small).jpg51.2 KB · Views: 1,110
 -
 ford gt transaxle 003 (Small).jpg54 KB · Views: 1,010
 -
 ford gt transaxle 004 (Small).jpg49.4 KB · Views: 881
 -
 ford gt transaxle 007 (Small).jpg54.1 KB · Views: 1,108
 -
 ford gt transaxle 006 (Small).jpg47.1 KB · Views: 930
Last edited:
Dave Lindemann
Lifetime Supporter
Fran -
Looks great! That should hold up to most any HP/torque output engine someone would want to use....oh wait, I almost forgot what forum I was on! Too bad it's so far out of my price range. Oh well, can't wait for 9/24! Talk to you soon Fran.
Dave L.
Looks great! That should hold up to most any HP/torque output engine someone would want to use....oh wait, I almost forgot what forum I was on! Too bad it's so far out of my price range. Oh well, can't wait for 9/24! Talk to you soon Fran.
Dave L.
Mark,
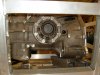
its about 200lbs and has been used in twin turbo GT's upto and above 1000hp....in stock configuration...
I will post some pics of it next to a new G50 next week....its hilarious how small the Porsche trans looks...
I am very excited to be able to use this trans for the Superlite as I am unaware of anyone else in our industry stepping outside the box to try it...
It will be the best answer for the Mega power customers we have ....its not cheap at 14k plus for retail but its new , 6 speed, lsd and cable shift like butter...next step is the solenoid activated paddle shift from Mastershift.....rockonsmile
Pat Buckley
GT40s Supporter
That Superlite designation takes a bit of a beating because of this trans?
Pat,
its still under 2300lbs with an LS7 and the BIG transaxle....
especially when you could potentially install 1000hp....so whats an extra cheeseburger or two among friends...
its still under 2300lbs with an LS7 and the BIG transaxle....
especially when you could potentially install 1000hp....so whats an extra cheeseburger or two among friends...
Pat Buckley
GT40s Supporter
Amazing - how much do you think it would weigh with an STi Subie engine? Or a type 4 VW?
Pat,
bring me a new Subie and we can see.....come on be a team player...
Having swung my WRX engine and trans around a few times ...they are not as light as some may think...I cant find a figure on the net...any ideas??
bring me a new Subie and we can see...
..come on be a team player...Having swung my WRX engine and trans around a few times ...they are not as light as some may think...I cant find a figure on the net...any ideas??
Last edited:
Similar threads
- Replies
- 8
- Views
- 2K