Doc Watson
Lifetime Supporter
...and I thought you would not approve of adding more weight to the car Frank!
Graham, I still have to make the top plate!!! after that never again, don't even ask me to make you some..... ;-)
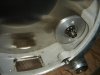
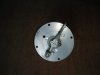
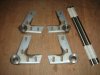
Keith, bottom stops gravel and road debris getting into the bellhousing (sh*t from below) and the top cover probably for venting heat/smoke from the clutch, both can be also used to inspect TDC or BDC of the engine (if you stamp the flywheel)....(bullsh*t from me?)
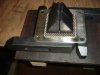
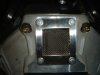
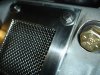
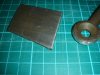
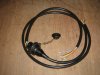
Used a 500 degrees C silver solder from a specialist who sells to live steam model locomotive builders. I found it while researching building a scale loco boiler (my BR 52 kriegslokomotive is a story for another day). You need very little of the solder if the fit is tight, capillary action does it all but a mesh is full of holes!!! used 2 1mm x 300mm rods so ordered more for the top cover, didn't support all the sides (see pic 4 post #76) and the center sagged a little, sorted now (steel plate and persuader) and waiting for the bolts to arrive, which have and unusual thread in them?!? 12-24 unc?!? the book says 1/4 unc?!? (Paul can you confirm the thread size for the cover plates) checked very carefully my set of taps 1/4 unc would not fit, 12-24 went in but got tight towards the bottom of the bellhousing, tapped them through with very small amount of material cut away. SS bolts washers and lock washers are ordered and will be with me shortly.
The learning process is steep, sorted drilling SS now and hacksaw and files are like a 6 hour workout for the past 2 weekends, who needs the gym when your cutting a SS engine cover plate by hand (once a fitter always a fitter) the top plate will probably take 2-3 hours to do from start to finish and I might sneek out later this week to do it.
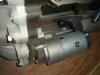
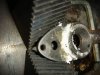
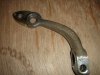
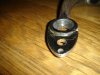
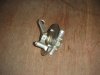
My eye of Sauron is now turning to the bellhousing/gearbox attachment, it looks like i need socket head bolts for the top and studs for the bottom two attachment points. Complicated further by the bottom threads having a helicoil insert (I assume for better strength) will get them ordered this week.
Graham, I still have to make the top plate!!! after that never again, don't even ask me to make you some..... ;-)
Keith, bottom stops gravel and road debris getting into the bellhousing (sh*t from below) and the top cover probably for venting heat/smoke from the clutch, both can be also used to inspect TDC or BDC of the engine (if you stamp the flywheel)....(bullsh*t from me?)
Used a 500 degrees C silver solder from a specialist who sells to live steam model locomotive builders. I found it while researching building a scale loco boiler (my BR 52 kriegslokomotive is a story for another day). You need very little of the solder if the fit is tight, capillary action does it all but a mesh is full of holes!!! used 2 1mm x 300mm rods so ordered more for the top cover, didn't support all the sides (see pic 4 post #76) and the center sagged a little, sorted now (steel plate and persuader) and waiting for the bolts to arrive, which have and unusual thread in them?!? 12-24 unc?!? the book says 1/4 unc?!? (Paul can you confirm the thread size for the cover plates) checked very carefully my set of taps 1/4 unc would not fit, 12-24 went in but got tight towards the bottom of the bellhousing, tapped them through with very small amount of material cut away. SS bolts washers and lock washers are ordered and will be with me shortly.
The learning process is steep, sorted drilling SS now and hacksaw and files are like a 6 hour workout for the past 2 weekends, who needs the gym when your cutting a SS engine cover plate by hand (once a fitter always a fitter) the top plate will probably take 2-3 hours to do from start to finish and I might sneek out later this week to do it.
My eye of Sauron is now turning to the bellhousing/gearbox attachment, it looks like i need socket head bolts for the top and studs for the bottom two attachment points. Complicated further by the bottom threads having a helicoil insert (I assume for better strength) will get them ordered this week.