

You are using an out of date browser. It may not display this or other websites correctly.
You should upgrade or use an alternative browser.
You should upgrade or use an alternative browser.
David's Monocoque Build
- Thread starter David Deschamps
- Start date
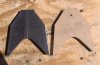

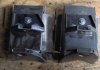
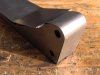
Another part of the motor mounts. I formed the lower area first ( larger hammer form ) then removed the form , otherwise it would be trapped when the top was formed ( smaller triangle like hammer form). The blank was located and bolted on through the bolt holes required by the part.
Attachments

looks great. This part really troubled me when i was trying to get it into Cad. You have done a fabulous job of recreating it.
Thanks Ryan, I figure once it's all welded up and painted it will look very close to original.
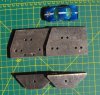
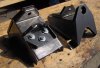
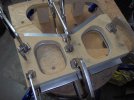
2286 Reinforcement for the rear bulkhead and seatbelt mountings. This is a prototype, bends are rather close and this makes it a little tricky. I think I'll be making this from 18ga or 16 ga for the final part , it does mount the seatbelts afterall.
Attachments
I was able to make one bend on my press brake but the other bend was to close and would not fit in the machine. So after the first bend I clamped it down on on some steel bar and slowly bent it over that. I figure I'll get some 1 x 4 with the seam on the short side then I only have two long bends.
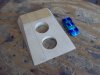
Thanks RyanWhere does that go David? I don't recognize what that is for.
looks great by the way. Keep up the good work.
Cheers.
Ryan
It goes across the top of the battery to hold it in place and I believe the two larger holes allow the battery vent caps to poke through. Only seen two or three photos of this part.

JimmyMac
Lifetime Supporter

Thanks Ryan
It goes across the top of the battery to hold it in place and I believe the two larger holes allow the battery vent caps to poke through. Only seen two or three photos of this part.
Ryan I took another look through my Mk1 photos and it looks like only one on 1013 , others may have it installed but with the fiberglass battery cover on can't see. Another thing about it is with battery problems I can see this part not put back on or easily lost.
James,
Thanks for the excellent image, another angle I had not seen.
Do you know what chassis number that is?
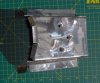
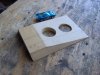
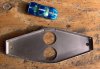
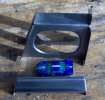
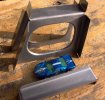
2033-2039 Assembly Reinforcement Door Rollbar . Some of the smaller parts are the most difficult to fabricate .
Attachments
Similar threads
- Replies
- 3
- Views
- 517
- Replies
- 13
- Views
- 1K
- Replies
- 18
- Views
- 2K