DAX Build Up

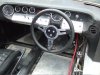
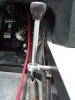
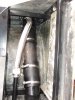
The Pic of Paul in the footwell has got to be one for a caption competition??

Hey Ian you are one lucky guy to get Paul building your motor in double quick time,I'm getting tired just following the pics on the web!
No doubt see it at the Classic if not before.
Cheers /ubbthreads/images/graemlins/beerchug.gif
 

Chris Kouba

Supporter
Ian,

I am trying very hard to catch how the master cylinders in this pic would function but I can't see it.

74425-PaulFixingsteering%23B2CB8.jpg


The orientation of the push rods and an assumption on my part that the pedals pivot on a fulcrum between clevis to m/c push rods and the pedal itself (ie. top of pedal swings toward back of car as brakes/clutch pressure gets applied) all makes me think that your lines from the reservoirs to the m/c and stainless to hard lines are reversed. Please feel free to tell me I'm wrong or missing something (or both). As I see it though (and it's about 2am here) it looks like you'll be pumping a lot of air into the reservoirs and not doing much braking!!

Looks like things are coming together nicely for you though. Congrats on finally getting it moving in a positive direction.

Chris
 

Ian Anderson

Lifetime Supporter
Mr Underscore

The pedals are a Tilton unit

The fulcrum is below the master cylinders and yes when pressure applied to the predal the top of the pedal moves rearwards - this applies pressure to the pushrod and master cylinder. (About a 5 to 1 ratio from our measurements)

I think the pedal pressure says we got the connecions right but I checked anyway and in the following picture lifted of Rally Design the Masters with a built in resevoir ar the same - fliud in away from the pedal / pushrod

Cheers
Ian
 

Attachments

  • 74517-MC2[1].jpg
    74517-MC2[1].jpg
    13 KB · Views: 972

Ian Anderson

Lifetime Supporter
Paul

Yes I am seriously lucky to get Paul to do the work - I am sure the car will be brilliant with his expertise

Cheers
Ian
 

Howard Jones

Supporter
Ian, something to think about. A peddle ratio of 5 to 1 is right at the minimum but still in the ballpark for a system without vacuum boosters.

I would recheck my measurements and if 5 to 1 or better I would take a chance and leave out the vacuum boosters.

Go ahead and read up on brake systems and do your own homework then decide for yourself.

I wish I had a peddle box with a 5 to 1 ratio in my GTD. If I did I would run the car without the boosters. By the way GTD's are right at 3 to 1 mechanically.
 

Chris Kouba

Supporter
Ian,

Cool. I was hoping I was out to lunch. I am accustomed to the m/c pushing fluid to a port/pipe on the end of the bore instead of the setup you have there. I didn't notice you had fluid in it already and had therefor tested it out.

Cheers,
Chris
 

Ian Anderson

Lifetime Supporter
Howard

Many thanks for the info - yes without boosters it would be very close and I would pefer it that way BUT there is a problem and the Dreaded SVA test checks force required on the pedal to stopping power at the wheel.

It might have got through but we took the decision to add the boosters to ensure the test passes.

By the way the end of the footwell remains open like this with a simple fiberglass box cover over it with 4 over center catches. So much easier to get at than some cars!


Ian
 
Ian,
If Paul is trying to sneak across the border in your car, he could take a lesson from this Border Runner. /ubbthreads/images/graemlins/lol.gif
 

Attachments

  • 74610-BorderPatrol3.JPG
    74610-BorderPatrol3.JPG
    42.7 KB · Views: 1,096

Ian Anderson

Lifetime Supporter
No pictures resently but work progresses.

The witing loom has been fitted and modified behing the dash and everything clipped back for the SVA - not much to photograph excepy a lot of coloured spaghetti. Also waiting for some bits to be made up - gearchange, fuel cap holders etc BUT work coninues.

First pictures - to get around the "normal" fuel filler caps that stand proud and would fail a SVA snag test I bought from E Bay 2 "Gilf GTi Mk1 dress up fuel caps" They arrived and then had to get them to fit the car so 2 donuts were made from Ali about1/4 inch thick. With a cut out for the cap.
 

Attachments

  • 78672-FUELCAPDONUT.jpg
    78672-FUELCAPDONUT.jpg
    123.4 KB · Views: 1,014

Ian Anderson

Lifetime Supporter
The reason we did not just fit aerocaps is the tanks have a breather that goes to a flange at the top pf the filler pipe just below the new donut - the aerocap ones do not have the breather.

And the GT40 caps fit over the whole lot (clearance is tight but they fit
 

Attachments

  • 78674-FUELCAPINSIDECOVER.jpg
    78674-FUELCAPINSIDECOVER.jpg
    146 KB · Views: 1,037

Ian Anderson

Lifetime Supporter
Bugger the last photo should have been rotated.

The steering wheel and gearstick trial fitted
 

Attachments

  • 78675-TRIALFITSTEERINGWH#C47AE.jpg
    78675-TRIALFITSTEERINGWH#C47AE.jpg
    171.5 KB · Views: 1,097

Ian Anderson

Lifetime Supporter
Gear Stick mechanism (Mounting bolt needs shortened)
 

Attachments

  • 78676-GEARSTICKMOUNT.jpg
    78676-GEARSTICKMOUNT.jpg
    141.2 KB · Views: 1,028

Ian Anderson

Lifetime Supporter
Saturday 01 April the airfilter (innards from rangerover) were mounted o pick up air from side scoop - 15 years will do this to an air filter element!
 

Attachments

  • 78677-AIRCLEANERMOUNTED.jpg
    78677-AIRCLEANERMOUNTED.jpg
    198.8 KB · Views: 1,032

Ian Anderson

Lifetime Supporter
After the air filter all the wires on the engine loom were traced and connected up - hell there are a lot of wires on Efi for sensors all over the place All seemed to be in place other than a fuel purge valve (We are off to a scrapyard to see what this is on a crashed Range Rover) and the Lambda sensors which seem to wire in to the main Range Rover loom as opposed to the Engine loom - we will check this too.

Finally the rear vents have also been fitted - purchased from a local engineering firm in polished stainless steel.

More to follow

Ian
 

Attachments

  • 78678-REARVENTSFITTED.jpg
    78678-REARVENTSFITTED.jpg
    136.3 KB · Views: 952

Ian Anderson

Lifetime Supporter
Today

I polished the wheels and tyres (mine) on Paul's car as some time this week it is likely that he will be visited by a UK Car mag to do a write up.

His car is stunning and the work in the rims sets it off brilliantly.

In the meantime we visited a scrapyard to trace a lead for a fuel purge valve lead that we cannot find a home for - sod's law as the Range Rover had a earlier version of the Efi system nstalled. - no further forward.

In the meantime when I polished the wheels, Paul marked out and cut 2 demister holes in the Gax dash amd fitted vent coners - then fitted 2 elecric demister units .
first photo rear of dash neat wiring
 

Attachments

  • 78727-dashwiring.jpg
    78727-dashwiring.jpg
    231.1 KB · Views: 1,034

Ian Anderson

Lifetime Supporter
When the dash was out I tookthis og the Dax fuel filler pipe and tank breather - under the new fuel caps pistured yesterday
 

Attachments

  • 78730-FUEKTANKBREATHER.jpg
    78730-FUEKTANKBREATHER.jpg
    173.8 KB · Views: 1,020

Ian Anderson

Lifetime Supporter
The edge of the "spider" windscreen fiberglass (as seen in the above photo) was measured today at 10mm - definately not a lightweight but also very strong and little flex at the top corner of the windscreen mounting.

We also started on the rear clip wiring and the side repeaters were fitted

The Ali engine bay radiator pipes are due back this week - then this can be finally plumbed and leak tested, likewise the header tank should be finished in the next week. Follow that by the fuel pumps and plumbing and soon the engine may be fired up!

Closer each day!

Cheers for now
Ian
 
Back
Top