

You are using an out of date browser. It may not display this or other websites correctly.
You should upgrade or use an alternative browser.
You should upgrade or use an alternative browser.
Frank's KVA Build
- Thread starter Frank Beuker
- Start date
Re: frank's kva
Frank:
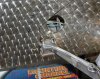
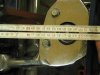
I noticed a photo of your unpolished rim from March of 06', and wondered if it was original etc... If so, have you crack checked
it and does anyone do this anymore? This is common among racers,
but the GT40's are high performance cars with amazing top speeds
and your picture got me thinking. Just a thought... Great pics, keep
them coming!!
Thanks!
Mark
Frank:
I noticed a photo of your unpolished rim from March of 06', and wondered if it was original etc... If so, have you crack checked
it and does anyone do this anymore? This is common among racers,
but the GT40's are high performance cars with amazing top speeds
and your picture got me thinking. Just a thought... Great pics, keep
them coming!!
Thanks!
Mark
Re: frank's kva
Just seen this one Frank. If you've already got your rack then it will only go one way. If you are using the rack in the photo it will need to mounted ahead of the
wheel centreline. If you mount it behind when you turn left the car will go right. Could take a bit of getting used to!! boomsmile
Good luck with it all
Frank Beuker said:thank's this will of help
i've orderd new upright from john wisher so i can determen where ever i want to put the connectionpoint for the tierod
is there a rule for the position of the rack (to the front or back)
frank
Just seen this one Frank. If you've already got your rack then it will only go one way. If you are using the rack in the photo it will need to mounted ahead of the
wheel centreline. If you mount it behind when you turn left the car will go right. Could take a bit of getting used to!! boomsmile
Good luck with it all
Re: frank's kva
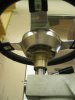
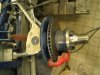
Mark i did'nt have it crack tested yet and they are original cobra hallibrands
russ i'm yousing the one in the photo
it was allready in the car and also was mounted in front of the centerline
so i don't have to counter steer
Mark i did'nt have it crack tested yet and they are original cobra hallibrands
russ i'm yousing the one in the photo
it was allready in the car and also was mounted in front of the centerline
so i don't have to counter steer
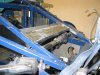
demolition day
I just had a bright idear
Why don't i put the rack as high as possible
the only thing was that i 'd have to remove some
panneling
my wife always say's to me that whenever she's coming to have a look the car is getting smaller everytime,so she's right again
but the possitioning of the rack seems to be ok and i don't have any problems with the pedalbox or steeringshaft
Attachments
![IMG_2594[1].jpg](/data/attachments/11/11285-c5b84a686dc5985a2d882ed65b0dff6a.jpg)
![IMG_2598[1].jpg](/data/attachments/11/11286-6fdfe87511d6b57dd300803369e6a93c.jpg)
![IMG_2601[1].jpg](/data/attachments/11/11287-bc6ce2f99443b6376c65ddca873a6e14.jpg)
Re: frank's kva
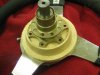
Frank,
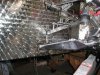
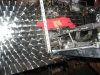
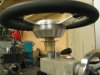
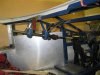
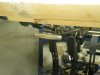
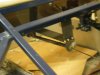
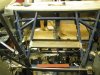
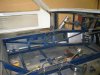
The solutions given to your steering rack position are good ones and technically correct. On my build I had installed the panelling BEFORE I positioned the rack. So I wanted to get the hole right the first time. Several members sent me the technical stuff just like Doc's. It was all nice but I couldn't trust the numbers to be wrong. What I did, is to make a jig to show the location of the rack at one half inch intervals. I then attached the steering arm to each position and moved the suspension through it travel. I put a laser line level on top of the upright and adjusted the aperature to a single beam and marked the travel on the wall at one inch or so intervals for each hole. I finally got one of the traces to be vertical. That is the one that would eliminate the bump steer. Here are the pics of the operation. In the second one you will notice the wood taped to the panel. The jig would move as the suspension moved through its arc. So I taped it down to prevent movement.
Bill
Frank,
The solutions given to your steering rack position are good ones and technically correct. On my build I had installed the panelling BEFORE I positioned the rack. So I wanted to get the hole right the first time. Several members sent me the technical stuff just like Doc's. It was all nice but I couldn't trust the numbers to be wrong. What I did, is to make a jig to show the location of the rack at one half inch intervals. I then attached the steering arm to each position and moved the suspension through it travel. I put a laser line level on top of the upright and adjusted the aperature to a single beam and marked the travel on the wall at one inch or so intervals for each hole. I finally got one of the traces to be vertical. That is the one that would eliminate the bump steer. Here are the pics of the operation. In the second one you will notice the wood taped to the panel. The jig would move as the suspension moved through its arc. So I taped it down to prevent movement.
Bill
Attachments
Re: frank's kva
Hi Bill
I've seen your building thread and that was also the reason why i took away the panneling and because i'm going to change the uprights with changeble steering arms i can start with the steering rack and go from there did you also take in to account the ackerman ?
how did you go with the gearlinkage
did you find the link's any usefull ?
frank
Re: frank's kva
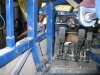
The links helped a lot. I am ready to start assembling the shifter and pieces. Have the plan worked out with rough drawings. Now to see what kind of problems it raises, which I am sure it will. My suspension is the C4 corvette, so I have what I have. I am not well versed in the engineering and geometry of the steering. So I will leave that up to the guys that will be working on my setup. The uprights(front) are being modified so that I can get some decent brakes for it. I will let all be known when I get around to an update. Should be in a week or two. All the parts should be in by then. I will probably have to redo the bump steer thing again as the steering arms are being modified also.
Bill
![IMG_2606[1].jpg](/data/attachments/11/11528-63f6dde6ccf13eb90267162a550d6981.jpg)
![IMG_2607[1].jpg](/data/attachments/11/11529-050a1168ac7113af8cca44bc8550281d.jpg)
![IMG_2608[1].jpg](/data/attachments/11/11530-2de199bc148669c5c1d21d87077befd1.jpg)

Re: frank's kva
thanks dave
i tried to get my hands on some alu today so i can make it tommorow
but because of the bank holliday all the shops were closed so tommorow i'll be working on something else
thanks dave
i tried to get my hands on some alu today so i can make it tommorow
but because of the bank holliday all the shops were closed so tommorow i'll be working on something else
Re: frank's kva
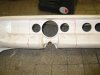
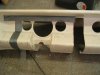
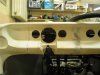
i had to change the position of the steering wheel more to the left
two reasons
- the steering wheel was al the way to the right almost next to the seat
- the angle of the shaft was wrong to the steeringrack if i didn't change the position i had to put a extra joint in between
but the result was that i've got to change the dash put the rev and two other meters more to the left so the dash also wasn't right to begin with
how is the position of the steeringwheel by the gtd's/rcr's.....
are you sitting straight forward ,or do you have to sit in a angle to grab the steeringwheel?
some pic's of the dash before and after (still busy so not finished)
and the new brackets for the shaft
Attachments
Chris Kouba
Supporter
Re: frank's kva
Nice work Frank.
You ask about other chassis and I can comment on the RCR for you. I was able to set the cockpit up exactly as I wanted. It was one of the major concerns I had going into this from a physical (I'm 6'2") and ergonomic perspective (I want the wheel EXACTLY in front of me!). It seemed only natural to expect that, and I was able to get precisely what I want- seated straight forward with the wheel squarely in front of me.
It looks like you have sorted that out precisely as well, and it's another thing which makes each car built specifically for each builder. Like Andy's (Doc Watson) signature says, "This is a car you have to be measured for". I like that concept.
Keep up the good work!
Re: frank's kva
thank's chris
I was talking to a friend of my and he said that at the end only 40% of the car is build by ken attwel and the rest has been designed by frank beuker
it wasn't the first idear i had when i bought it.
thank's chris
I was talking to a friend of my and he said that at the end only 40% of the car is build by ken attwel and the rest has been designed by frank beuker
it wasn't the first idear i had when i bought it.
Re: frank's kva
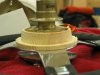
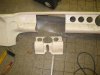
started working on the handbrake
used an old handbrake of a opel(vauxhal)
Alan i did put some pictures of my front suspension
started working on the handbrake
used an old handbrake of a opel(vauxhal)
Alan i did put some pictures of my front suspension
Attachments

Similar threads
- Replies
- 5
- Views
- 980
- Replies
- 10
- Views
- 3K