GT40 Australia #27

Peter Delaney

GT40s Supporter
More Progress at Last !
As my DRB was a very early build, things like roll-hoops & dropped floors were in the future when the car left the factory. Way back, I think I described the fun & games we had installing the roll hoop set-up – not easy after the spyder section had been permanently installed, but doeable.
The next major upgrade (after my engine disaster & rebuild) was the dropped floors. My car had the original DRB folded floor throughout – much like the real GT40’s – but this was a real pain (literally) – I got the seats made with the absolute minimum of seat cushion height, but even with this, I had to slide down in the seat to fit in under the doors. It was standing joke – whenever I had been for a drive in the 40, the family used to laugh, point to my flat hair on top & ask how things went in the Marines today !!

These days, there are 3 options for floors from DRB :

a) Standard full folded floor (like mine)

b) Dropped Floors – where a flat pan is welded under the seats which brings the floor in that area down to the level of the bottom sections of the folded floor & chassis rails (gets you an extra 20mm)

c) Super-Dropped Floors – as above, but the pan is about 20mm below the bottom sections of the folded floor & chassis rails (so, about extra 40mm of headroom).

Being a person who can’t help himself when it comes to re-inventing the wheel, I decided on a compromise between (b) & (c) – why make life easy when you can have a challenge !!

I was a bit nervous about losing 20mm of ground clearance with the Super-Dropped floors (& didn’t want to wind the car up too much more from its 125mm level), so a compromise of losing 10mm & maybe winding the car up 5mm seemed to be the answer.

I was lucky enough to have re-established contact with an old friend – Henry Neribecki – the race car "engineer’s engineer".

Pardon the digression here, but some background on Henry may interest some :

- I knew Henry from more than 25 years ago when he worked on my Mini Cooper S.
- After a long break, we caught up again, & I found a whole heap of weird co-incidences
- Henry worked with Eric Broadly on the Lola GT
- He designed & built all of Frank Matich’s stunning sports racers (SR1 to SR4) & open wheelers – all phenomenally successful in the 60’s & 70’s
- He is the acknowledged "expert" in Oz when it comes to racing a Lotus, and maintaining or restoring Lambos.
- His latest project is a radical clubman – all aly frame, WRX motor behind the driver, 500kg dry, +300hp, carbon fibre bodywork, and …. Registerable !!!!
- My daughter’s boyfriend is Frank Matich’s grandson !!

Back to the story :

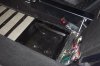
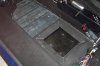
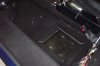
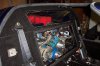
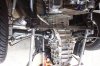
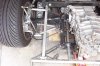
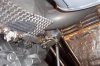
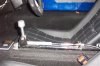
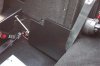
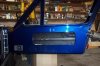
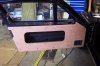
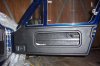
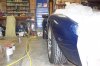
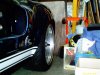
Henry was happy to take on the dropped floor project, & designed a super-neat setup – all flanged into the existing folded floor & fixed with aircraft rivets & "F18" aircraft glue. Beautifully designed & fitted, and avoided the problems of welding so close to the carpet & fuel tanks !

The difference in driving position & comfort is just amazing – I might even be able to fit in the car with a helmet on (YIKES) !!

The following pic shows how the floors were done.

Kind Regards,
Peter D.
 

Attachments

  • DCP_0683 (Medium).JPG
    DCP_0683 (Medium).JPG
    85.8 KB · Views: 860
Henry does great work Peter. He's made some of Australias most successful race cars: Matich's etc. He just made me a roll cage for the Lotus Elise. (I'm running it in the 6-hour at eastern Creek in november). He rang the other day and told me he had a GT40 in his shop. The puzzle fits together now.
 

Peter Delaney

GT40s Supporter
Tim, it is such a small world - talking to Henry the other day, I mentioned you & your GT40 / Hyabusa clubman & new Lotus ventures - "I know Tim & his brother, we've just made up some parts for the Lotus project" !!

BTW - any updates on the GT40 ?

Kind Regards,

Peter D.
 
Hi Peter

It is great to see such nice clean work done. You have mentioned a number of times the head height issue. Now it is one less thing on your mind (pun intended). It should now make you even more enthusiastic about driving the 40 (like you would need an excuse). Tim, Peter is right, how about some updates.

JW
 
Tim, is it being hand painted, or being painted with some exotic paint extracted from the crevice of an Brazilian beauty one drop at a time?

Pete's rebuit his car about eight times now and your still trying to build one lol.

Steve
 

Peter Delaney

GT40s Supporter
Thanks Jack, but the credit goes to Henry for the neat job.

My bit was done this w/e :

I originally had a sheet of closed-cell foam over the whole floor area, topped off with a 2mm aly sheet, then the carpet.

To cater for the dropped floor pans, I cut out the seat section from the foam & shortened the aly floor so that it only covered the sections in front of the seats. (The strips on the aly floor are just stick-on non-skid stair treads - to stop the carpet slipping around).
 

Attachments

  • DCP_0686 (Medium).JPG
    DCP_0686 (Medium).JPG
    84.7 KB · Views: 786

Peter Delaney

GT40s Supporter
Then similar cut-outs on the carpet, with the flaps going into the seat-pan - heated & folded down. (The extra layer of carpet in the front sections is just a "floor-mat").
 

Attachments

  • DCP_0687 (Medium).JPG
    DCP_0687 (Medium).JPG
    67.2 KB · Views: 798

Peter Delaney

GT40s Supporter
The finished product - the seats nicely hide all the carpet & rubber cuts, and the carpet stays flat courtesy of the heat-folded flaps (done with wife's hair-dryer !).

Apart from a huge improvement in the driving position for me (seats back 1/2" & down about 1 1/4"), I'll now be able to take some of my "more bulky" friends for a ride !!

Kind Regards,

Peter D.
 

Attachments

  • DCP_0688 (Medium).JPG
    DCP_0688 (Medium).JPG
    63.6 KB · Views: 763
Nicely done Peter

Henry is obviously a Pro, How did you end up securing the seats
under the floor? I still haven't finalised how I am going to bolt mine
down. I was thinking threaded 5mm plates welded under floor
and using coach head allen type screws to bolt the seat down and
cutting the bolts flush with the bottom of the plates.

Peter can you tell what radiator is in your car, I have a V8 Commodore
rad and am having trouble fitting it.
 
Last edited:

Peter Delaney

GT40s Supporter
High Dave,

Yep, Henry does good work. His idea for fixing the seats was to machine up 4 x circular "buttons" for each seat - about 6mm thick & 30mm dia. These are recessed into 12mm holes in the floor from below & welded in place.

The buttons have 6mm threaded holes to accept s/s "coach head" philips bolts coming down thru the seats, & the ends are machined off as you suggested. The underneath of the button is chamfered so as to "glide" over speed bumps !

I originally suggested 2 "skid plates" running fore & aft, but welding them under the new seat pans would have created nice little rust nests in the void between the plates & the seat pans. Next, I suggested cutting the plates into the seat pans & butt welding - so Henry came up with the "button idea" - less work, no rust voids, & thinner by a mm or 2.

My radiator came with the part-started car - I believe it is a Commodore one, but that it was modified by DRB - Peter Ransom should have the clues on this.

Hope this helps a bit.

Kind Regards,

Peter D.
 

Attachments

  • Seat Mount Button.jpg
    Seat Mount Button.jpg
    8 KB · Views: 751
Very nice idea and I have a pic of how to make them.
A great solution to a head scratching problem.

Dave runs down to shed and starts machining up seat mounts.
 

Peter Delaney

GT40s Supporter
These are some pics of the G50 gearshift setup for Henrick.

The original cable setup ran over the top of the gearbox & connected to the top of the boss on the gearbox shift shaft. However, the heat from the CAT's melted the cable sheath, so I ran the new cable along the side of the gearbox & connected it to a bracket on the end of the boss's lever.

To stop any bending of the lever fore & aft, I welded a strengthening plate across the top of the lever & boss.

It all seems to work fine, & no melted cables !

Henrick, let me know if you need any more pics, etc.

Kind Regards,

Peter D.
 

Attachments

  • DCP_0305 (Large).jpg
    DCP_0305 (Large).jpg
    69.1 KB · Views: 645
  • DCP_0565 (Large).jpg
    DCP_0565 (Large).jpg
    65.2 KB · Views: 655
  • DCP_0566 (Large).jpg
    DCP_0566 (Large).jpg
    61.9 KB · Views: 690
  • DCP_0633 (Large).jpg
    DCP_0633 (Large).jpg
    57.5 KB · Views: 661
  • DCP_0635 (Large).jpg
    DCP_0635 (Large).jpg
    63.2 KB · Views: 669
  • DCP_0519 (Large).jpg
    DCP_0519 (Large).jpg
    49.3 KB · Views: 646
  • Gear Shift Bracket.jpg
    Gear Shift Bracket.jpg
    40.3 KB · Views: 638

Peter Delaney

GT40s Supporter
Another update is probably well overdue !
I now have some 9,000kms on the car, but sadly none of them done on any major road trips (yet).
I'll put the developments in separate posts to keep things short :

1. Inside Door Trim Panels

After sorting out the seating in the car, the next project was to get the inside door panels done. After much thought, Mike Cooper (the guy who did such a nice job on the seats) came up with a design that we were both happy with.

Stage 1 was for me to make up the panels to the correct shape & fit them to the doors. The panels were done in marine ply, & I set about 15 x 4mm c/s bolts into them (epoxied into place). The bolts pass thru holes in the f/glass inner door panel, & all is held in place with wing-nuts - you can't see them, but they are dead easy to install/remove. I also made up some re-inforcing bars out of 1/2" aly angle - these run the full length inside the doors, along the bottom edge of the cut-outs - these were bolted in place 1st, then the door panels go on & cover the bolts. Apart from stiffening up the lower edge of the cut-outs (making a useful "door-pull"), they also provide a mini arm-rest area which does not intrude into the cabin.

Once we were happy with the whole setup, Mike worked his magic & covered the re-inforcing bars, the edges of the cutouts, & the door panels in the same leather that he used for the seats. His really smart suggestion was to put some fairly hard foam on the cabin sides of the panels & to trim it back some 5/8" from all the edges. Once the leather was glued over this, it provided a very nice "character line" around all the edges & so he ended up achieving my goals for the panels :

- No visible fixing screws or fittings
- Some nice edging to get away from the "flat panel" look
- A useable arm rest
- A strengthened bottom edge of the cut-out which can be used as a door-pull

To finish the doors off, I'll carpet the inside storage area & Mike will run some leather over the side-intrusion bars that are visible thru the cutouts.
See following pics of progress so far .....

(Mike has also done the centre tunnel in the same leather, with beautiful double-row stitching along the shoulders. He is working on the g/shift boot, & I'll post pics as soon as I can.)

The next installment (Wheel Spacers) will follow as soon as the rain stops & I can take some "after" pics !

Kind Regards,

Peter D.


Attachments

  • DCP_0775 (Medium).jpg
    DCP_0775 (Medium).jpg
    51.4 KB · Views: 471
  • DCP_0780 (Medium).jpg
    DCP_0780 (Medium).jpg
    51 KB · Views: 491
  • DCP_0791 (Medium).jpg
    DCP_0791 (Medium).jpg
    53.9 KB · Views: 498

Peter Delaney

GT40s Supporter
2. Wheel Spacers, Etc

I was not all that happy with the DRB factory-recommended wheel offsets - there was way too much "overhang" of the guards over the wheels - the tyres just did not fill the guards & look "right".

After much help from you guys in a separate thread on this subject, I finally decided that "correctly engineered" wheel spacers were going to be the only viable solution. So I had a chat with Jim C (Forum member) & he was happy to make up a set from billet aly. After lots of measurements, we settled on 3/4" spacers front & rear, & Jim did a brilliant job - perfect recesses on the inside to accept the boss on the hubs, & perfect bosses on the outside to mate with the recesses in the wheels. Longer wheel studs were fitted, & we ended up with a setup that was indistinguishable from a wider hub - all vertical plane loads are carried by the bosses/recesses, & rotational loads are carried by the studs which are virtually an interference fit thru the spacers. Talk about precision engineering !!

I reckon that the car looks much better with the wheels stepped out so that the tyres fill the guards, BUT, there was a problem !!!

On almost full right lock, the left front tyre hit the front lip of the LH guard, & the right front tyre hit the lip at the front edge of the RH tank cover !! So, some f/glass work went to the top of the project list - but I'll cover that (& a whole other bunch of glasswork !) in a later report titled "Disaster" !!

Kind Regards,

Peter D.


Attachments

  • 11012008(001) (Medium).jpg
    11012008(001) (Medium).jpg
    30.9 KB · Views: 454
  • 11012008(002) (Medium).jpg
    11012008(002) (Medium).jpg
    31.8 KB · Views: 461
  • 11012008(003) (Medium).jpg
    11012008(003) (Medium).jpg
    35.9 KB · Views: 481
  • PICT0021 (Medium).jpg
    PICT0021 (Medium).jpg
    81.5 KB · Views: 467
  • DCP_0792 (Medium).jpg
    DCP_0792 (Medium).jpg
    50.8 KB · Views: 458
  • PICT0016 (Medium).jpg
    PICT0016 (Medium).jpg
    51.2 KB · Views: 470

Peter Delaney

GT40s Supporter
3. Simmons Wheel Lug-Nut Covers

Whilst Jim & I were cooking up the spacer design, I also floated an idea suggested by Bill Bayard some time ago - some aly disks to cover up the wheel lug-nuts on the bolt-on Simmons wheels that nearly all DRB's seem to use. With these held in place by the DRB fake knock-offs, very few people would be able to pick that the wheels were not "pin-drives".

As Bill B came up with the original idea, I asked him to think up a name for the product - the result : "Codpieces" (covers your nuts) !!!

So, if any of you DRB owners with Simmons wheels want a set of "Codpieces", just contact Jim C !!

Kind Regards,

Peter D.


Attachments

  • DCP_0796 (Medium).jpg
    DCP_0796 (Medium).jpg
    54.9 KB · Views: 470
Back
Top