

You are using an out of date browser. It may not display this or other websites correctly.
You should upgrade or use an alternative browser.
You should upgrade or use an alternative browser.
JaseH's GTForte
- Thread starter Rockers73
- Start date
Looks like a nice bit of kit. Will you use a nibbler/shears etc for the more fiddly bits then? As an alternative to getting them done I was thinking of the jigsaw or 1mm disc/Angle griner to cut.
I can borrow the circular saw, so don't need to buy it. As Andy says, a jigsaw should do fine. I've been cutting some 1.2mm mild steel recently with a jigsaw which was fine (I actually found it easier to do it freehand rather than against a straight edge). So the aluminium should be easy. The jigsaw would be good for the fiddly bits too as long as it's not a really tight radius. If you're using an angle grinder, go steady with it as it's very easy to get carried away! Probably why some call it the angry grinder
")
Managed to finish the last template for the wheel arches last night. I got this pretty much spot on from the start which was good. Was going to check over the others before my friend popped round to flip the car over so I could finalise the drawings. Unfortunately I didnt get chance so that will have to wait. The cars now on its back in my garage while I measure up the floor panels, I'm awaiting one more quote from a laser cutting company my brother uses then I will make a decision on that. Im very tempted just to go ahead and cut the floors out this weekend as I'm very concerned about leaving the spider unsupported. At the moment Ive just got it rested on top of the chassis with lower front part rested on some wood, is that ok?
Going to finish measuring tonight and patch up a few scratches on the bottom with Hammerite.
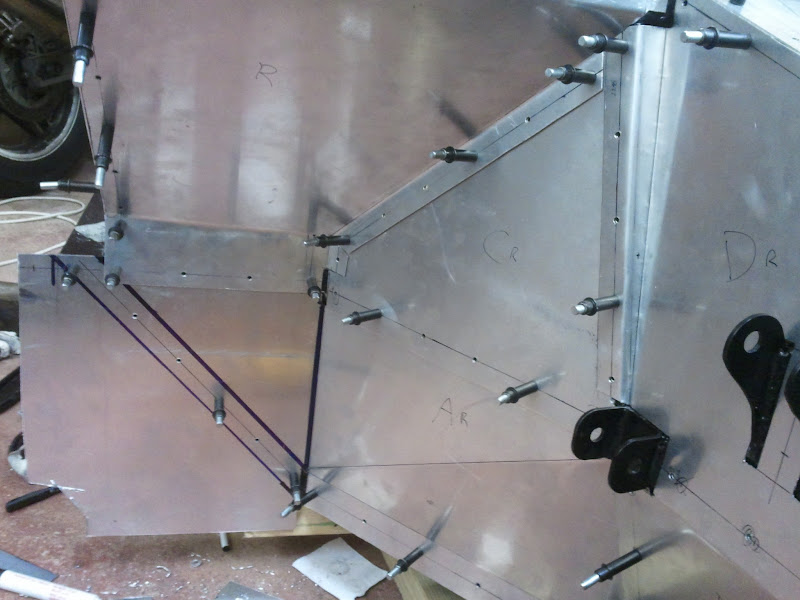
Here's my final wheel arch panel template in place.
Going to finish measuring tonight and patch up a few scratches on the bottom with Hammerite.
Here's my final wheel arch panel template in place.
Attachments

Yes, that's what I did, made it far too large with the intention of trimming it to match later.
You'll need (if you don't have one already) a small right angle drill to do some of the holes, it's also worth considering taking an angle grinder to one of the drills and lopping off a chunk of the shank, you only need to drill ~5mm deep, no need having 50mm of drill out of the chuck when you're really tight on space.
You'll need (if you don't have one already) a small right angle drill to do some of the holes, it's also worth considering taking an angle grinder to one of the drills and lopping off a chunk of the shank, you only need to drill ~5mm deep, no need having 50mm of drill out of the chuck when you're really tight on space.
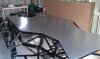
Managed to get the floor pan pieces cut out on sunday. My friend Bob turned up with his compressor and we cut out the 3 pieces mostly using some air shears, I tried to do some of the cuts with a jigsaw and a 18tpi blade but the results were crap. I have deburred all the edges and I am pretty pleased with the result. Drilled the first rear floor pan panel last night too. Got to do the other one tonight and then add some water holes. Looks like there is the potential for 3 water traps so Im going to drill 3 holes. What size is recommended? 8mm?
Attachments
Jase, Might be a bit late if you've already done it but I was going to leave a half beams width around the engine bay and panel over the engine bay. That way I could have a flat floor with the option to (easily) remove it at a later date if I ran into overheating issues (or just for maintenance).
Brett James-McCall
Moderator
Jase, you might want to permantely borrow the compressor and also invest in a rivet gun as well
Brett
Brett
Hi Jayson,
The floor pan needs bigger rivets and preferably stainless steel.
There as hard as nails litterally. You will need hands like mike tyson.
Dont buy a cheap air riveter they fall to bits but good one's are not cheap.
The smaller rivets in ally are best done by hand though in my opinion,, you need to feel the pressure, do a few and you will see what I mean.
I put a thin coat of black sikaflex 227 sealer between the panel and the chassis it seals it forever.
Drill all the holes then de burr them, then a thin layer of sealer then rivet the lot within 1/2 hour.. JOB DONE. It's never seen but looks good anyway
I undersealed the floor pan at the end it makes for a good job.
Hi Keith.
Thanks for the advice mate. I bought a tube of black polyurethane adhesive/sealant from CBS which I think is a sikaflex equivalent so I was going to use that. Ive bought 1000 4mm x 9.5mm aluminium sealed rivets for the panels as per the instructions. Do you think I should use stainless on the floor instead then? and what size?
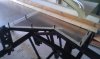
Ive marked out the rivet lines for the main floor (In masking tape) does this look alright to you guys?
Thanks for the advice mate. I bought a tube of black polyurethane adhesive/sealant from CBS which I think is a sikaflex equivalent so I was going to use that. Ive bought 1000 4mm x 9.5mm aluminium sealed rivets for the panels as per the instructions. Do you think I should use stainless on the floor instead then? and what size?
Ive marked out the rivet lines for the main floor (In masking tape) does this look alright to you guys?
Attachments

Looking good Jase, you might find this of interest
LocostUSA.com • View topic - Rivets and Rivnuts 101
The floor in the space frame based GT40 replicas IMO is a major part of its structural strength, personally I plan to have a double row of ~4mm stainless rivets at 20-25mm spacing on the underside.
The main beams are ~40mm wide so I'd run the rows 10mm from the outside (so 20mm 'inside' between them) and then a single row central on the smaller section tubes.
Hi Jayson, I was sending you a reply and my computor shut down on me so hopefully you get this one.
The floor pan looks good to me.
I used Stainless rivets but others may differ.
If you need I'm sure I have loads spare you can have.
Also If you want I can loan you the rivet gun.
My business is compressed air so my riveter is one of the best on the market
Let me know if you want to use it and I will send it to you.
Have a look at some earlier posts from me and others, there's loads about fixing panels and tools that others have used.
Grinder with 1mm slitting disk is essential in my opinion.
Dave
Thats a serious amount of drilling your going to be doing mate! I'm going to stick to my approx 50mm centres but I'm going to heed you and Keiths advice and use 4mm stainless I reckon. That was a interesting link btw.
Keith
Thats a really kind offer, thanks very much, I'll PM you.
Havent got much done so far this weekend. My poor father past away earlier this year so I now spend most saturdays doing stuff to help out my mum so yesterday was written off doing some construction work over her's and I dont think much will get done today as the boss of the household has got a big list of diy for me to do around the house .
Going to crack on with it now so I can hopefully get in the garage later to mark and punch those drill hole locations.
Thats a serious amount of drilling your going to be doing mate! I'm going to stick to my approx 50mm centres but I'm going to heed you and Keiths advice and use 4mm stainless I reckon. That was a interesting link btw.
Keith
Thats a really kind offer, thanks very much, I'll PM you.
Havent got much done so far this weekend
. My poor father past away earlier this year so I now spend most saturdays doing stuff to help out my mum so yesterday was written off doing some construction work over her's and I dont think much will get done today as the boss of the household has got a big list of diy for me to do around the house .Going to crack on with it now so I can hopefully get in the garage later to mark and punch those drill hole locations.
Similar threads
- Replies
- 40
- Views
- 3K