Mark's GT-R Build

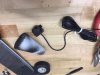
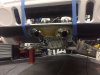
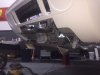
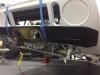
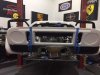
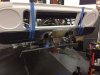
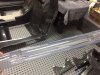
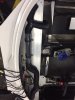
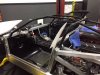
I plan to have a rear facing camera and I want the camera to be mounted on the rear edge of the roof. In that position I get a more normal view behind the car and I will get to keep an eye on the engine in the lower part of the frame.

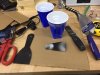
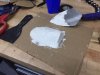
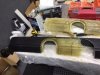
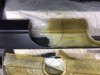
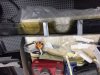
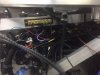
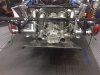
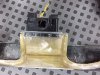
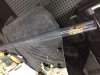
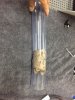
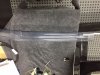
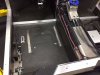
In order to achieve this mounting, I need to fabricate a camera housing. In developing a mold, I stated with a Styrofoam shape, then add plaster over the Styrofoam. The plaster is easy to shape and sand, and after painting will resist the chemicals in the fiberglass resin.

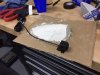
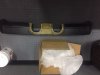
At this point I have the basic shape, but will refine it by sanding, then will paint it n preparation for use as a mold.
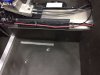
 

Attachments

  • IMG_5027.JPG
    IMG_5027.JPG
    58.5 KB · Views: 342
  • IMG_5028.JPG
    IMG_5028.JPG
    49.7 KB · Views: 305
  • IMG_5029.JPG
    IMG_5029.JPG
    41.2 KB · Views: 319
  • IMG_5035.JPG
    IMG_5035.JPG
    48.5 KB · Views: 368
I removed the mold on the first side and everything looks great. With one side done, I re-cut the opening for the second side and started the lay-up.

Still working on the wiring.
 

Attachments

  • IMG_5036.JPG
    IMG_5036.JPG
    50.4 KB · Views: 336
  • IMG_5037.JPG
    IMG_5037.JPG
    44.7 KB · Views: 310
  • IMG_5038.JPG
    IMG_5038.JPG
    52.9 KB · Views: 288
I finished the fiberglass lay up on the bumper, removed it from the mold and did some basic trimming. I really wanted to see it on the car, so I taped it in place. I need to pick out some exhaust tips, possibly going to 4 inch. I want a race car look, so polished is probably not what I will be looking for.
 

Attachments

  • IMG_5065.JPG
    IMG_5065.JPG
    28.9 KB · Views: 281
  • IMG_5042.JPG
    IMG_5042.JPG
    42.6 KB · Views: 303
  • IMG_5039.JPG
    IMG_5039.JPG
    39.5 KB · Views: 385
I am getting closer with the wiring. After I get all of the connections made, I can work on making things look more organized. I can see that these ground blocks help.
 

Attachments

  • IMG_5064.JPG
    IMG_5064.JPG
    41.8 KB · Views: 314
Some parts of the assembly are more fun than others. The wiring.....not so much, but putting the diffuser on was something I have been looking forward to. I want to get it set up early, because I want to send it to the Power Coater, along with a few other exterior pieces.

The Diffuser is really a NICE PIECE. Fran did a great job designing this. There are probably a number of ways to mount this, but I attached the front edge to the cross member under the transaxle and use the body mounting hardware provided in the kit.

This car is a blast to build.
 

Attachments

  • IMG_5060.JPG
    IMG_5060.JPG
    41.8 KB · Views: 350
  • IMG_5062.JPG
    IMG_5062.JPG
    35.1 KB · Views: 373
  • IMG_5063.JPG
    IMG_5063.JPG
    51.3 KB · Views: 414
Thanks H. It was fun modifying the bumper to match the exhaust.

I connected the Oil Cooler using a Lingenfelter adapter off the LS3 outlet above the oil filter. This is a great piece. I was not only able to connect the oil cooler, but it also had ports the Oil Pressure Sensor and the Oil Temperature Sensor. I used AN10 lines since both the Lingenfelter adapter and the Earl's cooler had AN10 fittings.

I added heat shielding to the oil cooler line that got neat the exhaust header.

Still working on the wiring.
 

Attachments

  • IMG_5066.JPG
    IMG_5066.JPG
    42.8 KB · Views: 293
  • IMG_5067.JPG
    IMG_5067.JPG
    57.3 KB · Views: 259
  • IMG_5068.JPG
    IMG_5068.JPG
    50.1 KB · Views: 299
  • IMG_5069.JPG
    IMG_5069.JPG
    63.7 KB · Views: 362
While I continue with the wiring, I wanted to mock up the rear to design the shape of the exhaust tips and start work on the grills for the rear.

I am also going to add the third brake light, but I want it to be like the Formula One race cars, having a low mounted trapezoidal center light. I found that the Suburu WRX brake light has the look and the quality. I found many four dollar brake light assemblies, but that is not going to work.

More to come on look of the rear end.
 

Attachments

  • IMG_5072.JPG
    IMG_5072.JPG
    47.6 KB · Views: 279
  • IMG_5073.JPG
    IMG_5073.JPG
    44.2 KB · Views: 306
  • IMG_5074.JPG
    IMG_5074.JPG
    43.1 KB · Views: 312
While still working on the wiring, I added the F1 style third braking light. I ordered the light from Subaru. This light can be found on the WRX. I still have to fiberglass in the seams, then I plan to have the fiberglass light frame be black, with the overall car being white, with silver strips.
 

Attachments

  • IMG_5089.JPG
    IMG_5089.JPG
    51.9 KB · Views: 310
  • IMG_5090.JPG
    IMG_5090.JPG
    45.9 KB · Views: 303
  • IMG_5091.JPG
    IMG_5091.JPG
    44.7 KB · Views: 314
Continuing with the wiring, but spent some time working on the AC manifold. I started with a polycarbonate tube 2.5 inches in diameter. After marking off the length needed for the opening to the AC air flow, I heated the tube and bent it a little to get the flex tubing over the ends. With a template I cut the AC opening to match the hole in the aluminum, used foam tape around the boarders and cut up a serpentine belt to strap the tube down. Instead of using a valve to divert the air flow, I plan to have 2 AC ducts in the normal positions, then two on top of the dash that I can either aim at the windshield or aim back at the passengers, closing off the vents if necessary.
 

Attachments

  • IMG_5084.JPG
    IMG_5084.JPG
    56.7 KB · Views: 268
  • IMG_5085.JPG
    IMG_5085.JPG
    74.1 KB · Views: 238
  • IMG_5086.JPG
    IMG_5086.JPG
    62.2 KB · Views: 216
  • IMG_5087.JPG
    IMG_5087.JPG
    58.9 KB · Views: 266
  • IMG_5092.JPG
    IMG_5092.JPG
    40.6 KB · Views: 263
  • IMG_5093.JPG
    IMG_5093.JPG
    33 KB · Views: 231
  • IMG_5094.JPG
    IMG_5094.JPG
    34.3 KB · Views: 253
  • IMG_5095.JPG
    IMG_5095.JPG
    35.5 KB · Views: 283
  • IMG_5098.JPG
    IMG_5098.JPG
    42.3 KB · Views: 252
My brother in law Tom had a few days available to spend with me in the shop and he has helped me with refining the interior tub in the past, but we were not able to finish it. Working on this takes two people. So with Tom available, we started back in on finishing the interior tub. After that was adjusted and fits passively, we added Second Skin Luxury Liner Pro to the entire interior on top of Damplifier Pro.
 

Attachments

  • IMG_5108.JPG
    IMG_5108.JPG
    42.7 KB · Views: 286
  • IMG_5109.JPG
    IMG_5109.JPG
    37.6 KB · Views: 256
  • IMG_5110.JPG
    IMG_5110.JPG
    40.4 KB · Views: 288
Very cool Mark! Are you able to fully line between the tub and chassis with luxury liner pro? Turns out the tub makes contact with the fuel compartment closeout for a good portion of the areas behind the seats so I won't be able to fit it between a good bit of the tub on my SLC.

It may be overkill but I might suggest taping up the seams and joints between the luxury liner and itself as well as where it meets the chassis. Anything that will help arrest airflow between the chassis and you will work towards killing sound.
 
With the Luxury Liner Pro in place, we put the adjusted interior tub in place. To get he tub to this point probably took taking the tub in and out over twenty times. I can not say enough about using the pneumatic "Micro" jig saw to accomplish the trimming needed. It does not chip the gel coat and is highly maneuverable in small spaces and around corners. The interior tub is a great piece and is really well fitted to the frame of the car. It is really the required piece to get the lower edge of the door to seal. I have the tub almost resting on the Luxury Liner. It will keep things really quiet and makes the tub sound solid rather than like a drum when you tap on it. We made the tub have a slight amount of lateral movement available so that we could fine tune the alignment of the door sill edge with the outside edge of the chassis. There is 1/4 of an inch or so gap between the tub and the chassis panels, but the entire interior tub will have some surface finishing materials added, such as carpeting. I removed an area of the tub covering the fire wall that is just under the roll bar. My car had to have a box made to accommodate the air intake and by the time I cut the tub to fit around this box, there was only about 3/8 of an inch of fiberglass under the roll bar. The huge advantage removing this area of the tub allows me to lift the tub and work under it to screw in the roll bar and add any additional interior wiring as needed.
 

Attachments

  • IMG_5112.JPG
    IMG_5112.JPG
    50.3 KB · Views: 317
  • IMG_5113.JPG
    IMG_5113.JPG
    51.7 KB · Views: 330
  • IMG_5114.JPG
    IMG_5114.JPG
    41.1 KB · Views: 274
While I had Tom to help me, we really wanted to get the roll bar in place, but I have heard this can require quite a bit of prying and tugging to get seated. I remember when I took it out, it seemed to have some points of tension.

Other than a minor amount of crow bar needed to get the attachment point over the "shoulder" of the fire wall, the roll bar went in perfectly.

In my mind, getting the tub and roll bar in place is a major mile stone. First of all, I needed a second person to accomplish this and could be at a stand still when working by myself. Second, it is really not possible to mock up any body panels with any accuracy without the roll bar in place. Third, this is a major amount of "in for the last time" stuff.

Now back to finishing the wiring, building the console, getting the dashboard final position with the body spider correctly positioned, finishing the AC manifold, adding fluids, adjusting the clutch, cutting out the remaining body panel "cut outs", making a hinge for the front and rear clams, adding the lighting, sanding, priming, and sanding the body, prepping the glass for install and coming up with some interesting unique features, the car is almost ready for interior and paint.

I love this stuff!
 

Attachments

  • IMG_5115.JPG
    IMG_5115.JPG
    55.5 KB · Views: 265
  • IMG_5116.JPG
    IMG_5116.JPG
    62.3 KB · Views: 293
  • IMG_5117.JPG
    IMG_5117.JPG
    52.9 KB · Views: 303
  • IMG_5118.JPG
    IMG_5118.JPG
    47.9 KB · Views: 304
That is a great suggestion, Cam. I can lift the tub up enough to accomplish the taping you have suggested. What kind of tape should I use?

I was able to get all of the interior panels covered with Luxury Liner Pro. It lifted the tub about 1/4th of an inch or so in some areas, but the rocker body panel needs to go under the tub at the door sill and that will fill in the gap that was created. It really sounds solid with the liner. I plan to use the Luxury Liner Pro inside the doors after I paint the inside fiberglass with Spectrum.
 
I used some of the low temp aluminum tape from mcmaster but anything should work that's got some amount of heat resistance (some of your joints will be near hot pipes I imagine). I have pictures of the stuff I used in my latest post here:

16. Time to give the beast legs (and other stuff) – Cam's Superlite SLC

Hmm ... I believe the rocker on the SLC is supposed to go below the metal edge but maybe I can lift the body up a hair so I can squeeze the luxury liner in. That would also buy me a bit at the wheel arch clearance too.

Edit: this is the stuff I used 7631A21. McMaster-Carr
 
Last edited:
Back
Top