Mitch Krause's RCR GT40 Build

Randy V

Moderator-Admin
Staff member
Admin
Lifetime Supporter
January 10, 2015
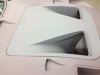
Working the front clip


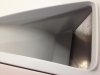
The Guides are now in place and I decided that the back side of the clip needed additional support around the latch area. Since the SARMA latches are cut into the latch recess, clip is weakened in that area. I cut some aluminum angle to form a cavity behind the slits cut for the latch. I used my hot-glue gun to “tack” the angle in place, then started laying in the Everglass.. The pictures don’t show the finished product, but I wanted to get an update done to this log tonight. I’ll post more updates later.
IMG_5840_zpsb277cfdc.jpg

IMG_5845_zpsc93b917f.jpg

IMG_5847_zps07729372.jpg

IMG_5864_zps0166227f.jpg


Okay – all that is ugly – but I will straighten it all out…

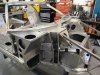
Next up is to get the center clip fasteners (Dzus) holes drilled in the clip. Okay – so how do I figure out where to drill the holes? I have already fastened the steel mounts with Dzus spring. I needed a transfer punch to mark my center.
I took a 3/8” bolt, sawed off the threads and turned the head down to a point in my lathe. This transfer punch fits in the hole for the Dzus button. I'll put some tape on the clip and push the clip down onto the transfer punch. Easy stuff now – just drill a pilot hole where the transfer punch mark was left.
IMG_5856_zps432a024d.jpg

IMG_5855_zps3769562d.jpg

IMG_5858_zpsf841c38a.jpg

IMG_5857_zps2c34c106.jpg
 

Chris Kouba

Supporter
The IBM Clip (I’ve Been Moved)
I have confirmed that the rear clip is not moving back into continually repeatable positions... I will be stepping up my plans for reinforcing this and will get the rear clip dialed back in.

I would hang tight on reinforcing it until you get the drivetrain in. I tried getting mine set up and then realized I needed to cut the alu sheet to fit the trans or cable attachments or something. If you're going to use it, wait to reinforce it until you've seen its final configuration.

It looks like your crossbrace is for an Audi? My trans is ZF so your experience may be slightly different, but my advice is the same.

Chin up bud, you're making some progress!

Chris
 
Rear clip......
Randy the rear subframe that Tom came up with eliminates all the flex and locater problems you are dealing with. I am working on replacing both front and rear subsections on my RCR as well. Scott
 

Randy V

Moderator-Admin
Staff member
Admin
Lifetime Supporter
Thanks guys...

Chris - good point - I have had the entire engine and transaxle in the car and there were some minor adjustments to the back of the tray and the body to clear the shifter.
So I think I am pretty safe / close to where I will ultimately be..
Yes, the brace is the same for the Audi and Porsche as I understand it. I had to do some clearancing on the bottom of the brace as the G50 was right up against it and I did not want to sacrifice any of the strength in the bellhousing.
IMG_1112.jpg


Scott - I reviewed Tom's thread again and that is pretty close to what I would ultimately like to build - but for now, I will probably go and bolt some square tubing to the aluminum pan to make it more rigid. Right now it flexes a lot when opening and closing the clip.
 

Randy V

Moderator-Admin
Staff member
Admin
Lifetime Supporter
January 11, 2015
Clipping right along…


Today I wanted to pretty well complete the front clip latch reinforcements. Mission accomplished. Once I get the front clip off of the car, I will do the finishing touches as it’s a bit tough without the clip being well supported.
IMG_5874_zps0e082d70.jpg

IMG_5870_zpsa2137d93.jpg


On to the center fasteners for the front clip. Like many of the originals GT40s there were a pair of Dzus fasteners to keep the aerodynamic forces from vibrating the clip at speed. As you saw the other day, I made the mounts (those rusty steel things which will be cleaned up and painted) with the Dzus springs and I made the transfer punch to tell me where to drill the clip. Well it worked pretty good. I used tape on the clip and lowered it into place. Once all the way down, I just pounded the top of the clip directly over the area of the transfer punch and made the mark. I drilled first with a 3/16” bit and then opened up from there with a Dremel and routing bit. Now I just need to get the correct Butterfly Dzus buttons. I have 5/16 x .500 and I am a bit short on the reach, so I will order up a pair of .550 reach Butterfly Dzus.
IMG_5875_zps06dbae6b.jpg


Although it was a really short day - I actually got more than this accomplished. I had to do some make the retainer for the left side latch on front clip and a few other odds and ends.

That’s it for this week.. I’ll order up some parts and materials over the week.
 

Chuck

Supporter
Randy

Here is something else to think about

When driving at speed the trailing edge of the insert in the front clip bulges upward a bit due to the air pressure. Had I known that when I built the GT I would have glassed a small extension that would slide under the lip on the clip to keep it in place or add a Dsuz fastener to the center of the insert along the same line as the two corner fasteners. It is minor point but given your attention to detail thought I would mention it

I am thinking about a simple modification using a Dsuz fastener, but it would have been easier before it was painted.
 

Attachments

  • image.jpg
    image.jpg
    104.1 KB · Views: 503

Randy V

Moderator-Admin
Staff member
Admin
Lifetime Supporter
Hi Chuck... Thanks for that tip. I recall Fran warning me that the double-nostril hood panels did not move enough air to exhaust what was taken in through the grill at speed. This supposedly also causes a lot of strain on the 4 Dzus springs and the rivets holding them to the front clip.
I've taken a couple of measures to ensure that I don't have the problem Fran defined. I will add your idea to the mix as well.
I cut up my Double-Nostril panel and made it as deep as the single-nostril panel. I have also made alloy inserts that the 4 retaining fasteners will anchor in. I don't have any of the pictures of the later at this time, but will attempt to grab a couple pictures from this iPad and upload them here..
 

Attachments

  • image.jpg
    image.jpg
    66.3 KB · Views: 481

Chris Kouba

Supporter
When driving at speed the trailing edge of the insert in the front clip bulges upward a bit due to the air pressure.

That's weird Chuck, I've had mine all the way to 55mph and never had this problem. Mine must be special!

Randy- As long as you have the shifter mounted on the trans, you should be good to go. I didn't have the shifter on (or at all) initially, and when it showed up it was obvious I had some trimming to do. Looks like you're in good shape.

CK
 

Randy V

Moderator-Admin
Staff member
Admin
Lifetime Supporter
Thanks guys...

Well, I managed to escape work this weekend so far and am getting some much needed time in the shop.

My updates on this thread help motivate me to "continue the story".. I really appreciate all the helpful tips both here and in email.
 

Randy V

Moderator-Admin
Staff member
Admin
Lifetime Supporter
January 17, 2015
Getting my expectations in alignment

Well, at least getting the front clip in alignment. As you recall, this clip is tweaked and does not fit the well without “encouragement” – so I made alignment guides for the feet of the front clip.
Now it was time to get rid of the 1/4" thick stick that I had to have to hold the clip in alignment around the base of the windshield. I used some 3/16” thick UHMW Plastic material and a 1/16” aluminum shim behind it. I will pull the shim once I paint the car to give it a bit of room. I built up the lips on the clip to interface with these guides.
IMG_5883_zps3f51a5a8.jpg

IMG_5879_zpsd7c6d236.jpg


Barely noticeable unless you’re looking for it.
IMG_5880_zpsd73d04f6.jpg
 

Randy V

Moderator-Admin
Staff member
Admin
Lifetime Supporter
January 17, 2015
It’s an Open and SHUT case!

Getting my Shut-Lines (panel gaps) right are important to me. If you recall from my original build log, the body molds for this car were supposed to have been taken from P1008. This car must have been tweaked because it was shorter on the left side than the right by roughly 1.25”. I’ve reduced this disparity to 5/8” now but that means the gaps on the left side of the front clip, just like the rear clip, are too wide and require filler work.
Here you see the beginning and ending shut-lines. The gap at the front of the door is 3mm and the top edge is 2mm. These are the minimum gaps to allow the opening of the door and still clear the clip.
IMG_5889_zps942e51eb.jpg

IMG_5905_zps69a5aed5.jpg

IMG_5879_zpsd7c6d236.jpg

IMG_5906_zps215ab246.jpg


I’m feeling pretty good about today’s results and am gaining more confidence in my bodywork skills.
Sure it takes me twice as long – or longer – than a professional, but when I think of how much progress was not made in the shop it was at for 4 years, well, I’m smoking through it at a pretty good rate!
 
Randy, part of the 'fit up' problem on virtually all cars with a glass spider results from the original steel spider having very slim 'A' pillars. It would be somewhat difficult to replicate the cross section form of the steel spider in f/glass so most replica mold builders end up fudging the w/screen opening and/or door profile slightly at this point to accommodate the fatter cross section reqd to give the f/glass spider some strength.

attached pic is a Gelscoe I think to give an idea of original, haven't found any close-up pics of original cars to see if they use a 'dress trim' in that area.
 

Attachments

  • 542.jpg
    542.jpg
    64.8 KB · Views: 617
Back
Top