My v8 mid engine project

Brief update

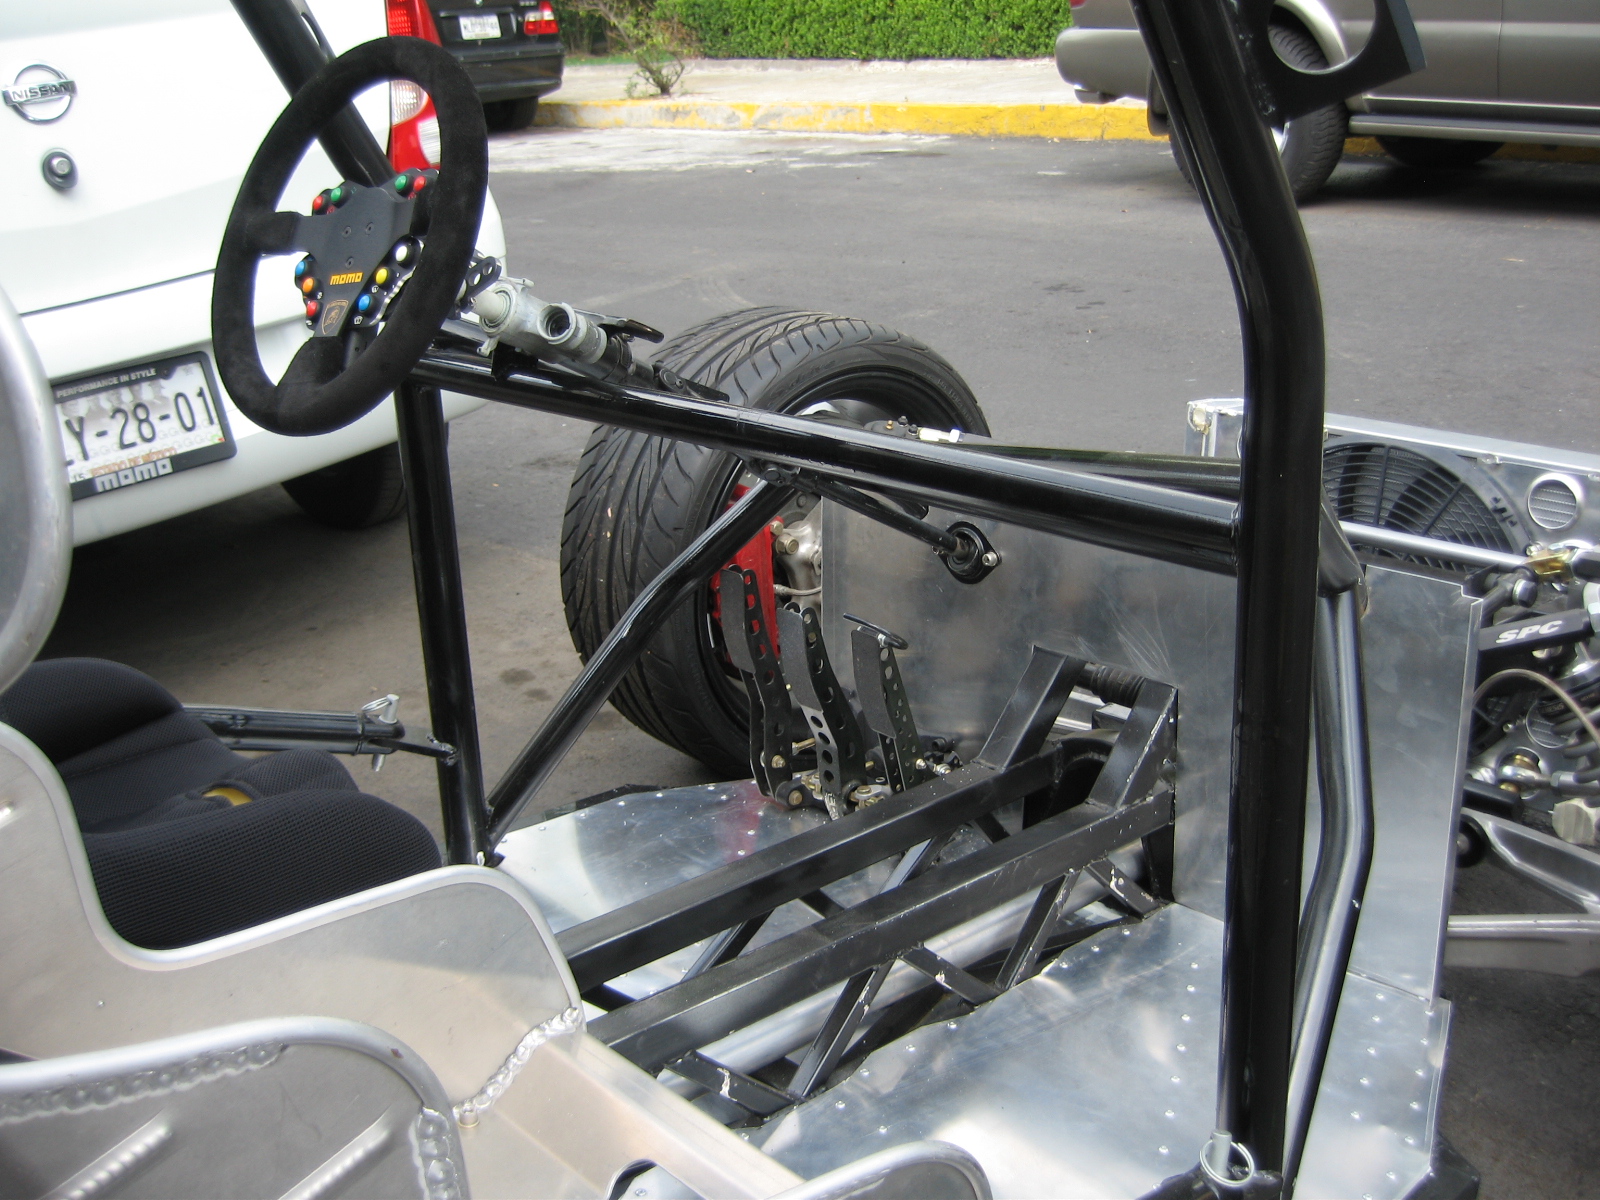
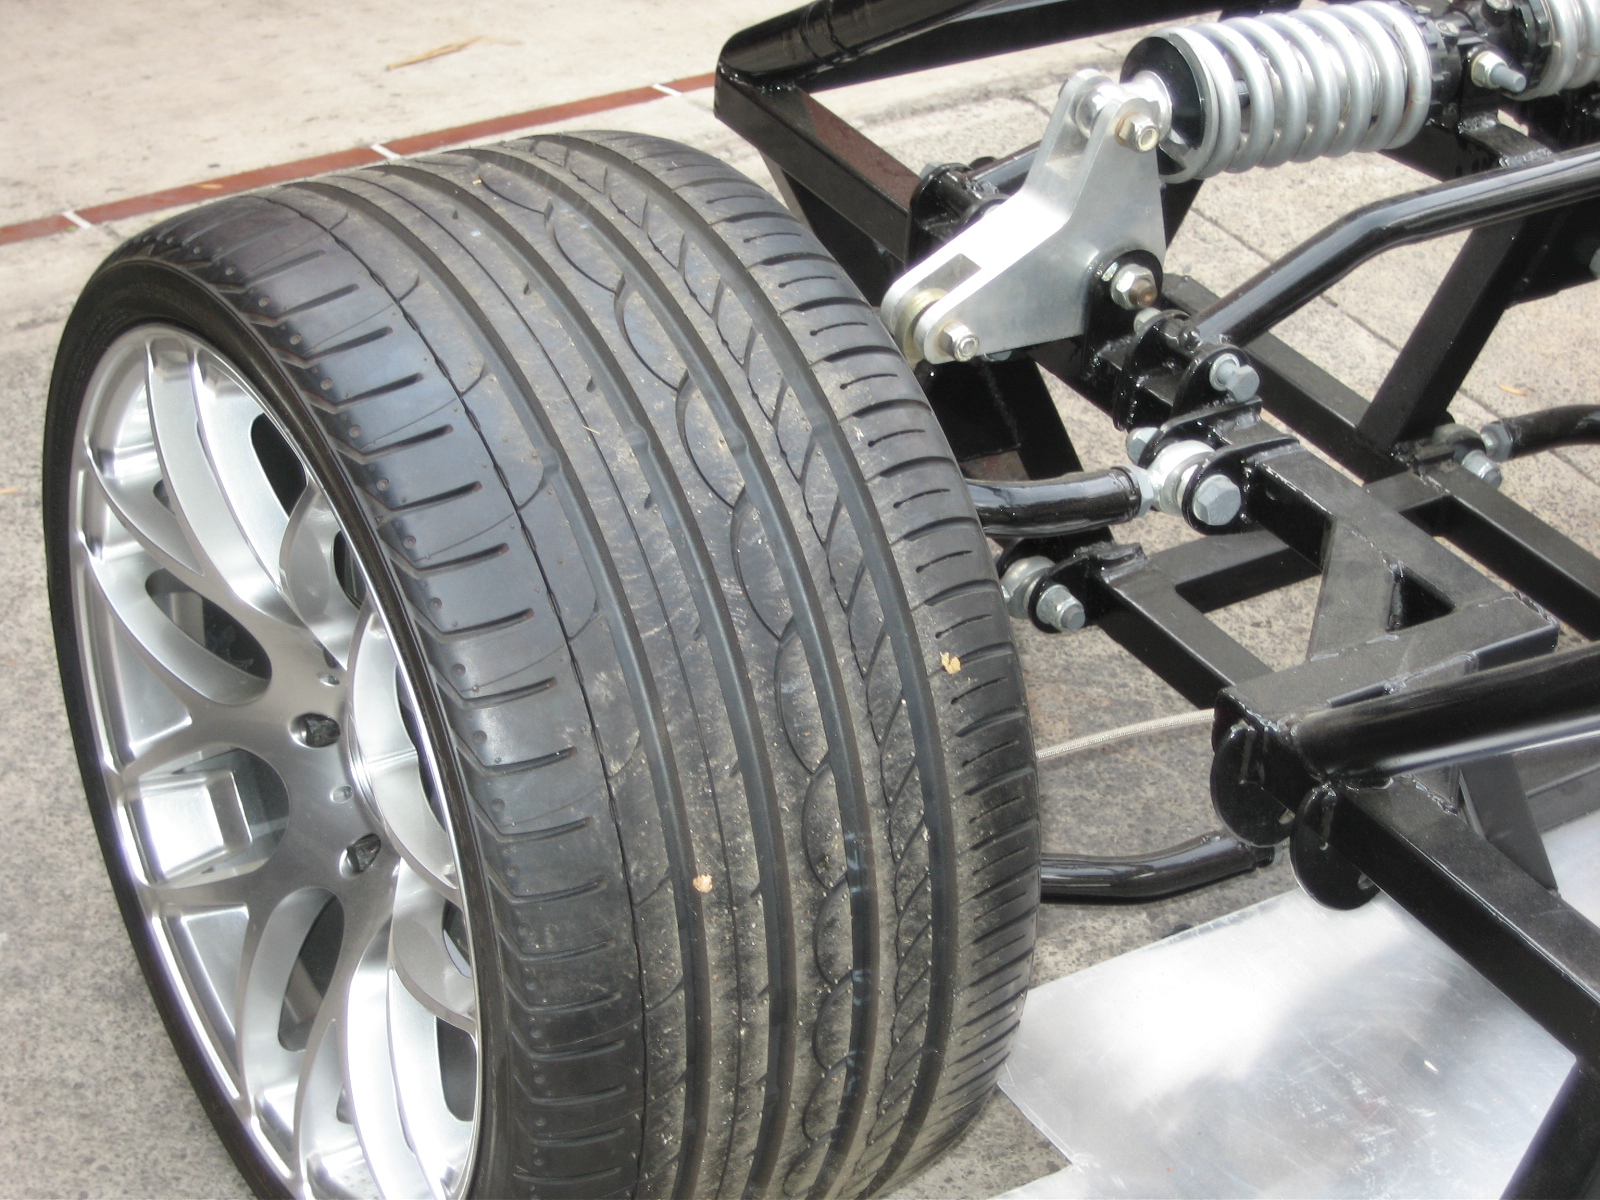
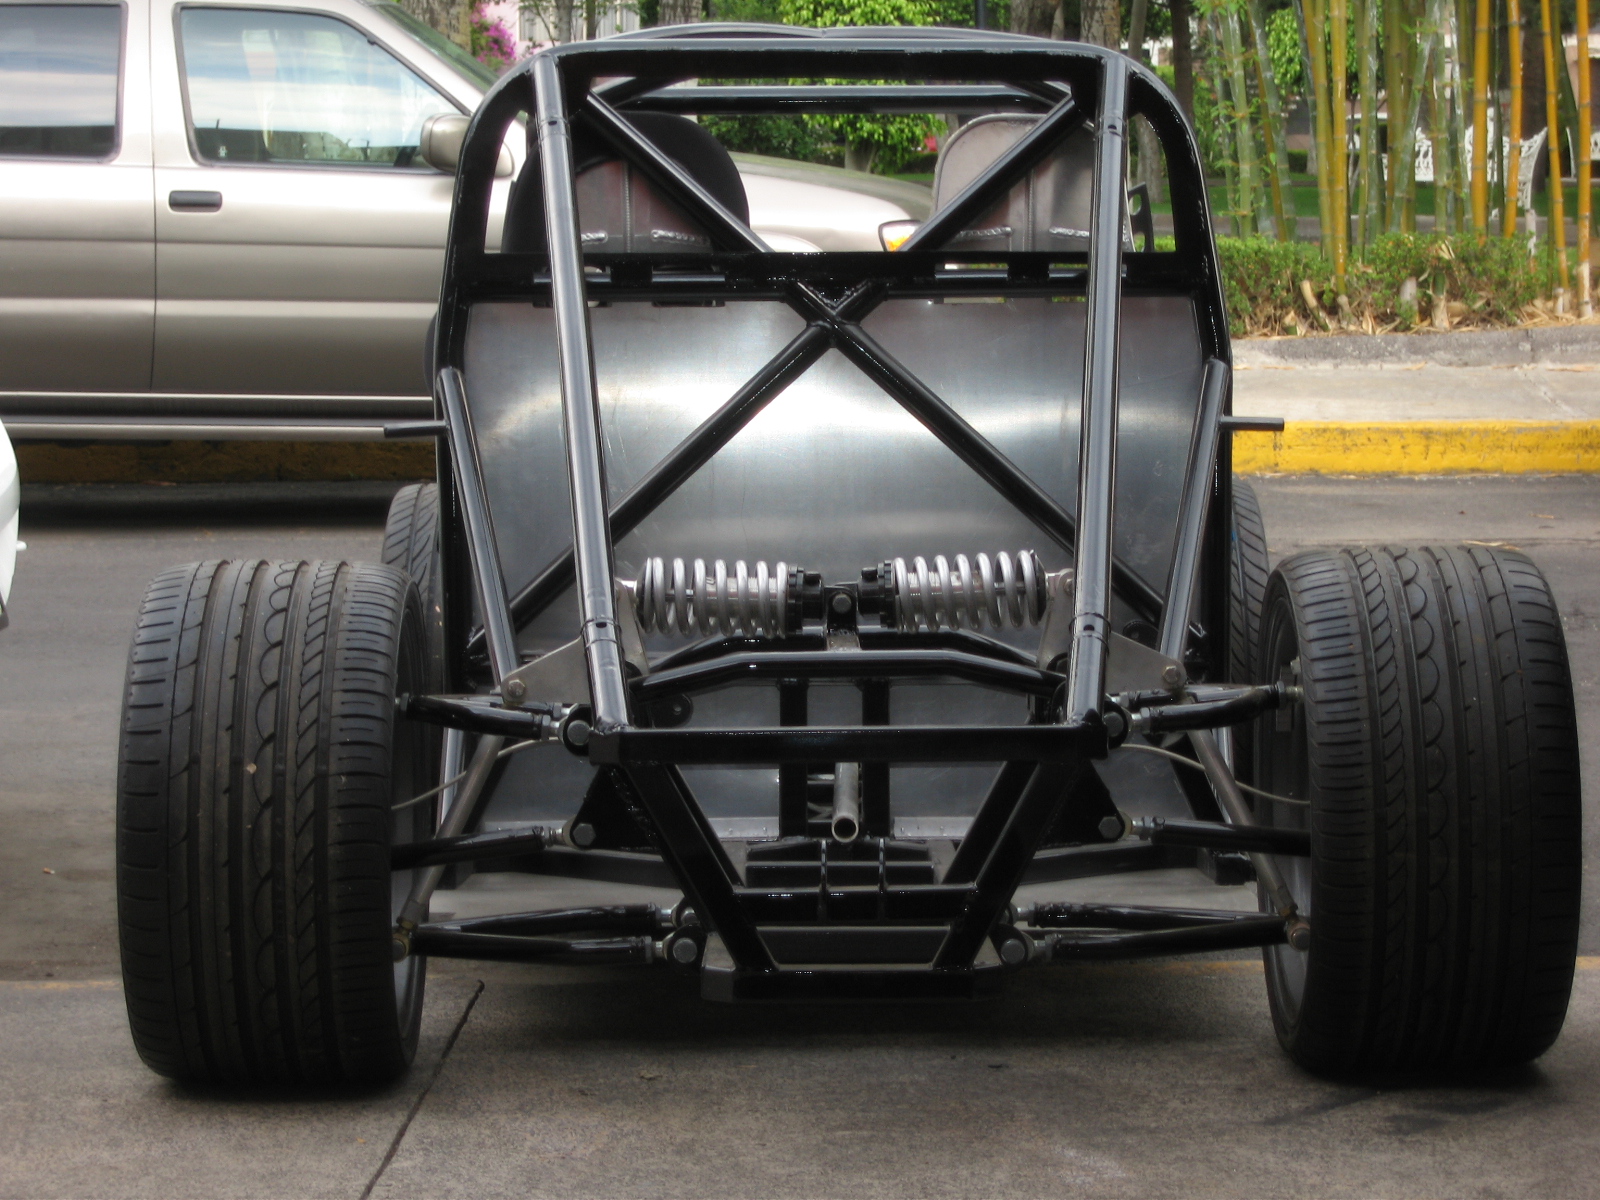
Now all major chassis metalwork is there or thereabouts. I still have some gusetting and cross bracing to do, but onwards I need to start thinking about suspension location and wishbones. I've found that the hubs were actually escort; so won't work. So I've sold them and am looking for some new cortina jobs.

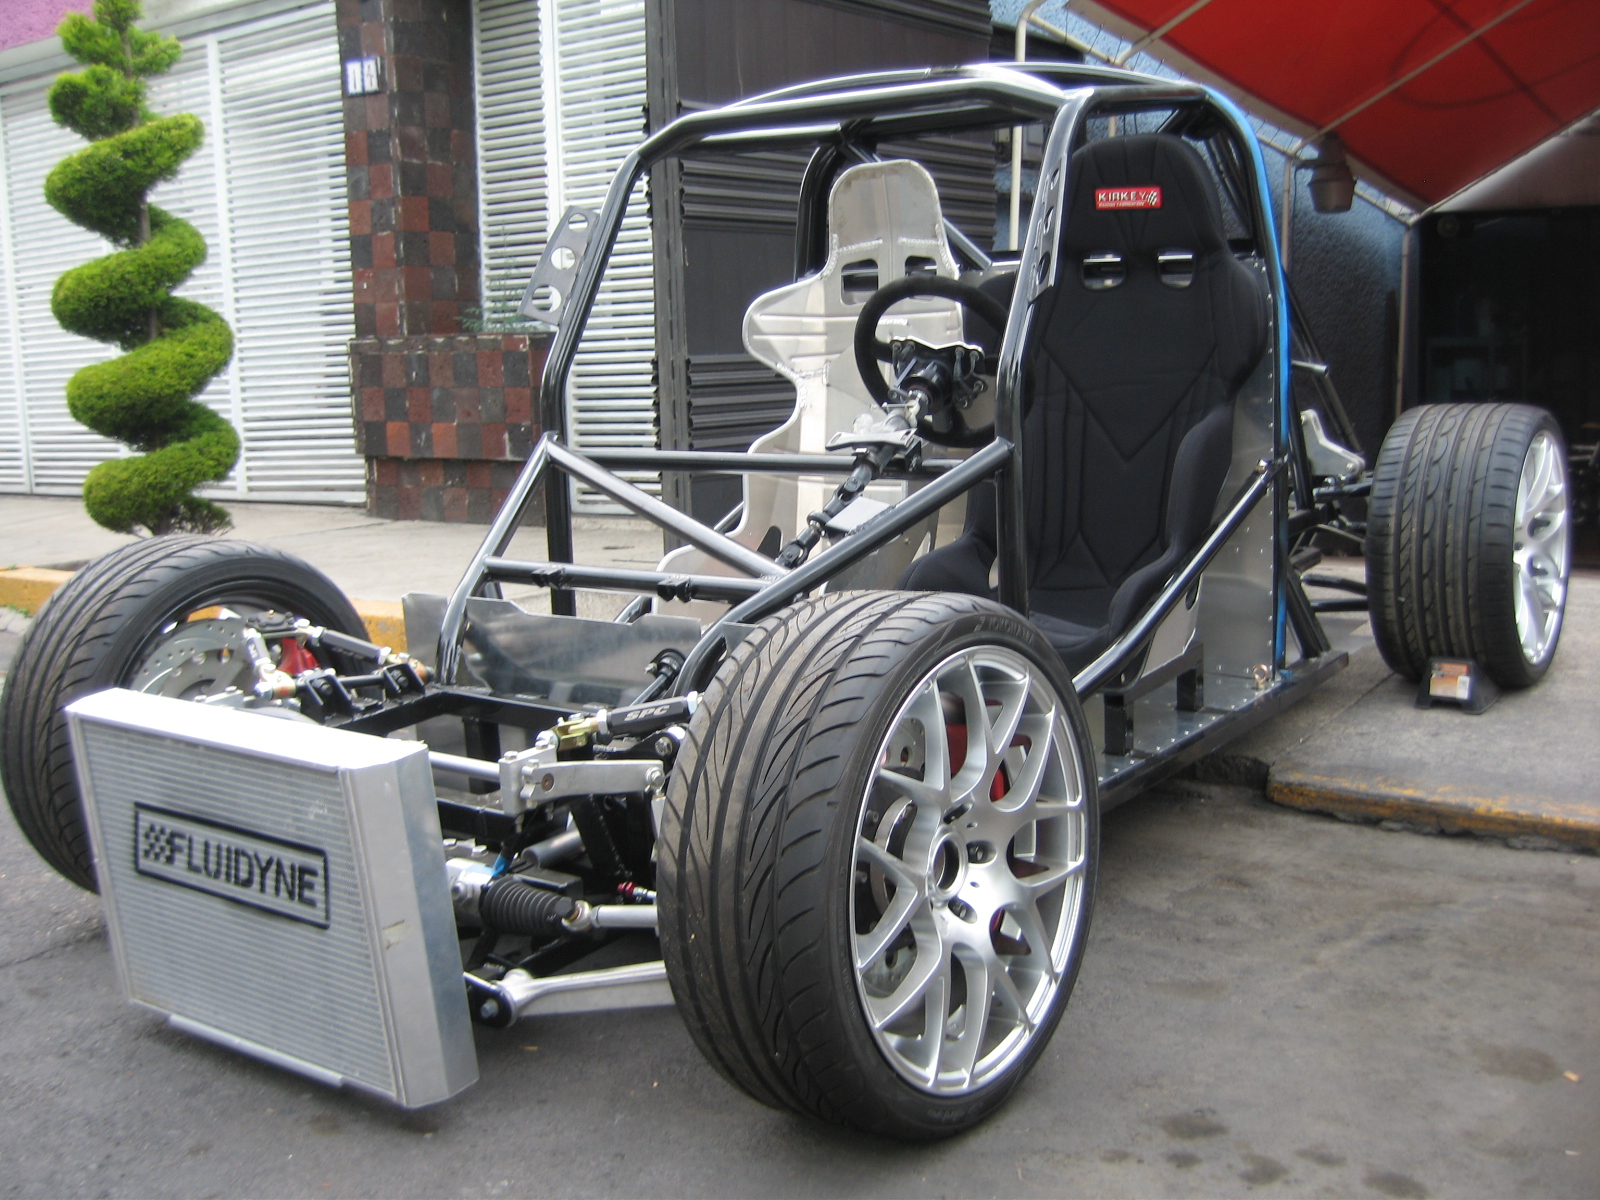
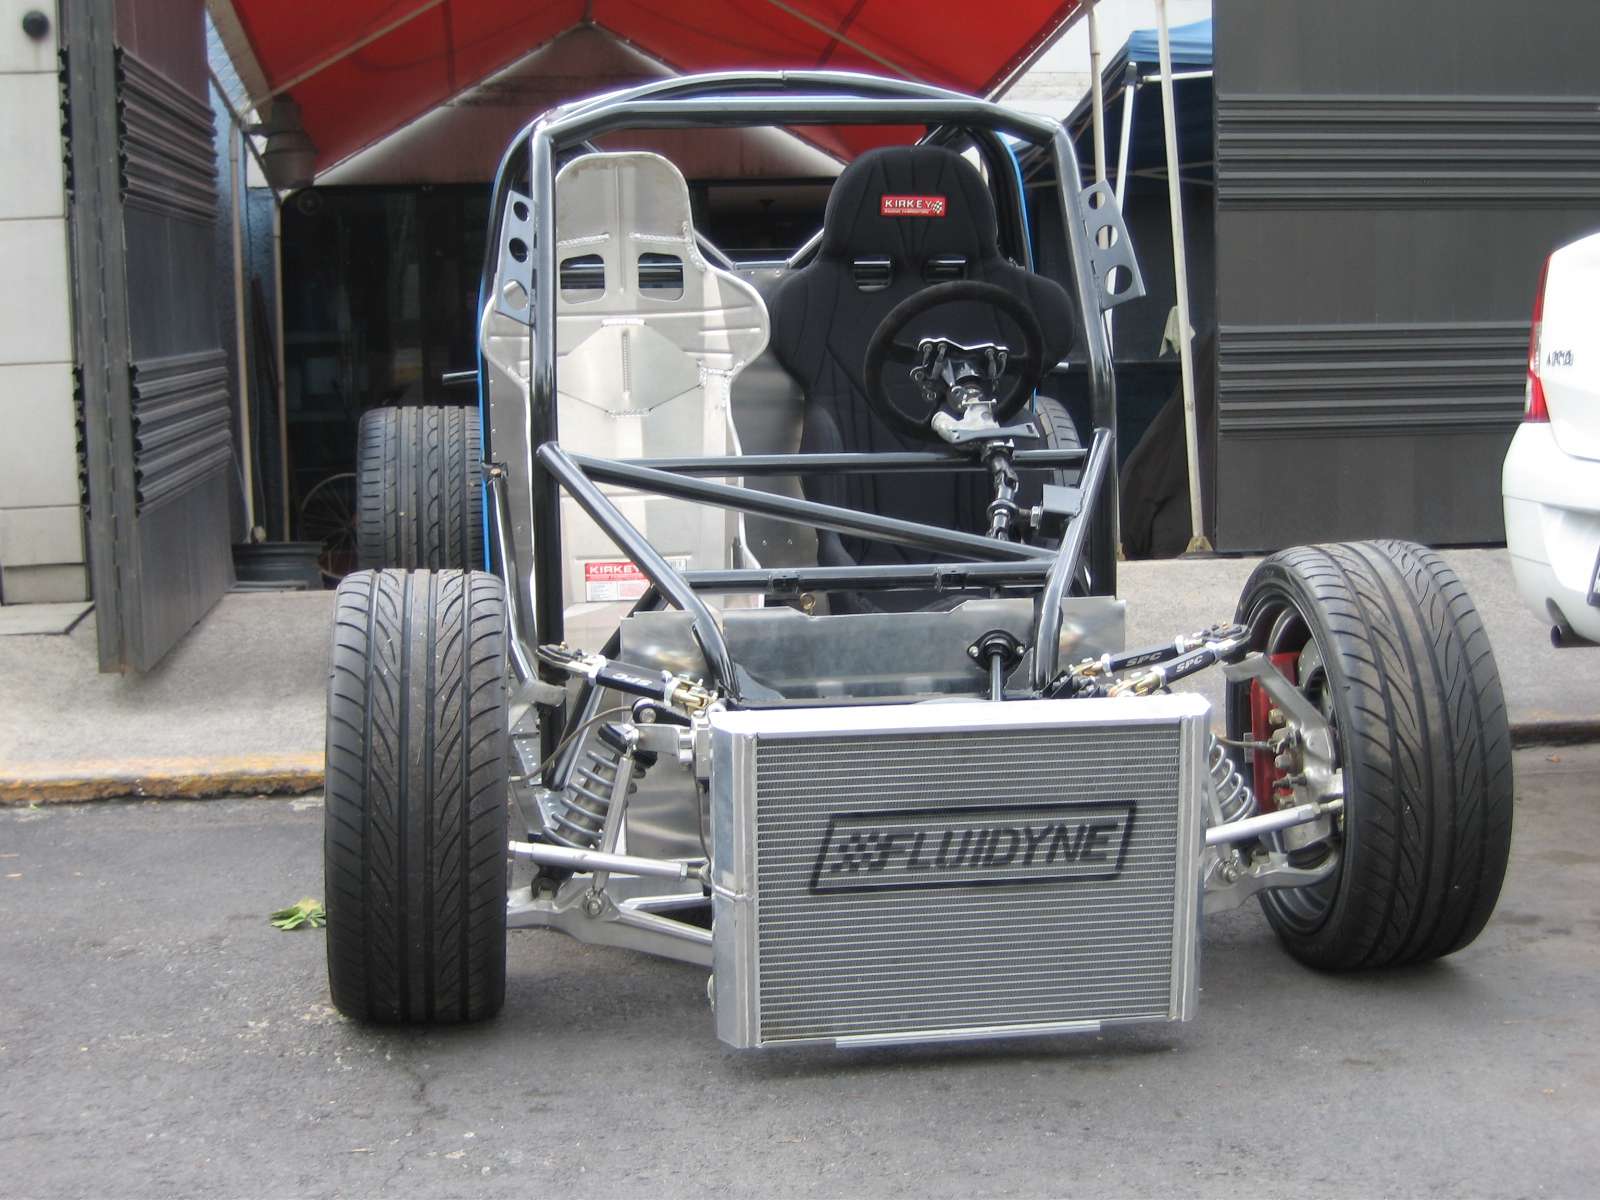
Some pics with the rollbar installed

8d196761741f03754fde9a27be53529a_zps88a32933.jpg

dc989e53651de2127f7f58c2a91db933_zps956fd578.jpg
 

Doug S.

The protoplasm may be 72, but the spirit is 32!
Lifetime Supporter
Cool project, Stephen!

My hometown area has a lot of dry creeks, sandy bottoms. Lots of folks welded up their own frames, but always with front engines. I get that you are very savvy with tech...the sand-rail crowd seems to be doing a lot of the same...except having not looked at their stuff for many years, it suddenly dawns on me that they were mostly rear-engined at that time. One of the guys used a GM350/TH400 in a mid-engine config, but he had to give up rear suspension for that and it was WAAAAY longer than you're fabbing up. Anyway, their stuff might be helpful, have you checked out their forums, too?

I'll be lost when y'all start talking suspension....but will follow anyway :thumbsup:

Cheers!

Doug
 
Thanks for your kind words Doug. It feels like I've achieved a lot, and learned a lot, already.
Suspension will be based upon ford cortina/taunus- which will be double wishbone front and rear. This means there won't be a conventional suspension strut with stub axle and hub, but a kind of floating upright and hub. Springs and dampers will be conventional eyed designs-likely avo. Most difficult bit will be arranging the rear driveshafts and rear uprights that I will have to fabricate from sheet steel.
It's been fun so far!
 
Very small update- although I spent a long time in the garage today :(

First job was easy- finish off the oil cooler adapter from the block- I drilled and tapped the Ali plate I made earlier for some jic -10 oil fittings and dowty washers- easy!

c194a3f7fff783b5669e5a21b44223fd_zps34497754.jpg


Next came the job of moving the engine and gearbox into the shed for trial fitting and making the engine mounts. Christ! This thing is heavy, and steps between the garage a shed didn't help!

Anyway, I got it into the shed and soon found that despite the measurements I took earlier, there are just some things you can't measure with a ruler and angle gauge! The water pump outlet and oil and water fittings were set to interfere with the chassis rails I'd made and used in the designs. Essentially I needed to move the chassis tubes out of the way entirely to get them away from the various fittengs and give myself a cats chance in hell of mounting the alternator on the other side. Out with the angle grinder and out with the main chassis tubes! Bugger......

f21fe779bf72a24df3ae705eeb384ba2_zps6832d1c9.jpg


I widened the chassis tubes and welded them in situ. Engine now sits much nicer than before and plenty of room for all the bits! A bit of a setback really.

Just enough time to re-try the engine. Hopefully this will be the view most people have when this things on the road!

27ef22dbda2c64f6b744ad9e74f8bfe9_zps20b84866.jpg


More updates soon.... Onto the suspension!
 
audi V engines sure are huge!
Have the v6 turbo myself, also mid engine to be.
what is the engine management you'll be using?
Look forward to seeing more on this!
 
Hey Hugo! Your project has been something of an inspiration to me! I'm a little way behind you now, but I'm continuing to be away at it.

I'm going to be using a pectel ECU, it's very comprehensive, more so than what I need, but nevertheless it's available.

So a little update.

Started on the wishbones; I've now finished the rear uppers and am now working on the rear lowers. Some pics;

43d8ab975abe458796429871c3e7b88d_zps9bf3d421.jpg


I've also had to rethink my engine mounts somewhat;

Front pulley clearance

473a8956e6e4a7189914aea5e42e713d_zps7b60c0e2.jpg


4045b66303197c8089bc2c23fc0a614f_zps425afb28.jpg


Engine mounts

7ac7db56627402d065a5e78493a1e65e_zps7c6c5e96.jpg

efea6c7622f383b6712c586318e19017_zpsa0dda23d.jpg

3dc40305b6441a71e476149d9276394a_zps5a17fd2c.jpg

64eedf305aa1d845bba8309c8a5fab2b_zpsa74e6bb0.jpg


Front susp brackets
31e76acfe9359fb834d293be0a5a884d_zps35e1024a.jpg

b10ac8e21cdb8392cb4c5207b2cfd939_zps80e9b40a.jpg


And rear- notice I've had to taper the rear upper chassis rails to clear the wheels! Hugo I have no idea how you've got yours to fit! Haha

0abe8cf1f0f414146d57ffbd2a3bde47_zps6193713e.jpg


529395c47b06574b62f92fcc4e81a30d_zps6f3831ca.jpg


Hugo what have you done about the alternator- did you relocate it?

Cheers
For your interest guys

Steve
 
Stephan in your second last photo I think I saw
a hacksaw whats that about don't you have a
grinder I have to many skinned knuckles to use
one of those enjoying your build log bloke
chris
 
Haha! It's not something I use often, I gave two grinders on the go. Only issue is every now and then there's a little cut needed that you can't quite reach with a grinder.... So out comes ol' faithful!

Thanks for your kind words fella, it's good encouragement!
 
Hugo what have you done about the alternator- did you relocate it?

Cheers
For your interest guys

Steve

The alternator are in stock position, I don't have a good picture of the mounts, and right now my engine it's out of the car.
This are the only pics of two of the three mounts. (I have one on the rigth side in front, near the alternator)

Rigth side mount:


Left side mount: (the left circle in the picture is when the third support mount but in this picture it's not bolted).

 
Nice progress Stephen.
Making chassis mods was a set back but worth it, nothing worse when you are done and you say to yourself " SELF" I should have sorted that but know its to late.

Everytime I look at your build I want to by you another shed, I get claustrophobic looking at it.
How are your neighbors handling the noise.

Well done.

Jim
 
Thanks Jim! You're welcome to come build me one! I'll even supply tea and biscuits.
A little more progress. Firstly I realised I hadn't shown you pictures of the shell....here she is:

cd22e57a769cd3ba80c80b3e3821b6e4_zps11f6bdf2.jpg


Tonight I stripped it and dropped out the floor- it's been 40 years since the floor was removed, so I was dreading what I was to find. But in general, very happy! A couple of bits of corrosion, but nothing I can't handle, and in general, very solid!

582d6228608c2b87398e638596485ae7_zpsfeca1406.jpg


78bd809bad3af589580768a68e0402cd_zpsac9b4856.jpg


Meanwhile, on the chassis, I mocked up the rear uprights/wishbones

b611824b2f4d94417b9961fe0b314ff6_zps09b241a4.jpg


And did the same the other side. I' going to have to have a good hard think about suspension setups, may be forced to go with pushrod due to the location of the driveshafts.

3aea820d1dc60939aeb7e89d00b63518_zps2324b804.jpg


f5c244230349d7ff235b6c8818014366_zpsbc4b3806.jpg


2165276fb1fbdbf67726ac878a101635_zps0f9130b7.jpg


Then I pulled the engine to get the chassis rolling and complete some welds-

19e3d24f4ac9fe536d924007194c3eba_zps324022ad.jpg


That's about it! Gotta get the chassis under the bug and have a look at fitment, then finish up the welding/bracing and prepare the chassis for powder coat.

Good progress I think!
 
Hi chaps,

Been a while since last update so I'll try and keep it breif!

So the time came to trial fit the shell on the chassis. Lots of problems! Long story short the designs to which I was building the chassis were well off, particularly in the front bulkhead area, so that got modified and cut out....

7F92B168-E42F-481B-B250-201B2081D2D0_zpslm3yyg3w.jpg


C5D01BFC-8517-4779-90E1-AEBA8DA83B97_zpsfjv9tmvg.jpg


Eventually got it all lined up and true......

C7C8911E-2351-4774-9070-A8DD3FA374B6_zpseepytd2w.jpg


E4D523B2-81EF-4DC5-932F-EC56B5D62321_zpsuazvgqr1.jpg


B8054F1B-7282-40F5-A8FA-243E9B0A6A92_zpsjxhewb6h.jpg


Then I made up an Ali floor and starter on the engine.... Clearly the engine had had a bit of valve/piston interference..... So rebuild it was!

C97E3DCD-755D-467D-8D87-79A1FFCE1AF6_zpsmbwmeemq.jpg


There were issues with the tunnel as well, and fitting the seats, so I had to re snuff true it, much lower and much narrower!

504CA1C4-FF77-47CC-8328-A010901551EF_zpsfiqs1bq8.jpg


3b6007f33d1da6ee77825114c843020f_zps5f6c8157.jpg


2A6340CC-54C6-463A-9940-69817208B35F_zpsbuf8kfcc.jpg


8cbe6a8f43ffc37fcb25b0252da1fe94_zpsfe3412bd.jpg


b8076c57f46ee445870654dad1cf6277_zpsa5c57ad0.jpg


45F7C0DE-AC44-4BBC-9A53-67FBE63B39B8_zpsrsiqig81.jpg


97ffdf344ddc7a89f0d043b9623fb119_zpsbdfd421f.jpg


B5536710-F67E-45AF-8E80-966EB7772B31_zpsjxcwokgz.jpg


90A088EB-BA07-43C2-8FDB-9C4EA6077BF5_zpsmrfmbu8k.jpg


6AFB1B71-30B7-4E28-B21D-D121C9B89E8A_zpspex7fhzs.jpg


BDC336EA-1CE6-4599-83F8-09E51C624848_zpsaseopxaw.jpg


493BD8D4-D9DC-4675-91F8-658C70DDE959_zpsli4uoyfk.jpg
 
What a great project!
Seeing what you are doing to a VW Bug make me wonder what is planned for that bicycle in the last photo.
 
Back
Top