Ohio MDA

Re: Let Jim have his own thread back

Well all,
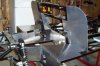
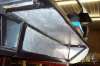
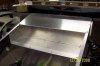
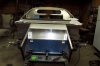
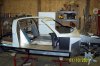
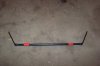
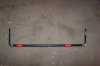
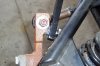
Not much to report here. I've been busier than a three peckered billy goat with work, and more importantly, the "Honey Do list". I am nearing completion on my extra curricular activities though, and hope to jump on the paneling in the next month. Winter is my best time for a project like this, but "you takes what you gets" when it comes to hobbies. I did get my Webbers delivered last month, but I don't want to build the motor until the car is further along. I think most all of my free time has been attempting to debug any assembly problems that may come up before I encounter them. You know, everyone gets them, they just suck when they stop progress. Well, hopefully I'll have a productive update soon. Wish me luck.
Jim
 
Well I've finally been able to get back on the band wagon and push with the paneling. I'll tell ya, I probably spent as much time looking at the job second guessing myself as I did working on it. I am, however, satisfied with my work and am progressing at a decent pace. I've had to modify things and add tweaks to get the results, but it worked.
 

Attachments

  • attachment angles.jpg
    attachment angles.jpg
    85.5 KB · Views: 434
The previous pic showed the attachment angles I had to make, the next two show the finished product of both sides.
 

Attachments

  • LF done.jpg
    LF done.jpg
    73.6 KB · Views: 447
The other side, I had to break the rear panel into two pieces to make it work. Man, this is difficult work, but I'm getting better at it.
 

Attachments

  • RF done.jpg
    RF done.jpg
    67.1 KB · Views: 426
Today, I spend 4 hours working on the engine bay paneling. I managed to get the next set of panels trimmed and fitted ready for rivets. That's the most progress I've made in such a short amount of time.
 

Attachments

  • LR panels trial fitting.jpg
    LR panels trial fitting.jpg
    91.9 KB · Views: 459
It's been a long time since my last post. I have made some progress, but with certain factors (economy, forever waiting on parts, reshuffling of my company direction), it's been hard to do much of anything. I'm always stepping cautiously as I don't want to make a move in the wrong direction. I have discovered that something will have to be done in the cockpit as I'm 6'1" tall and my head is higher than the roof. Fran at RCR is going to sell me a couple of Gurney bubbles, (I'll get those from you eventually Fran, if your reading this), but now I'm thinking of removing some of the floor panels and welding in a drop to the floor. I've seen this on some of the Series II MDA chassis, and I think it's the only way I'll be able to drive the car and see out the windsheild. I do have the ally paneling finished and have fitted the spyder in it's intended position. Next is to proceed with the remaining body panels and prep the fiberglass for fit a finish before moving on to the mechanicals.
 

Attachments

  • rearpanelright.jpg
    rearpanelright.jpg
    83.2 KB · Views: 284
  • right pontoon underside1.jpg
    right pontoon underside1.jpg
    81.8 KB · Views: 261
  • finished front bulkhead.jpg
    finished front bulkhead.jpg
    60 KB · Views: 257
  • front bulkhead panels, footwell cover 2.jpg
    front bulkhead panels, footwell cover 2.jpg
    64.1 KB · Views: 281
  • 100_0628.jpg
    100_0628.jpg
    50.5 KB · Views: 295
I've encountered some rough waters along the way that had to be smoothed out. I waited 3 years for new front anti roll bar blades that never showed so I had to cut them down and remake them to work. The origianls had way too much angle and conflicted with the tie rod ends and steering. Once cut apart and modified, they have a near 90 degree angle. They still need trimmed by about 1/2" to clear the shock spring but then they should be good. I also had to make (4) 1/4" shims to space my anti roll bar bushings away from the chassis to prevent the mounting bolts from squeezing the bushing and binding the roll bar. On the rear of the car, the brake caliper mounting brackets were machined incorrectly and pushed the calipers approx. 2 mm off center. Fortunately, a local machine shop was able to mill the necessary 2mm off the mounting face to get the calipers back in line.
 

Attachments

  • blades before mods.jpg
    blades before mods.jpg
    48.1 KB · Views: 254
  • blades after mods.jpg
    blades after mods.jpg
    48 KB · Views: 271
  • left steering left sway bar conflict 3.jpg
    left steering left sway bar conflict 3.jpg
    71 KB · Views: 281
  • left steering left sway bar conflict 4.jpg
    left steering left sway bar conflict 4.jpg
    71 KB · Views: 295
  • left rear caliper 3.jpg
    left rear caliper 3.jpg
    19.1 KB · Views: 270
I should note here, I haven't order the Gurney bubbles from Fran yet. After reading my post one might assume I've ordered parts from RCR and haven't recieved them yet. Not the case. My waiting on parts is purely a reference to the original parts ordered from MDA. I know how firestorms get started here and don't want to see another one flare up.
 
Back
Top