

You are using an out of date browser. It may not display this or other websites correctly.
You should upgrade or use an alternative browser.
You should upgrade or use an alternative browser.
Sabre #???
- Thread starter llarsen
- Start date
/ubbthreads/images/graemlins/grin.gif /ubbthreads/images/graemlins/grin.gif /ubbthreads/images/graemlins/grin.gif
I can't wait to see the transaxle... /ubbthreads/images/graemlins/ooo.gif
Hersh /ubbthreads/images/graemlins/smile.gif
I can't wait to see the transaxle... /ubbthreads/images/graemlins/ooo.gif
Hersh /ubbthreads/images/graemlins/smile.gif
Paul Thompson 'Hooligan'
Admin
or the starter for that matter!! /ubbthreads/images/graemlins/grin.gif
Pete McCluskey.
Lifetime Supporter
It has a kick starter doesn't it?
Hey Lynn,
How is it going putting that new painted body back together? /ubbthreads/images/graemlins/grin.gif Are you going to have someone do the interior or are you going to attempt it like I did?
Hersh /ubbthreads/images/graemlins/smile.gif
How is it going putting that new painted body back together? /ubbthreads/images/graemlins/grin.gif Are you going to have someone do the interior or are you going to attempt it like I did?
Hersh /ubbthreads/images/graemlins/smile.gif
Lynn Larsen
Lynn Larsen
Hersh,
They have done much of the interior now. I think I would have done as good or better of a job as they did. In fact, I could say that about most of the work short of the actual paint spray.
Indeed, I am thinking about contracting my build services out on a VERY limited basis, if anyone is interested. Here is my logo:
Attachments
Well Lynn,
If the services performed are as good as that logo then they will line up at your door. /ubbthreads/images/graemlins/wink.gif /ubbthreads/images/graemlins/grin.gif /ubbthreads/images/graemlins/grin.gif /ubbthreads/images/graemlins/grin.gif
Hersh /ubbthreads/images/graemlins/smile.gif
If the services performed are as good as that logo then they will line up at your door. /ubbthreads/images/graemlins/wink.gif /ubbthreads/images/graemlins/grin.gif /ubbthreads/images/graemlins/grin.gif /ubbthreads/images/graemlins/grin.gif
Hersh /ubbthreads/images/graemlins/smile.gif
Lynn Larsen
Lynn Larsen
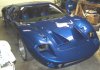
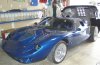
My car is back home in my garage at long last. After over a year at the paintshop, I would rate the paint job as good. Some of the panels aren't as flat as I would have liked them, there is some ooze from cement used on the windshield, although, I am very happy with the gasket that was used: it is just wide enough to cover the gap and being narrower than many I have seen is very unobtrusive. The windshield had a fairly narrow black out strip around the complete periphery - some I've seen had an inch or better black out along the bottom - and the unpainted, unfinished edge of the fibreglass can be seen around the bottom and two sides. I suppose I'll have to carefully black that out with a pinstriping brush or something. Gaps are much better than I expected: they are narrower and more even than I thought they would be. I do seem to have some Dzus line up issues that will need to be tweaked.
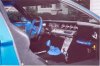
The interior work is OK, nothing to write home about. The dash is vinyl covered and, again, looks OK except for the trim piece they put along the face of the top vertical edge. I know this is the hardest part of the dash to get right and this is probably the worst looking part of the car.
If this job had been reasonably priced I would probably say that overall, I am satisfied. However, that wasn't the case, so at best I would rate my favorability at neutral. I am just thrilled to have the car back in my hands and felt as though I was paying a ransom when I made out the final check to them last night.
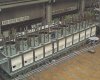
Now I have to correct many things that kind of went to hell while over there: rusty sway bars, rusty adapters between the tranny flanges and the half shafts, dead battery. One thing that really surprised me is the amount of rust through I am seeing on the Jet-Hot coated headers. This isn't the paintshops problem, but I think I am going to contact Jet-Hot about it because in some places it is more than just some orangish freckels. I noticed in the intial bend of #4 that it looked down right bronze rather than silver. There are also numerous fasteners that they lost along the way that will need to be replaced. I sent the mounting hardware for the side mirrors so they could drill out the holes prior to painting. They did drill pilot holes, but didn't drill them to size and lost the hardware as well! Very unprofessional lot!
I am also going to powder coat all of the suspension pieces before I do the final alignment. I had painted them with an aluminized paint, but they had gotten nicked up over the course of the build. They didn't look bad until the body got painted, now they stick out like sore thumbs.
Hope to post some pics soon,
Lynn
The interior work is OK, nothing to write home about. The dash is vinyl covered and, again, looks OK except for the trim piece they put along the face of the top vertical edge. I know this is the hardest part of the dash to get right and this is probably the worst looking part of the car.
If this job had been reasonably priced I would probably say that overall, I am satisfied. However, that wasn't the case, so at best I would rate my favorability at neutral. I am just thrilled to have the car back in my hands and felt as though I was paying a ransom when I made out the final check to them last night.
Now I have to correct many things that kind of went to hell while over there: rusty sway bars, rusty adapters between the tranny flanges and the half shafts, dead battery. One thing that really surprised me is the amount of rust through I am seeing on the Jet-Hot coated headers. This isn't the paintshops problem, but I think I am going to contact Jet-Hot about it because in some places it is more than just some orangish freckels. I noticed in the intial bend of #4 that it looked down right bronze rather than silver. There are also numerous fasteners that they lost along the way that will need to be replaced. I sent the mounting hardware for the side mirrors so they could drill out the holes prior to painting. They did drill pilot holes, but didn't drill them to size and lost the hardware as well! Very unprofessional lot!
I am also going to powder coat all of the suspension pieces before I do the final alignment. I had painted them with an aluminized paint, but they had gotten nicked up over the course of the build. They didn't look bad until the body got painted, now they stick out like sore thumbs.
Hope to post some pics soon,
Lynn
Lynn,
At least you are back in control. I know that once you get all these small things done you will drive your GT and all those negative things will melt away. When I was there and saw your car I was really impressed with all the work you did. Building a Sabre is three times harder than any of the other kits. You had no company for support and probably not much of an instruction manual. All I know is that you will straighten out those small issues to your liking and then enjoy your GT. I look forward to seeing it someday.
Hersh /ubbthreads/images/graemlins/smile.gif
Lynn Larsen
Lynn Larsen
Tim,
I don't know what to tell you. I had been very happy with the Jet-Hot until I crawled under and saw the discoloration that is showing up in the high heat areas (near the flanges and the outside of the first few curves.) Had I been able to polish the headers as they suggest (aluminum polish) perhaps this wouldn't have happened at all. And maybe it will polish out. I didn't get a chance to call them today; we're in the 4ht quarter and it was like half of IBM just found out my name today! I am beat right now.
Anyway, I'll post what they say when I do talk with them. If you do talk to them, I'd be interested in what they say to you.
Regards,
Lynn
Lynn Larsen
Lynn Larsen
Hersh,
Thanks for the kind words. It has been an experience that is for sure. I'll post picures as soon as I get everything put back on the body. I am very happy with the Bright Island Blue color; albeit a Ford color I really like how it ranges from a dark blue as in my avitar to light blue depending on the lighting. It also has a very deep appearance to it thanks to heavy pearlescents and the very fine metallics.
They did have a time getting the windshield gasket on. They said that this windscreen (sourced from Dan White and made in South Africa) was much thicker than your normal windshield. That is good to know since it is taking a little of the droop of the roof had. This happened as a result of the spyder being a little streched out because of the ambiguity in where the scuttle panel should be attached to the cabin nose inclosure. The scuttle panel and spyder are in two pieces which are bonded together during construction and I think there may have been a little shrinkage as the bond cured that contributed to the bottom of the windscreen frame being strectched inperceptably forward which in turn pulled the front edge of the roof down slightly (<1/2".) The roof was pulled up and reinforce on the underside, but there is still a little flex being held by the windscreen.
Regards,
Lynn
Lynn Larsen
Lynn Larsen
Lynn Larsen
Lynn Larsen
Lynn Larsen
Lynn Larsen
They are Vitaloni Californians that Racer Parts Wholesale used to carry for around $20. I don't think they carry them anymore though.
Lynn
Lynn
Tim Kay
Lifetime Supporter
Boy, that's twice in two days /ubbthreads/images/graemlins/shocked.gif
Yesterday I inquired with Paul Durban, currently selling his Tornado on Ebay, which mirrors he had mounted. Coincidentally, he also used the Vitaloni Californians purchased from Demon Tweeks, UK. /ubbthreads/images/graemlins/grin.gif
I checked Demon Tweeks website and it appears they still carry them.
These sure caught my eye, if sometime in the future your shooting pics, send me a couple of the mirrors up close from different angles /ubbthreads/images/graemlins/cool.gif
Lynn Larsen
Lynn Larsen
Update:
I am transitioning from the cabin to the front clip area on my post paint rebuild. This does not include aesthetic improvements that I will be making later, after the car is registered and on the road. The year at the paint shop has clearly pointed out all of the parts that need to be removed and powder coated. All of the suspension links, half shaft adapters, sway bars and a number of other bits that look sorely out of place with their new orangish patina") .
.
I am very pleased with the Ford Motorsports sill plates that I installed. Although they were made for '70/'80 Ford F150s, they really add a nice touch to the sills with the FMS logo and provide something for the weatherstripping along the bottom of the door to seal against. I had to build the sill up 7/16" to accomodate the lip on the polished SS sill plates. To do this, I found an inexpensive material that is readily available. It is 1/16" thick and comes in 4'x8' sheets and is a fiberglass/polyester composite used for lining bathroom walls inexpensively. (You'll probably want the flat stuff, not the textured variety It is very easy to mill/shape and can, obviously, be laminated to provide most any thickness. Its flexibility made it very easy to fit into place while having lips that went under 'in place' parts. Two narrower strips along the outside edge also provided a nice pocket for the carpeting to go under the edge of the sill plates while providing a stable base for them when they are bonded into place.
I was agonizing over a seal from the sill plate up to the windshield and just behind the door hinge; should it be metal, composite, or what?? I was in the process of shaping pieces of my composite sheet to laminate, when my neighbor brought over a piece of high density, closed cell ?latex? foam that he had used as tie down fenders on his boat (where rope went over the edges.) He told me that with all of the squishing and rubbing that the ropes inflict on the stuff, it always bounces back and shows virtually no marks. So using the templates I had created for this space (took ~5 to get it to perfectly profile the shape of the inner door just behind the hinge) I carved a couple of pieces from 2" thick blocks using an electric carving knife. The supplier only had this stuff in white, but the new "plastic" paints seem to have enough flexibility to allow them to deform without the paint chipping off. (Time will tell the full story on this.) The foam is stiff enough and there is enough profile variation under the edge of the dash that I have not had to bond or mechanically attach the "seals" at this point. They obviously do a great job of sealing this space, which will otherwise duct air, and whatever it's carrying, from the front wheel wells directly into the cabin.
Regards,
Lynn
I am transitioning from the cabin to the front clip area on my post paint rebuild. This does not include aesthetic improvements that I will be making later, after the car is registered and on the road. The year at the paint shop has clearly pointed out all of the parts that need to be removed and powder coated. All of the suspension links, half shaft adapters, sway bars and a number of other bits that look sorely out of place with their new orangish patina
.I am very pleased with the Ford Motorsports sill plates that I installed. Although they were made for '70/'80 Ford F150s, they really add a nice touch to the sills with the FMS logo and provide something for the weatherstripping along the bottom of the door to seal against. I had to build the sill up 7/16" to accomodate the lip on the polished SS sill plates. To do this, I found an inexpensive material that is readily available. It is 1/16" thick and comes in 4'x8' sheets and is a fiberglass/polyester composite used for lining bathroom walls inexpensively. (You'll probably want the flat stuff, not the textured variety
It is very easy to mill/shape and can, obviously, be laminated to provide most any thickness. Its flexibility made it very easy to fit into place while having lips that went under 'in place' parts. Two narrower strips along the outside edge also provided a nice pocket for the carpeting to go under the edge of the sill plates while providing a stable base for them when they are bonded into place. I was agonizing over a seal from the sill plate up to the windshield and just behind the door hinge; should it be metal, composite, or what?? I was in the process of shaping pieces of my composite sheet to laminate, when my neighbor brought over a piece of high density, closed cell ?latex? foam that he had used as tie down fenders on his boat (where rope went over the edges.) He told me that with all of the squishing and rubbing that the ropes inflict on the stuff, it always bounces back and shows virtually no marks. So using the templates I had created for this space (took ~5 to get it to perfectly profile the shape of the inner door just behind the hinge) I carved a couple of pieces from 2" thick blocks using an electric carving knife. The supplier only had this stuff in white, but the new "plastic" paints seem to have enough flexibility to allow them to deform without the paint chipping off. (Time will tell the full story on this.) The foam is stiff enough and there is enough profile variation under the edge of the dash that I have not had to bond or mechanically attach the "seals" at this point. They obviously do a great job of sealing this space, which will otherwise duct air, and whatever it's carrying, from the front wheel wells directly into the cabin.
Regards,
Lynn
Lynn Larsen
Lynn Larsen
Similar threads
- Replies
- 0
- Views
- 811
- Replies
- 11
- Views
- 964