Walter's RCR40 Build

Time for a little update on the state of affairs:

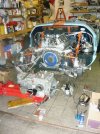
My early ZFQ box was factory refurbished (new synchros, ring and pinion, …) and upgraded (pretty much to current specs I was told) and mated with engine and new clutch (SPEC Stage 2).
This unit was installed back into the chassis. The water pump was modified: outlet to the heater was plugged externally and internally, and the thermostat was removed. As a consequence the radiator circuit is used permanently and there is no more pressure to the header tank which is connected to the water pump via the heater inlet. With the water pump, alternator, AC compressor etc. removed removal and refitting of the engine-gbx unit is fairly simple (no need to remove the rear wheels, rear floor, springs, etc. ).
The exhaust system (now with ceramic coating) was fitted.

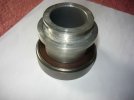
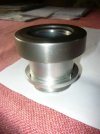
Fluids were filled (engine primed with oil, 5W50 was used). Injector seals needed renewal (some leaked fuel). Engine fired right up but zero oil pressure indicated by the gauge). So the oil pressure was measured at the sender location: read fine and also from the gauge thereon. However a first short test drive showed oil pressure problems with symptoms similar to before the rebuild: pressure dropped from reasonable to about 10 psi within about 15 min of driving. After several tests the oil cooler circuit was identified as the culprit. The oil thermostat was eliminated and new oil lines were installed. This fixed the oiling problem entirely (~100psi at idle when cold, about 50psi when hot with the red Katech oil pump).

Two more problems were found: one of the race kats had disintegrated blocking one exhaust pipe. Exhaust was freed and the internals of the other kat were removed to protect the engine for now. Car drove home without problems - had to refrain from speeding though ;-) .
New kats will need to be installed before I take the car to the annual inspection. Finally, the gearbox would not take reverse (and first, as I found out later). A slightly loose bolt at the first joint was identified as the culprit. All well now.

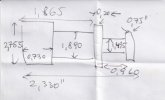
With both seats out I removed the front bracket/cover holding the hand brake lever to learn about the feasibility of hand brake adjustment. Will continue on over the weekend time permitting.


P1010596 (1).jpegP1010597.jpeg
 
2 new Magnaflow 599560910 CATs were installed and I passed emission inspection (< 0.3% CO) no problem.
The CATs are made of a soft material which turned out to be difficult to weld. The CATs will be ceramic coated this week. Found a minor but potentially dangerous fuel leak on a fitting to the rhs fuel filter - my small hands helped me to tighten the joint without having to remove more than one fuel line ;-) .

Next up is further improving upon heat management in the engine bay. HJS offers mufflers with integrated CATs. This may let me do away with the exhaust loop from cat to muffler and out to the rear. the long path for the exhaust fumes and the large surface area, combined with the proximity of the mufflers to the clam shell, act like a heater coil. Another thought is to simply add CATS to straight end pipes. May be too loud?
 
Small but useful progress in developing the car:

I installed 2 air vent hoses into the pedal/foot area of the car to assist cooling the interior. The air is taken from part of the side vents in the nose - the other half being used to cool the brakes. I fitted a sheet of foam above the radiator to force more air into the latter.

Also I made the first oil change after rebuilding the car. Old oil looked healthy. I used about half of the oil in 5W30 and the other in 10W60 (of the same brand oil). I did not want to use 5W30 only, as recommended for the LS7 crate engine.


Also I had a problem with an erratic starter. Long story short: the terminal post for the solenoid wire was loose. Indeed, the wire connection to the inside of the starter was torn, most likely by turning the post while tightening or loosening the nut for the outside cable. Unfortunately, this post is simply pressed into an isolated hole in the starter housing. With my Depstech camera I could explore the inside of the solenoid housing near the post hole and saw a wire tab. I then soldered a wire strip (a short piece of copper brush wire from my Scalextrics toolbox) to the inner tip of the post and carefully inserted it in the proper direction and pressed it into position after I had reattached the solenoid wire. Luckily the starter works again.
So the lesson is: with the Powermaster 9503 XS Torque starter always fix the counter nut with a wrench when removing the lock nut for the wires. Not easy due to space restrictions. In any case, I ordered a new starter to hopefully have it sit on the shelf for a very long time. The new starter now has a yellow tag: ``do not over-tighten the lock nuts” or so.

Other than that (and before this work) I drove the car to the Ventilspiel 2023 event at the Red Bull Ring. There were 3 GT40s on track: 2 CAVs and one GTD (I believe) - all running well. My personal favourite, however, was a Brabham BT36. Wish I had known it had been up for sale recently.
P1010604.jpegP1010605.jpegP1010599.jpeg
 
Last edited:
next problem just as I thought I was in business /-: Had a fun drive over the Alpl pass - formerly known for an annual hill climb event.

Clutch fork shaft on the ZFQ sheared right off. Fortunately it happened at a parking lot as I wanted to take off to return home - pedal traveled in freely - first I thought I had missed it.... took the train home, taking the opportunity to obtain a senior citizen discount card, and returned with a trailer.P1010609.jpeg
Time to pull the ZFQ once more...

The tow hook definitely was the most useful upgrade I've made on this car!
 
Last edited:
ZFQ box is out. The new shaft is fitted (was told the shaft which broke is not of Quaife origin). The new one has splines but no grooves for the locating bolt. Which is good because the old rod sheared at the innermost of 3 grooves. I may have to slightly shave the splines to fit the locating bolt. In any case I'll carefully measure clutch lever free play and push rod length. I'll use a modified E-Type adjustable clutch push rod. Finally clutch pedal travel will be set.
Along the way I found a CV boot torn at the lip of the flange, both of which will be replaced. Removing the half shafts gave me better access to the back floor mounting bolts anyway. I also found a little bit of play in 2 of the CV joints. I'll order a set of up-rated Porsche 930 CV joints + boot kits to be mounted should play in the current CVs increase.
 
Clutch release bearing:
Since I had the opportunity I took a closer look at the clutch release bearing and the hub it's pressed on. The release bearing size is OD=70mm, ID=40mm, H=18.5mm (40x70x18.5) - my measurement converted from inch. Locally, I could only get a sealed regular bearing 40x68x15 (SKF 6008-2RS1). Several hours of searching the net for a suitable release bearing and I found Sachs 1863 600 127 (40x75x18.4) which will fit. (Also close is 40TNK20 40 x 70 x 17,90 mm used in a Mitsubishi GS200 tractor.) I ordered a Sachs to go with my next clutch replacement.
Before mating the ZFQ to the bell housing I measured release-bearing to clutch-finger distance. It came out at a near perfect 0.172" (4.3mm) for a single disk clutch. I verified clutch movement using the service windows on the bell housing and my Depstech "eye".
I attach a few photos of the release bearing unit and a sketch of its dimensions in inch. Maybe helpful for someone who uses an LS7/ZFQ bell housing/ZFQ unit with external slave cylinder. Certainly good for my own records ;-)
 

Attachments

  • P1010615.jpeg
    P1010615.jpeg
    27.9 KB · Views: 95
  • P1010617.jpeg
    P1010617.jpeg
    37.4 KB · Views: 105
  • P1010618.jpeg
    P1010618.jpeg
    102 KB · Views: 108
  • BOB-RB copy.jpg
    BOB-RB copy.jpg
    30.3 KB · Views: 128
First two outings this year. After clutch fork rod replacement and installation and set-up I noticed that the slave cylinder was seeping fluid. So half-axle came out again and the cylinder was rebuilt. Along the way I replaced the lhs axle boots/bellows with performance boots from the Driveshaft Shop - one was cracked. I also made a new clutch push rod to gain in thread interference. After some difficulty in bleeding the system I found that I had to tighten the bleed screw a bit more than I normally would.
Alas, a short test drive ended with a tow home - thanks to my friend Toni. ``No power" turned out to be a loose wire connector. A non-working speedo was due to too wide a gap between sensor an drive shaft bolt heads. Gap should be about 2mm. Now all seems well except for a slightly ``jumpy" throttle - will have to investigate.
Next up is the installation of a simplified exhaust system - straight pipes with custom integrated CAT-muffler system. I hope this will let me do without fans in the engine bay.
 
Clutch release bearing:
Since I had the opportunity I took a closer look at the clutch release bearing and the hub it's pressed on. The release bearing size is OD=70mm, ID=40mm, H=18.5mm (40x70x18.5) - my measurement converted from inch. Locally, I could only get a sealed regular bearing 40x68x15 (SKF 6008-2RS1). Several hours of searching the net for a suitable release bearing and I found Sachs 1863 600 127 (40x75x18.4) which will fit. (Also close is 40TNK20 40 x 70 x 17,90 mm used in a Mitsubishi GS200 tractor.) I ordered a Sachs to go with my next clutch replacement.
Before mating the ZFQ to the bell housing I measured release-bearing to clutch-finger distance. It came out at a near perfect 0.172" (4.3mm) for a single disk clutch. I verified clutch movement using the service windows on the bell housing and my Depstech "eye".
I attach a few photos of the release bearing unit and a sketch of its dimensions in inch. Maybe helpful for someone who uses an LS7/ZFQ bell housing/ZFQ unit with external slave cylinder. Certainly good for my own records ;-)
I allways found that to keep the fork with an external clutch actuator is complicated. Why don't you use a coaxial throwout bearing likeTilton, MacLeod... that combine hydraulic and the ball bearing. You just have to adjust the play with washer and that's it ! And it works great, it is widely used on plenty of modern car, I have this on my 427 Galaxy that I use on race track.
1711434631116.png
 
I allways found that to keep the fork with an external clutch actuator is complicated. Why don't you use a coaxial throwout bearing likeTilton, MacLeod... that combine hydraulic and the ball bearing. You just have to adjust the play with washer and that's it ! And it works great, it is widely used on plenty of modern car, I have this on my 427 Galaxy that I use on race track.
View attachment 137490
I fully agree with your comment, also when you say "is widely used on plenty of modern car". On a GT40 I'm happy to live with 60s technology.
 
I looked at the engine that you are using, it is not coming from the 60s :)
No, it isn't ;-) . The engine maybe is not too far off 60s technology, however, EFI and catalytic converters definitely are. So are the fuel cells.
When I looked for a car in around 2019 I had to make the decision to go for a replica that, by age, could be titled as ``historic" (i.e. street registered 1990 or earlier) or a more recent build which would pass modern EU emission and many other standards. I looked at several GTDs, a very nice KVA and others over a period of about 2 years. But I wanted a monocoque and right-hand drive, rather than space frame and/or left-hand drive. Another concern then was the Brexit. In the end I decided to go for the RCR40, in spite of its Chevrolet engine and EFI. Now with the engine properly built and upgraded and my acquired understanding of the FAST EFI it would be crazy to search for an original Ford V8 and Webers from the 60's - haha. When modifying details of the car, however, I have tried to stick to original components (interior mirror, head lamps etc.) It is sometimes overlooked that many of the parts used then are still in production because they were used in (British) cars from the 60's (e.g. Lucas stuff used in Jaguars). I just ordered a new spare Girling slave cylinder and rebuild kit! It is wonderful that Brits hang on to their glorious past! The other day a Honda dealer told me that he could not get me a new chain tensioner for my 1994 CBR900 Fireblade...
 
Perfectly cool day for ``building" confidence in the car and make an outing in the country. No issues and thus time for pictures. Still waiting for my new muffler system.
 

Attachments

  • GT40-DW1.jpg
    GT40-DW1.jpg
    487.4 KB · Views: 15
  • GT40-DW2.jpg
    GT40-DW2.jpg
    933.9 KB · Views: 17
Back
Top