That just looks like a headache lolJumping around, I started messing with my power steering plans. I had the motor and module, but thought it might be nice to have all of the splined bits and a second motor so if this thing went south I would have a spare before they became scarce.
It turns out, I may use most of this column, ditching the dated looking wiper controls, turn signal switch and ignition key. It all bolts on.
There's a dude in Portugal that sells a module that generated the pulse train that tells the EPS how much assist to give. It includes a potentiometer that adjusts it.
Looks like mounting it with the adjustable height will be a breeze. This will also give a collapsible column.

You are using an out of date browser. It may not display this or other websites correctly.
You should upgrade or use an alternative browser.
You should upgrade or use an alternative browser.
AP mk1 twin turbo
- Thread starter Luce_
- Start date
Jumping around, I started messing with my power steering plans. I had the motor and module, but thought it might be nice to have all of the splined bits and a second motor so if this thing went south I would have a spare before they became scarce.
It turns out, I may use most of this column, ditching the dated looking wiper controls, turn signal switch and ignition key. It all bolts on.
There's a dude in Portugal that sells a module that generated the pulse train that tells the EPS how much assist to give. It includes a potentiometer that adjusts it.
Looks like mounting it with the adjustable height will be a breeze. This will also give a collapsible column.
the supplier in Portugal now makes a module that is GPS based to automatically adjust the assistance based on the vehicle speed
I run the Portugese GPS module and its perfect (1974 Ford Capri, Corsa B EPS). No hassle with potentiometer, just fit and forget. Easy parking and the more speed the lrss assistance.
I run the Portugese GPS module and its perfect (1974 Ford Capri, Corsa B EPS). No hassle with potentiometer, just fit and forget. Easy parking and the more speed the lrss assistance.
Can you share a link for the GPS module? Can assistance be dialled down if too much? Have a Corsa EPS in a ‘40 with a non GPS box of tricks which is too light for my liking at anything above parking speeds.
Home - ANT Steering & Electronics - Bruno SteeringCan you share a link for the GPS module? Can assistance be dialled down if too much? Have a Corsa EPS in a ‘40 with a non GPS box of tricks which is too light for my liking at anything above parking speeds.
No adjustment, fully automatic, you will have your steering working as a factory system where you have the maximum steering assistance when vehicle stopped and you have the minimum steering assistance at higher speeds. And while you increase your speed the steering will decrease its assistance.
When I bought the EPS and control module 5 years ago, the first gen with the pot was all that was available. I'll use it for first roll, but all the EPS is looking for is a pulse train to tell it how fast you're going so it knows how much assist to give. I'll drive the car and see how much boost it gives at what frequency, and use a micro-controller and map what I like to what one of the wheel sensors is putting out.
This thing uses the corvette suspension, so I have 4 ABS tone rings. I'll use one front for speedo, one for this, and maybe the rears for the megasquirt traction control.
Thanks for sharing Bruno's site. I may still be interested in some of his other goods.
This thing uses the corvette suspension, so I have 4 ABS tone rings. I'll use one front for speedo, one for this, and maybe the rears for the megasquirt traction control.
Thanks for sharing Bruno's site. I may still be interested in some of his other goods.
I haven't messed with the throttle yet, but one thing I had planed was doing it like I did another mid engine project. I ran a brake line, with AN fittings and double flares as straight as possible, with teflon braided lines the last 12" or so to bulkhead fittings, and laced a 1/16" 304 aircraft cable inside. Worked very well with very little friction. My first thought is maybe a bell crank to the front to give some adjustability and keep the cable away from your feet.
I'm finally getting a chance to play in my shop.
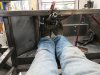
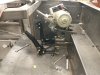
I've been procuring and noodling on how to implement the EPS. My early plan was to use the whole core of the column and get the collapsible and tilt features as well as the OEM self canceling turn signals. Well, the turn signal switch was a ugly floppy dong I didn't want. Then, the tilt is useless. You can't put it any lower than where the dash hole dictates if you have legs. But I pushed on, reclocked the motor from the stock position and moved a tube in the frame to accommodate, but it's still too much shit in the way. Thinking about being in an accident and my shins getting shoved into this made me back up. (see pic)
I've been procuring and noodling on how to implement the EPS. My early plan was to use the whole core of the column and get the collapsible and tilt features as well as the OEM self canceling turn signals. Well, the turn signal switch was a ugly floppy dong I didn't want. Then, the tilt is useless. You can't put it any lower than where the dash hole dictates if you have legs. But I pushed on, reclocked the motor from the stock position and moved a tube in the frame to accommodate, but it's still too much shit in the way. Thinking about being in an accident and my shins getting shoved into this made me back up. (see pic)
Attachments
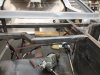
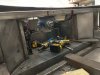
But Rick had the idea of rotating the rack so the pinion shaft was near vertical and use a bevel gear. That sounded to complicated, but gave me the idea putting just the EPS unit above the rack instead of over your shins. It seems like it'll fit and be well ahead of the pedals, even at full mash.
Luck was on my side, and the cross piece on the OEM shaft and what Arden supplied were the same, even though the cups were different size, so I was able to put together a U joint from what I had to mate the rack directly to the EPS unit.
I wanted to slot the rack mounts to adjust out bumpsteer, but I this will fix the racks mounting point. I 'll have to use the shims on the tie rod as provided. Once I have it nailed down correct, I'll machine a single conical shim rather than the stack of washers.
I'll have to cut down the shaft on the EPS and mate it to a steering column. I still haven't given up on making a column with a piece of 304 exhaust tube and cone to include a Passat turn signal with hi/lo witch and hazzard switch.
Attachments
Devin
Supporter
Brian,But Rick had the idea of rotating the rack so the pinion shaft was near vertical and use a bevel gear. That sounded to complicated, but gave me the idea putting just the EPS unit above the rack instead of over your shins. It seems like it'll fit and be well ahead of the pedals, even at full mash.
Luck was on my side, and the cross piece on the OEM shaft and what Arden supplied were the same, even though the cups were different size, so I was able to put together a U joint from what I had to mate the rack directly to the EPS unit.
I wanted to slot the rack mounts to adjust out bumpsteer, but I this will fix the racks mounting point. I 'll have to use the shims on the tie rod as provided. Once I have it nailed down correct, I'll machine a single conical shim rather than the stack of washers.
I'll have to cut down the shaft on the EPS and mate it to a steering column. I still haven't given up on making a column with a piece of 304 exhaust tube and cone to include a Passat turn signal with hi/lo witch and hazzard switch.
Do you know the part number and/or make of the steering rack you are using?
From one pic I saw on an AP build, it said 68-72 Sprite - Midget and have also heard of using a Mustang rack?? Don’t know if one has advantage over the other or perhaps a better threads for proper tie rod ends?
Thanks
Devin
Mine with the car is the midget. I think I have a Pinto (non power Mustang 2) in the garage. I'll have a peek.
One advantage of the Midget is the mounts are just round saddles, so you can index it and get the steering oriented how you need. The mustang II uses rubber bushings that bolt the rack to the frame leaving you with the challenge of making an angled mount if you don't like the shaft angle.
One advantage of the Midget is the mounts are just round saddles, so you can index it and get the steering oriented how you need. The mustang II uses rubber bushings that bolt the rack to the frame leaving you with the challenge of making an angled mount if you don't like the shaft angle.
Looks like I will burn my 4" in the footwell.
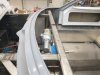
This setup keep the steering angle from being too radical and keeps all of the extra stuff in front of my feet instead of at my shins. I'm a wee 5'9", and with my ass 10" off the rear bulkhead, I can barely touch the pedals, even moving the masters inside the cockpit. Truth is, rather than have the extra 4" behind my seat, this brings the controls back to the usual seating position, but moves the dash forward relative to seating position and makes it feel more open and spacious.
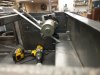
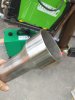
And for you Wolfman, a pick of a Mustang II/Pinto rack sitting above the Sprite/Midget rack. They're close to the same width, but the M2 rack input shaft comes in at a hard angle. This would mess with your pedals.
This setup keep the steering angle from being too radical and keeps all of the extra stuff in front of my feet instead of at my shins. I'm a wee 5'9", and with my ass 10" off the rear bulkhead, I can barely touch the pedals, even moving the masters inside the cockpit. Truth is, rather than have the extra 4" behind my seat, this brings the controls back to the usual seating position, but moves the dash forward relative to seating position and makes it feel more open and spacious.
And for you Wolfman, a pick of a Mustang II/Pinto rack sitting above the Sprite/Midget rack. They're close to the same width, but the M2 rack input shaft comes in at a hard angle. This would mess with your pedals.
Attachments
Devin
Supporter
Outstanding comparison Brian! This is SO valuable to see and hear from someone firsthand that has both side by side to help me (and I’m sure other builders) make an informed decision and knowledgeable purchase.Looks like I will burn my 4" in the footwell.
This setup keep the steering angle from being too radical and keeps all of the extra stuff in front of my feet instead of at my shins. I'm a wee 5'9", and with my ass 10" off the rear bulkhead, I can barely touch the pedals, even moving the masters inside the cockpit. Truth is, rather than have the extra 4" behind my seat, this brings the controls back to the usual seating position, but moves the dash forward relative to seating position and makes it feel more open and spacious.
And for you Wolfman, a pick of a Mustang II/Pinto rack sitting above the Sprite/Midget rack. They're close to the same width, but the M2 rack input shaft comes in at a hard angle. This would mess with your pedals.
I salute you!
Thanks
Devin
I don't know that this is the correct diameter, but a muffler clamp like this.

would be an excellent mount. when you're happy with its placement, you can weld the saddle part to the bulkhead.
Chris made one out of thick 2 aluminum bars, with a pair of half circles horked out with a hole saw.
304 Stainless Steel U-Bolt Muffler/Exhaust Clamp Band 3" | eBay
Material: made of 304 Stainless Steel. Clamp Type: U-Bolt. Clamp Size: 3". No Instruction will be provided. Available in a wide range of styles and sizes.
www.ebay.com
would be an excellent mount. when you're happy with its placement, you can weld the saddle part to the bulkhead.
Chris made one out of thick 2 aluminum bars, with a pair of half circles horked out with a hole saw.
I've been back and forth on the EPS location a few times now. After a few iterations and not knowing how things will sort out, I finally threw may hands up realizing I need to first locate my ass and head in the cabin, then figure the rest out.
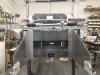
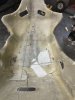
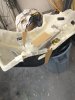
So I visited a custom upholstery shop. I was thinking I would fabricate a Kirkey like seat and have it padded and covered, but he was fairly insistant that it's easier to get a set of ricer seats and modify them. So I did.
As spartan as these seats will be, I've still decided to drop the pan 1" at the back of the seat. It works as is, but I think the 1" extra head room will be nice.
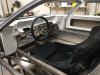
I've tacked the floor pan in with a couple of self tapping screws and set my modded seat in, and sort of set up the steering wheel adn lose pedals, and this is snug but very comfy.
So I visited a custom upholstery shop. I was thinking I would fabricate a Kirkey like seat and have it padded and covered, but he was fairly insistant that it's easier to get a set of ricer seats and modify them. So I did.
As spartan as these seats will be, I've still decided to drop the pan 1" at the back of the seat. It works as is, but I think the 1" extra head room will be nice.
I've tacked the floor pan in with a couple of self tapping screws and set my modded seat in, and sort of set up the steering wheel adn lose pedals, and this is snug but very comfy.
Attachments
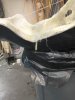
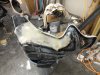
I cut and laid back the seat at the back, then cut and banana-ed the back just below the shoulders. Since these pics, I've started grinding out the back to feather in a scarf patch on the outside.
I've hung a steering wheel on the EPS and located it.
Finally, I'm moving forward. The seat mods are tedious as you have to do one part, then set for 24 hrs, then you can flip it and catch the other side.
I have a dirty corner of the shop where the CNC plasma table is, and I have a big wall exhaust fan. It makes grinding fiber glass not such a problem. Back when I was in suburbia doing this sort of stuff on the Cobra in the drive way, it sucked...BAD.
Attachments
Similar threads
- Replies
- 18
- Views
- 2K
- Replies
- 3
- Views
- 2K