FYI....insides of half shafts came right off; outsides were frozen in place due to RTV and lips on outsides...Dennis Olthoff suggested using lead hammer and tapping 'hosels' of outsides of half shafts while turning wheel to break them loose ... worked like a champ ... much easier to replace CV boots with half shafts removed!!!

You are using an out of date browser. It may not display this or other websites correctly.
You should upgrade or use an alternative browser.
You should upgrade or use an alternative browser.
Breaking Loose Half Shafts
- Thread starter muttsjet
- Start date
Mark,
Could you spell out the exercise of dismantling the CV's or could you point to a Youtube video that outlines what you did. I have the 930s from the Driveshaft shop. If yours is different, anyone have the info. Have reviewed a lot of them and have an idea. Just looking for conformation. Where did you get the new boots and bands??
Bill
Pic of my half shafts attached.
I did not actually dismantle the CV's. I pulled the half shafts (one side at a time) from the car by removing the bolts from the inside of the half shaft first (came off pretty easily from the gear box), and then the bolts from the outside of the half shaft attached to the wheel (had the break the outsides loose as described above).
Once removed, I cut the old boots off, repacked the CV 'joints' with grease, and installed new CV boots using the 'Dorman 614-001 HELP! Universal Fit CV Boot Kit', and using the 'Dorman 614-030 HELP! Universal Fit CV Boot Air Tool' to get the boots over the CV 'joints'. It was a very fight fit but with a little pounding was able to get new boot over the CV 'joints'. I packed the boots with grease once on the half shafts. I tried using the steel bands provided with the kit, but couldn't get them as tight as I wanted them so ended up using zip ties and they've worked perfectly.
I then placed sealant around the ends of the half shafts and rebolted them to the wheel, and then the gearbox, torquing the bolts alternatively to the correct torque.
Hopefully this provides some of what you were looking for.
Mark
Attachments
Mark,
Thank you for the information. One last question. You mentioned using sealant on the ends of the shafts. What was the sealant and why did you use it?? When I got the axels from The Driveshaft Shop there was no sealant or mention of it. I have just removed my half shafts from the car, in preparations of repacking the joints and replacing two boots that are "leaking". By that I mean they are spraying grease all over the place from around the large end at the flange. I have the 930 trans, and purchased the axels during my build. I don't know if over the years(11 year build) if it dried out the boots or what but I only have ~2000 miles on the car. I plan to take the joints apart, clean them, and repack the joints. I have ordered the 2 new boots and a tube of Red Line grease(very sticky stuff). I will document the process so that all can learn from it. All the parts should be here by Monday. Removing the shafts was a bit of work but not terrible. The bolts were torqued at 30 ft. lbs. of torque with blue thread locker(which over time multiplies the torque required to get them loose). The force required is aided by adding heat from a map gas torch for a minute or two to the thread ends of the bolt/shaft end before applying pressure to break the bolts loose. These were then cleaned with a wire wheel to get the residue of the locker from the threads. More to follow next week.
Bill
Well, I have jumped into the half shafts in order to get new boots on the trans end of both half shafts. The following will hopefully show others how easy it is done, what tools are needed and the techniques to get it done in a short amount of time. MY terminology may be off so feel free to make corrections to the parts.
Tool list.
Fortunately you don't need a lot of tools.
Socket wrenches for regular headed bolts. Mounted Allen head wrenches/sockets8mm for The Driveshaft Shop axles)
A medium hammer.
A medium sized Punch. Most mechanics will tell you to use brass but you won't be hitting anything really hard.
Small straight blade screwdriver.
Retianer/C clip pliers(most auto shops carry them for under $15)
One roll of paper towels
Nitril gloves
Set of new bands for the boots and if the boots have been on for several years you may want to invest in new boots. The boots on ebay are around $6-$10 or so. Make sure they are the right type for your flanges. If you have the boots that have the large end fitting down into a groove, you are better off getting them from your original purchaser. Mine were in the shape of the letter P and the Flange was shaped like the letter U.
CV grease. All the stores have it, but if you want a high quality, look for Red Line. It is thicker, stickier and won't liquefy til nearly 800 degrees(the product describes it as the drop test, so I guess it won't drop off a stick til nearly that temp). One tube or bucket should do all 4 I would think. Most say 4 ounces will do one axle You may want more.
You may want to remove the rear clip and wheels. Not necessary but a back saver.
1st step is to get the wheels off the ground and at their normal ride angles. This will help you get the bolts out. Speaking of which, If you used Loctite or any other sealer on your bolts when installed you will need to add heat to the bolt threads(Map Gas or similar) for a couple of minutes. The locker stuff will increase your amount of torque required to loosen the bolts.
Take the shafts over to the work bench and lock them in a vice.
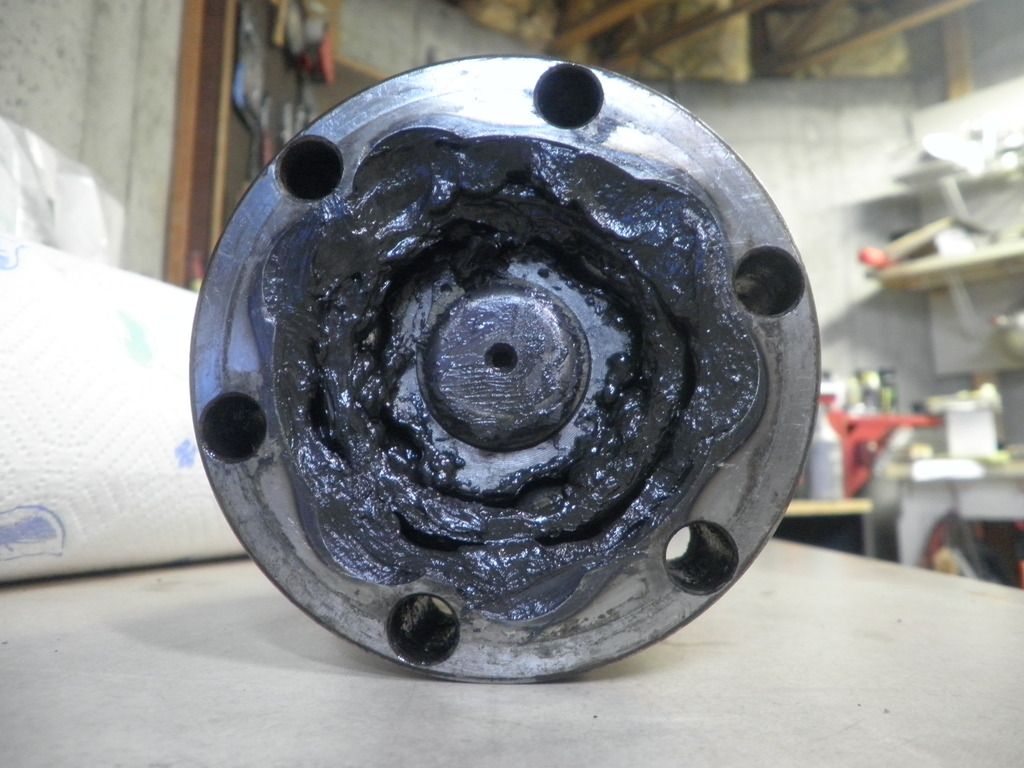
Next remove the bands with a side cutter or a small screwdriver to open up the lock tabs,and pull the boots back to expose the inner part of the CV. If you are replacing the boot just cut it off the axle.Scrape as much of the old grease out of the joint as you can(inner and outer).
This is what you should see:
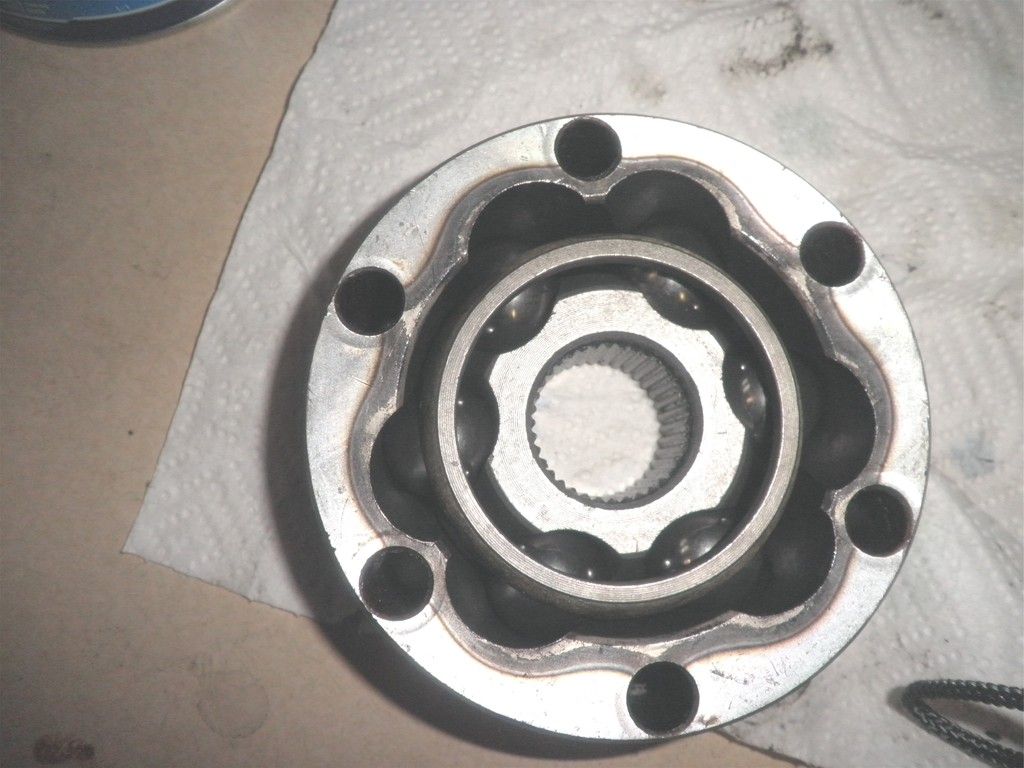
When clean , like this:
Facing trans
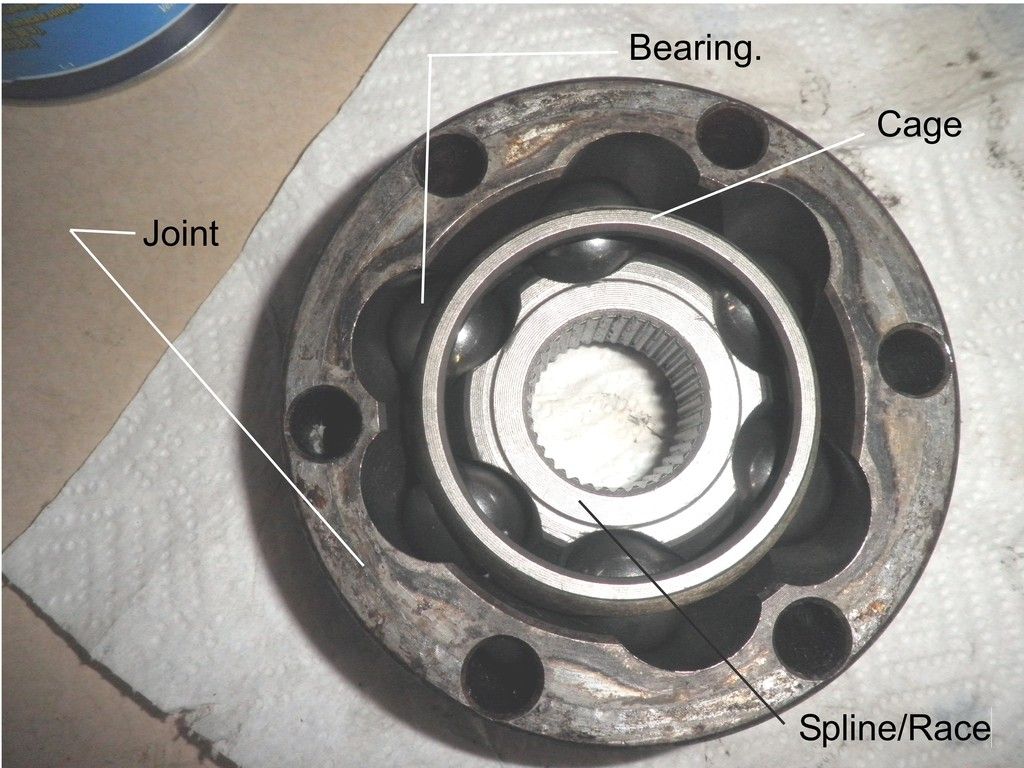
Toward Flange
You will notice a retainer clip at the end of the axle. Using the hammer tap the inner joint further onto the axle. You probably won't see it move but it will make it a bit easier. Use your new clip pliers and or the small screwdriver and hammer to get the clip out of its groove. Using the hammer and punch tap the flange off the outer joint. Next you can yank the CV off the axle or tap the inner part of the joint(Spline) outward to break the joint free and pull it off the axle. Take a look at both sides of the joint to orient you to which way everything faces.
Take a close look at the spline and outer joint. Notice that the grooves of the Spline and the outer joint match up with 2 narrow grooves lined up with two wide grooves. This is the only way they should go back together. If done narrow to narrow the joint won't work and probably won't all go together.
To remove the cage and bearings, tilt the cage outward to expose the bearing.

Use the small screwdriver to pop the bearing out. Then rotate the cage and remove the other 5 bearings. The cage and spline should slide out. Use the paper towels to clean each piece thoroughly. If using the Red Line, the two greases are not compatible.
Inspect the grooves of the spline and outer joint. Look for galling or pitting. If present a new joint is needed. If not present then you are ready to reassemble.
Put the spline into the cage at a 90 degree angle and turn up to its normal position. Line up the narrow gap to the wide gap of the outer joint. Cock the spline and cage up and almost out of the outer joint and place the bearing into the slot. press down and it should pop into the grove. Rotate the spline and cage to the next groove and repeat. As you add more bearings it will become a little harder to get the bearing to pop into the groove. To help out place the joint onto the desk surface and press down on the cage and spline and it should pop the bearing into the outer joint. When done the spline and cage should push into and pull outward in the outer joint. You are now ready to reassemble your axle.
The first step is to slide your boot onto the axle and slide it a little past its mark on the axle. May need to add a little grease to the lip of the small end of the boot along with using a screwdriver to help it get onto the axle. Pack the axle side of the joint with about 4 oz of the grease. Install the flange using adjustable pliers to fit solidly onto the outer joint. Pack a little more grease into the CV joint/flange. Put the joint onto the axle and tap it into place. Clean the groove for the C clip and tap the CV joint a little further onto the axle. Put the C clip into its groove. You may have to tap the joint a time or two to get the clip to seat in its groove. Using the punch and hammer tap the clip downward all the way around til it seats in its groove. Place the boot onto the flange and install the holding band(s). There are videos on putting the bands on that are self explanatory depending on which tool you purchased. Pack the outside of the CV joint and put the axle back onto the car. To see a demonstration of this entire process watch the video of a 914 half shaft. It is identical with two minor parts different, a beveled washer to keep pressure on the inside of the joint and pegs on the outer joint that fit into the wheel or trans. Hope this opens up the mystery of the CV joint.
Bill
https://www.youtube.com/watch?v=LsytyVzokBg
https://www.youtube.com/watch?v=KOma2BMhrzc
Tool list.
Fortunately you don't need a lot of tools.
Socket wrenches for regular headed bolts. Mounted Allen head wrenches/sockets8mm for The Driveshaft Shop axles)
A medium hammer.
A medium sized Punch. Most mechanics will tell you to use brass but you won't be hitting anything really hard.
Small straight blade screwdriver.
Retianer/C clip pliers(most auto shops carry them for under $15)
One roll of paper towels
Nitril gloves
Set of new bands for the boots and if the boots have been on for several years you may want to invest in new boots. The boots on ebay are around $6-$10 or so. Make sure they are the right type for your flanges. If you have the boots that have the large end fitting down into a groove, you are better off getting them from your original purchaser. Mine were in the shape of the letter P and the Flange was shaped like the letter U.
CV grease. All the stores have it, but if you want a high quality, look for Red Line. It is thicker, stickier and won't liquefy til nearly 800 degrees(the product describes it as the drop test, so I guess it won't drop off a stick til nearly that temp). One tube or bucket should do all 4 I would think. Most say 4 ounces will do one axle You may want more.
You may want to remove the rear clip and wheels. Not necessary but a back saver.
1st step is to get the wheels off the ground and at their normal ride angles. This will help you get the bolts out. Speaking of which, If you used Loctite or any other sealer on your bolts when installed you will need to add heat to the bolt threads(Map Gas or similar) for a couple of minutes. The locker stuff will increase your amount of torque required to loosen the bolts.
Take the shafts over to the work bench and lock them in a vice.
Next remove the bands with a side cutter or a small screwdriver to open up the lock tabs,and pull the boots back to expose the inner part of the CV. If you are replacing the boot just cut it off the axle.Scrape as much of the old grease out of the joint as you can(inner and outer).
This is what you should see:
When clean , like this:
Facing trans
Toward Flange
You will notice a retainer clip at the end of the axle. Using the hammer tap the inner joint further onto the axle. You probably won't see it move but it will make it a bit easier. Use your new clip pliers and or the small screwdriver and hammer to get the clip out of its groove. Using the hammer and punch tap the flange off the outer joint. Next you can yank the CV off the axle or tap the inner part of the joint(Spline) outward to break the joint free and pull it off the axle. Take a look at both sides of the joint to orient you to which way everything faces.
Take a close look at the spline and outer joint. Notice that the grooves of the Spline and the outer joint match up with 2 narrow grooves lined up with two wide grooves. This is the only way they should go back together. If done narrow to narrow the joint won't work and probably won't all go together.
To remove the cage and bearings, tilt the cage outward to expose the bearing.
Use the small screwdriver to pop the bearing out. Then rotate the cage and remove the other 5 bearings. The cage and spline should slide out. Use the paper towels to clean each piece thoroughly. If using the Red Line, the two greases are not compatible.
Inspect the grooves of the spline and outer joint. Look for galling or pitting. If present a new joint is needed. If not present then you are ready to reassemble.
Put the spline into the cage at a 90 degree angle and turn up to its normal position. Line up the narrow gap to the wide gap of the outer joint. Cock the spline and cage up and almost out of the outer joint and place the bearing into the slot. press down and it should pop into the grove. Rotate the spline and cage to the next groove and repeat. As you add more bearings it will become a little harder to get the bearing to pop into the groove. To help out place the joint onto the desk surface and press down on the cage and spline and it should pop the bearing into the outer joint. When done the spline and cage should push into and pull outward in the outer joint. You are now ready to reassemble your axle.
The first step is to slide your boot onto the axle and slide it a little past its mark on the axle. May need to add a little grease to the lip of the small end of the boot along with using a screwdriver to help it get onto the axle. Pack the axle side of the joint with about 4 oz of the grease. Install the flange using adjustable pliers to fit solidly onto the outer joint. Pack a little more grease into the CV joint/flange. Put the joint onto the axle and tap it into place. Clean the groove for the C clip and tap the CV joint a little further onto the axle. Put the C clip into its groove. You may have to tap the joint a time or two to get the clip to seat in its groove. Using the punch and hammer tap the clip downward all the way around til it seats in its groove. Place the boot onto the flange and install the holding band(s). There are videos on putting the bands on that are self explanatory depending on which tool you purchased. Pack the outside of the CV joint and put the axle back onto the car. To see a demonstration of this entire process watch the video of a 914 half shaft. It is identical with two minor parts different, a beveled washer to keep pressure on the inside of the joint and pegs on the outer joint that fit into the wheel or trans. Hope this opens up the mystery of the CV joint.
Bill
https://www.youtube.com/watch?v=LsytyVzokBg
https://www.youtube.com/watch?v=KOma2BMhrzc
Last edited: