Roaring Forties #091

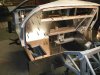
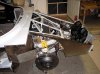
Well its been a while since I posted . I thought Id be done with the most of my sheet metal by now . I took a little break from the car , Got caught up on the house chores , took care of my other vehicles needs, and thought Id get back on the GT . Then the flu hit me, then when I was over that,I was lifting up one of my antique console radios and twisted wrong while lifting,,, ouch. So Im on the mend and just starting to work on the car again.I made my radiator tray today and that was about all my back could handle.
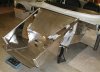
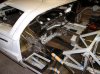
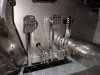
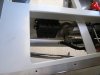
Since I last posted I made the radiator side panels (I call them sail panels). I cut new ones from sheet and they extend all the way up the upper front tubes instead of stoping 2/3 the way up. Also I have finished locating,drilling , and countersinking my seat hold downs.I am using flush fasteners coming up from underneath.
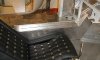
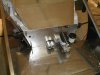
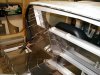
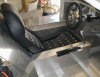
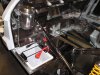
So I guess I can finish the side tunnel next to the drivers seat and locate my pedals and go from there .Oh I almost forgot,,, the sheetmetal that sticks out on the aft edge of the front wheel wells I am covering with that foam slotted pipe insulation covering. After ripping my legs open numerous times because its hard to see when your walking around the car I dug some of this spare stuff out of my attic. Havnt hurt myself since /ubbthreads/images/graemlins/smirk.gif and dont crash into it either . Highly recommended .Regards Dan
 

Attachments

  • 46110-PA300006a.jpg
    46110-PA300006a.jpg
    56.5 KB · Views: 699
It looks great Dan. You car seem to be going together quickly. I hope your back is better.
 
Well I have been getting back on the GT . I made a new front bulkhead panel and secondary bulkhead panel. The ones that came with the kit had a few holes in the wrong place , so I cut new ones. I also just finished making the drivers left hand console today . The side panel is removable and I made an extension on the front and a new panel on top. Hopefully I can run everything I need to through that fwd angled "channel " If not I'll modify it. That way when the dash is in place you wont be able to see any plumbing going through that area. I also shortened the aft end at the top so it doesnt come into my side rib area and is about even with the seat back, seems like this wont catch my behind /ubbthreads/images/graemlins/shocked.gif , when I swing into and out of the car. /ubbthreads/images/graemlins/grin.gif
 

Attachments

  • 49285-PC240001a.jpg
    49285-PC240001a.jpg
    54.2 KB · Views: 676
Have the master cylinders tacked on temp. After I Finish making the last holes for the brake lines in the bulkhead I'll shoot and seal it on.
 

Attachments

  • 49286-PC240007a.jpg
    49286-PC240007a.jpg
    61.2 KB · Views: 694
Well got some more done today. I made a new R/H sill rear panel, (the one from RF has a hole in it for a RH drive car shift linkage).Got the left side done and the inner lower engine panels. Still need to polish them and shoot them on, but will hold off on that to help with the plumbing job later.
 

Attachments

  • 49388-PC270002a.jpg
    49388-PC270002a.jpg
    84.4 KB · Views: 641

Jim Dewar

Supporter
Hey Dan,
It looks great! Slow down and post more photos. Your easier to follow than the RF manual. Keep it going!
Jim
 
/ubbthreads/images/graemlins/laugh.gifHey Jim, got the blood boiling again and sparks are flying from my 90'high speed ! Fit the top panel on the left late tonight where the battery box is, got it real close, need to finish the fit tomarrow.I just came in from the shop and need to get up for work in 6hrs. When are we going to see a RF build string from Jim Dewar #103 on the Builders Forum. /ubbthreads/images/graemlins/grin.gif
 
Making some more headway, Not sure if the aft bulkhead panel is going to work, may make another. I trimmed off the tab that folds just on the horizontal cross tube because it didnt fit up the way I wanted. I am going to attach a seperate angle in place and see how that looks. /ubbthreads/images/graemlins/crazy.gif
 

Attachments

  • 49567-PC310006a.jpg
    49567-PC310006a.jpg
    79.6 KB · Views: 635
Got a few small pieces finished up tonight on the L/H side. This area is pretty time consuming, especially getting that triangular panel fitted and not screwing it up ! On to the R/H panels. /ubbthreads/images/graemlins/tongue.gif
 

Attachments

  • 49684-P1030009a.jpg
    49684-P1030009a.jpg
    93.5 KB · Views: 636
Got the R/H side pretty well done. Have to slightly trim the top two angles to clear the top of the spider and seal right. Will be polishing up everything and starting to work on that center console next. /ubbthreads/images/graemlins/tongue.gif
 

Attachments

  • 50007-P1090003a.jpg
    50007-P1090003a.jpg
    77 KB · Views: 622
Wow , where did 2 months go ?? Well I finally have been working on that center console . I located the parking brake in the same fore/aft position, but instead of mounting it on top of the structure ,I bolted it below the R/H tube. I still should have room for the shifter cables .
I then made the height of the console about level with the driver's L/H console. When seated in the car my right elbow has a good resting place if I wish. The hole for the shifter will be trimmed larger at a later date .I feel very nice and "snugged" in , reminds me of one of my past formula cars. /ubbthreads/images/graemlins/cool.gif
 

Attachments

  • 53588-P3060003a.jpg
    53588-P3060003a.jpg
    72.4 KB · Views: 623
Thanks Rolf, hope all is well with you and yours. Here is a pic of current front Dan. A/C is also hung and lines hooked throughout except to condenser.
 

Attachments

  • 60925-P7110001a.jpg
    60925-P7110001a.jpg
    100.3 KB · Views: 630
And the rear 3/4 as it sits. The "D" panels are not shot on , nor the tops of the area above ther rear tanks. The door handles / latches are fit and have to get the aft part welded up to size before I shoot the rest on. The under side fuel plumbing is 95 % done on both sides as well.
 

Attachments

  • 60926-P7110006a.jpg
    60926-P7110006a.jpg
    122.3 KB · Views: 628
Here is my modified RF "early" pedal box. When you move it to the LHD side the push rods don't fully line up with the "ears" on the pedals. I added a third ear to the brake pedal instead of just off setting it. I then swiss cheesed it to give the gas pedal a different look and then radiuses the other pedal pads to give them a more round corners. The non skid was removed, trimmed down and hole punched. I am going to get some more and redo the non skid .Note , FYI temp fasteners in the rod ends just to get things "tacked up" and will be adding spacer inbtwn the ears.
 

Attachments

  • 65019-P9160003.JPG
    65019-P9160003.JPG
    67.2 KB · Views: 656
Dan,
I did the same off set with my pedals. That is the best set of pedals I've seen in an RF. That is one outstanding creative effort. I wish I had thought to do that.

Hersh /ubbthreads/images/graemlins/smile.gif
 
Thanks Hersh, I wish I would have drilled the holes in the brake and clutch pedals too , then maybe make slightly larger holes in the non-skid and that would have looked better. If I have anything else plated maybe I'll drill them and take them to the plater again. /ubbthreads/images/graemlins/crazy.gif
 
Well I have ran my bleed line through the console, then over into the L/H side and up to the tank. I polished the tank, did a final polish on the D panel, and the aft sill panel and finally shot them on. I made a small bulkhead panel just inboard of the battery box and mounted my mega fuse junction block to it . I removed the bracket that held my tank valve and mounted it to this panel also. Keeping the mega fuse box under the sill will give a cleaner look .All premade cables still shoud reach and some actually be a bit long,,, may shorten the hot lead from the switch to the fuse block. /ubbthreads/images/graemlins/1poke.gif
 

Attachments

  • 72826-P1220001.JPG
    72826-P1220001.JPG
    67.5 KB · Views: 628
And here is one of that panel I added before I closed it all up. /ubbthreads/images/graemlins/beerchug.gif
 

Attachments

  • 72827-P1140002.JPG
    72827-P1140002.JPG
    76.2 KB · Views: 541
Back
Top