

You are using an out of date browser. It may not display this or other websites correctly.
You should upgrade or use an alternative browser.
You should upgrade or use an alternative browser.
Chuck and Ryan's RCR Build
- Thread starter CESLAW
- Start date
:thumbsup::thumbsup::thumbsup::thumbsup::thumbsup::thumbsup:Tom:
Yea. Different cam too. Plan to move to fuel injection in near future and this was the first step.
Chuck
Jim Rosenthal
Supporter
Chuck, which direction did you move with the cam choice? I have a four-barrel now but am planning to put the Weber rig on that I got from Eric Johnson. I am interested to know what your engine builder advised for the four-barrel versus the Webers, which are the same Webers I have.
Jim:
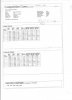
Spec sheet for the Weber cam attached. There were no markings on it so it was sent off to Comp Cam and the attached info is what they found.
It may be hard to read.
Exhaust duration at .050 was 233.
Intake duration at .050 was 223
Exhaust lobe sep: 112
Intake lobe sep: 112
Spec sheet for the Weber cam attached. There were no markings on it so it was sent off to Comp Cam and the attached info is what they found.
It may be hard to read.
Exhaust duration at .050 was 233.
Intake duration at .050 was 223
Exhaust lobe sep: 112
Intake lobe sep: 112
Attachments

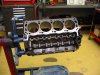
Our former T and L Engine
The T and L 302 in our GT was rebuilt after only 1200 miles. The specific failure that prompted the rebuild was not necessarily the fault of T and L, but the various issues leading up to that point and what was discovered during the rebuild made us glad we did it. Several have inquired about the details. Hopefully the following will be an objective review of our experience.
We purchased the engine in early 2007. Our initial dealings with T and L went well. The engine was build per our specs and delivered close to the promised date. The price was good.
1. Before the engine had ever been run we replaced the valve covers and noticed that a couple of rocker arms were not centered on the valve stems. The wrong push rod guide plates had been used on one cylinder. T and L sent us replacements.
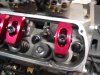
2. The original rocker arms were pink colored cheap off shore brand known to fail. T and L provided Comp Cam rocker arms. We replaced them ourselves. Pictures attached.
The engine was first fired up in the GT in February 2008. It started up just fine. The saga of tuning the Webers has been addressed elsewhere. Many of those issues were related to inadequate initial set up. More problems emerged as the miles were added.
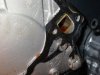
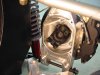
3. A gasket in the water pump had been distorted during installation by T and L causing it to leak. Determining the source of the leak and then repairing it was a major project. Picture attached.
4. There was an oil leak from the rear of the intake manifold. Repairing the problem would have required removing the intake manifold. We decided to just live with it short term.
5. Here is a big one. We were told verbally and it was confirmed in writing that the engine was a 28 ounce balance. A 28 ounce flywheel was ordered from Kennedy Engineering. When we took the just completed car to Run and Gun in October, 2008, the first time around the track the car vibrated terribly. Upon recontacting T and L they informed us it was a zero balanced engine. This required a complete tear down of the drive train so that the flywheel could be rebalanced. This gave rise to some lingering concerns about whether the brief stint on the track with a badly misbalanced engine may have caused some problems that would come back to haunt us later.
6. In July, 2009, the GT was trailered to Road America. It was running reasonably well at that time. What prompted the rebuild was a sudden change in engine performance two months later. A lot of blow by and persistent backfiring and spitting from the Webers prompted us to do a leak down and compression check. Clearly there was a serious problem. We pulled the engine and took it to Lumpy Loughary, Performance Motorsports Systems, Greenville, Illinois. Lumpy has worked with Dean Lampe on a couple of engines and came highly recommended.
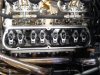
A tear down of the engine revealed that the combustion chambers were badly carboned. The rings were so bad that they were ‘stuck’ thus permitting the blow by and loss of compression. Why this happened is not clear, but it could be due to the many hours spent idling while adjusting the carbs. But why the problem became manifest so suddenly after the car had been running well remains unclear to me.
Regardless, Lumpy discovered some interesting things. The deck on one side was .015 higher than the other. As a result the compression ratios were different on one side than the other. Could this have been a factor in the difficulty we had balancing the Webers?
The cam provided by T and L was sent off to Comp Cam for evaluation since it had no identifying marks. The specs indicated it should have been appropriate for Webers.
Lumpy’s observation was that the components used were generally good quality. (We had paid extra for the forged internals). Overall the build was about average for a crate engine. There were no glaring internal omissions except for one: the discrepancy in the deck height, which was significant and inexcusable.
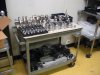
Lumpy made a number of revisions. The gear on the distributor was replaced. He upgraded the oil pump and the distributor drive shaft. The oil passages were cleaned and chamfered. The valves were properly ground. Lots more attention to detail, overlooked in a bargain basement crate engine.
We replaced the Weber carbs with a Holley Quick Fuel 650 CFM and an Edelbrock air gap intake manifold. The cam was also replaced. With some careful dyno tuning and carb jet adjustments, Lumpy got a conservative 380 horsepower at 6100 RPM and 364 pounds torque at 4400 RPM on premium pump gas with a 10:1 compression ratio.
We will be converting to fuel injection in the near future, hence the decision to replace the Webers with the Holley for now. The new cam will be better suited to FI as well.
The lessons we learned are simple. (1) You get what you pay for. (2) Find a local builder that knows what he is doing
In any event, we no longer have a T and L engine, and now have a bit more peace of mind.
The T and L 302 in our GT was rebuilt after only 1200 miles. The specific failure that prompted the rebuild was not necessarily the fault of T and L, but the various issues leading up to that point and what was discovered during the rebuild made us glad we did it. Several have inquired about the details. Hopefully the following will be an objective review of our experience.
We purchased the engine in early 2007. Our initial dealings with T and L went well. The engine was build per our specs and delivered close to the promised date. The price was good.
1. Before the engine had ever been run we replaced the valve covers and noticed that a couple of rocker arms were not centered on the valve stems. The wrong push rod guide plates had been used on one cylinder. T and L sent us replacements.
2. The original rocker arms were pink colored cheap off shore brand known to fail. T and L provided Comp Cam rocker arms. We replaced them ourselves. Pictures attached.
The engine was first fired up in the GT in February 2008. It started up just fine. The saga of tuning the Webers has been addressed elsewhere. Many of those issues were related to inadequate initial set up. More problems emerged as the miles were added.
3. A gasket in the water pump had been distorted during installation by T and L causing it to leak. Determining the source of the leak and then repairing it was a major project. Picture attached.
4. There was an oil leak from the rear of the intake manifold. Repairing the problem would have required removing the intake manifold. We decided to just live with it short term.
5. Here is a big one. We were told verbally and it was confirmed in writing that the engine was a 28 ounce balance. A 28 ounce flywheel was ordered from Kennedy Engineering. When we took the just completed car to Run and Gun in October, 2008, the first time around the track the car vibrated terribly. Upon recontacting T and L they informed us it was a zero balanced engine. This required a complete tear down of the drive train so that the flywheel could be rebalanced. This gave rise to some lingering concerns about whether the brief stint on the track with a badly misbalanced engine may have caused some problems that would come back to haunt us later.
6. In July, 2009, the GT was trailered to Road America. It was running reasonably well at that time. What prompted the rebuild was a sudden change in engine performance two months later. A lot of blow by and persistent backfiring and spitting from the Webers prompted us to do a leak down and compression check. Clearly there was a serious problem. We pulled the engine and took it to Lumpy Loughary, Performance Motorsports Systems, Greenville, Illinois. Lumpy has worked with Dean Lampe on a couple of engines and came highly recommended.
A tear down of the engine revealed that the combustion chambers were badly carboned. The rings were so bad that they were ‘stuck’ thus permitting the blow by and loss of compression. Why this happened is not clear, but it could be due to the many hours spent idling while adjusting the carbs. But why the problem became manifest so suddenly after the car had been running well remains unclear to me.
Regardless, Lumpy discovered some interesting things. The deck on one side was .015 higher than the other. As a result the compression ratios were different on one side than the other. Could this have been a factor in the difficulty we had balancing the Webers?
The cam provided by T and L was sent off to Comp Cam for evaluation since it had no identifying marks. The specs indicated it should have been appropriate for Webers.
Lumpy’s observation was that the components used were generally good quality. (We had paid extra for the forged internals). Overall the build was about average for a crate engine. There were no glaring internal omissions except for one: the discrepancy in the deck height, which was significant and inexcusable.
Lumpy made a number of revisions. The gear on the distributor was replaced. He upgraded the oil pump and the distributor drive shaft. The oil passages were cleaned and chamfered. The valves were properly ground. Lots more attention to detail, overlooked in a bargain basement crate engine.
We replaced the Weber carbs with a Holley Quick Fuel 650 CFM and an Edelbrock air gap intake manifold. The cam was also replaced. With some careful dyno tuning and carb jet adjustments, Lumpy got a conservative 380 horsepower at 6100 RPM and 364 pounds torque at 4400 RPM on premium pump gas with a 10:1 compression ratio.
We will be converting to fuel injection in the near future, hence the decision to replace the Webers with the Holley for now. The new cam will be better suited to FI as well.
The lessons we learned are simple. (1) You get what you pay for. (2) Find a local builder that knows what he is doing
In any event, we no longer have a T and L engine, and now have a bit more peace of mind.
Attachments
Jim Rosenthal
Supporter
Chuck, you are very likely going to love the Quick Fuel carburetor. I have a similar one on my Cobra- sold by ProForm, but it is built by QF. Everything on it can be adjusted or replaced, unlike a Holley where some items are not removeable or adjustable. We spent a lot of time fiddling with the Cobra's engine and changing out air bleeds and jets, etc. We did have to change the cam out for a milder cam- the builder had originally put in a Lunati bracket-racing cam which made no power at all below about 2500 revs. Once we had changed the cam, the engine was just perfect for the car. The only problem is that it revs so eagerly that if I am not careful I hit the limiter in first and second all too quickly...we should all have such a problem. Have fun.
I could not have written as delicate a post as this given the issues you've endured.
It was a challenge.
After all What is your proffesion :lipsrsealed:It was a challenge.
TOM
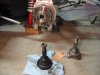
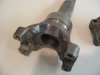
Stub Axles
The stub axles needed to be replaced since the ZF uses universal joints rather than CV joints. The Corvette stub axles were ordered from Mid America Motorworks, Effingham, Illlinois, part number 602556C, described as a “spindle, rear wheel, 88 – 96.” Be sure to order the retainer straps, part number 614864, as well. The eight bolts needed to secure the retainer straps are M8 x 20 x 1.0 pitch.
The wheel hub was disassembled. The nuts, which were torqued to 120 pounds when installed, took a good bit of grunt to come loose. Once removed a few whacks with a large hammer freed the Audi stub axles.
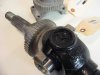
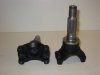
The Corvette stub axles have a toothed ring which must be removed. A split was made in the gear after which it could be easily slid off. Pictures before and after the toothed ring was removed are attached.
The opening in the yoke on the stub axles is a bit tight limiting the angular movement of the axle. Accordingly a bit of grinding was done to open it up and give it more vertical travel.
The exposed portion of the stub axles were painted low gloss engine black: the generic color we use for virtually everything.
With the stub axles back in place, torqued to 120 pounds, the rear wheels were reassembled, and the calipers reinstalled. One step closer to the engine being installed.
The stub axles needed to be replaced since the ZF uses universal joints rather than CV joints. The Corvette stub axles were ordered from Mid America Motorworks, Effingham, Illlinois, part number 602556C, described as a “spindle, rear wheel, 88 – 96.” Be sure to order the retainer straps, part number 614864, as well. The eight bolts needed to secure the retainer straps are M8 x 20 x 1.0 pitch.
The wheel hub was disassembled. The nuts, which were torqued to 120 pounds when installed, took a good bit of grunt to come loose. Once removed a few whacks with a large hammer freed the Audi stub axles.
The Corvette stub axles have a toothed ring which must be removed. A split was made in the gear after which it could be easily slid off. Pictures before and after the toothed ring was removed are attached.
The opening in the yoke on the stub axles is a bit tight limiting the angular movement of the axle. Accordingly a bit of grinding was done to open it up and give it more vertical travel.
The exposed portion of the stub axles were painted low gloss engine black: the generic color we use for virtually everything.
With the stub axles back in place, torqued to 120 pounds, the rear wheels were reassembled, and the calipers reinstalled. One step closer to the engine being installed.
Attachments
Chuck,
Question: With your new axles installed, how close do they get to the rear pan support heim or the support bracket when you compress the rear suspension?
Don't know yet. Will have an answer soon - hopefully . . . .
Jim Rosenthal
Supporter
Interesting that you are using U-joints (Kardan joints) in this installation. Is there a CV or Rzeppa joint on the axle at either end, or do they use U-joints at each end?
The original cars used Metalastik couplings on the transaxle end of the halfshafts, and Kardan joints at the rear uprights. They have been described as unreliable- but anything you can thrash around LM for 24 hours, pushing 400-500 hp through it, for 9000 gearchanges and NOT have it fail is not unreliable. I think that the Metalastik couplings don't age well, though. The Mark V cars were fitted with CV joints on each end of each halfshaft, which is a lot more appropriate for cars that are not raced frequently and sit around a lot- toys as opposed to working race cars. I am interested to see if you perceive a difference with the U-joints as opposed to the CV joints.
The original cars used Metalastik couplings on the transaxle end of the halfshafts, and Kardan joints at the rear uprights. They have been described as unreliable- but anything you can thrash around LM for 24 hours, pushing 400-500 hp through it, for 9000 gearchanges and NOT have it fail is not unreliable. I think that the Metalastik couplings don't age well, though. The Mark V cars were fitted with CV joints on each end of each halfshaft, which is a lot more appropriate for cars that are not raced frequently and sit around a lot- toys as opposed to working race cars. I am interested to see if you perceive a difference with the U-joints as opposed to the CV joints.
Wow, what a saga. I am glad it is nearing the end. I look forward to hearing more as the enjoyment curve ramps up.
We swapped our 4 barrel carb for EFI from Mass Flow (Cobra) and have been really pleased. It's difficult to get a carb to match the performance of a mass airflow sensor driven EFI setup, especially at low speed cruise. I am not expecting my Kinsler setup to run quite as well, but I am sucker for the look.
We swapped our 4 barrel carb for EFI from Mass Flow (Cobra) and have been really pleased. It's difficult to get a carb to match the performance of a mass airflow sensor driven EFI setup, especially at low speed cruise. I am not expecting my Kinsler setup to run quite as well, but I am sucker for the look.
Interesting that you are using U-joints (Kardan joints) in this installation. Is there a CV or Rzeppa joint on the axle at either end, or do they use U-joints at each end?
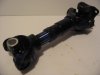
So is a picture worth a thousand words? Pretty neat, huh?
Looks to me like it came from a bulldozer. Suspect it will handle what ever we can dish out.
Attachments
Jim Rosenthal
Supporter
They look like the ones for the 427 Kirkham Cobra. Beefy. Your nerve will break before they do ")
Your nerve will break before they do
You got that right.
Similar threads
- Replies
- 24
- Views
- 3K