

You are using an out of date browser. It may not display this or other websites correctly.
You should upgrade or use an alternative browser.
You should upgrade or use an alternative browser.
Mitch Krause's RCR GT40 Build
- Thread starter Big-Foot
- Start date
Hey Randy, interesting you brought that up....the fill process can take some time on mine if the gas station nozzle pressure is high, even at the 'cracking point'. It may be self-inflicted based on how I built the system, but I do wish I had a higher flow filling system right now...
Sounds like a possible venting issue... It does seem like pumps push fuel through pretty quickly these days. My 33 Ford's fuel filler tube is only about 8" long and the force of the fuel coming out the nozzle creates a wave that wants to wash back and slosh out!
No, it's more like a restriction issue.
I left the tank's filler connection at about 1" to try and reduce some of the fuel burping up the filler pipe that can occur when the fuel sloshes forward under hard braking. I should have opened it up to the full ID, so will have to go back at a later time and open it up to ~1.5".
I left the tank's filler connection at about 1" to try and reduce some of the fuel burping up the filler pipe that can occur when the fuel sloshes forward under hard braking. I should have opened it up to the full ID, so will have to go back at a later time and open it up to ~1.5".
Mitch Krause
Supporter
I chuckled when Randy said "...the only way is to build a model....". That is exactly what I did. Now you can chuckle to, if only at my cardboard fabrication skills. I had built this to take to the custom exhaust shop to show them what I needed. This is what resulted in them saying it had to be a mandrel bend. He indicated they could not make the turn radius with their equipment, so he is ordering the mandrel bend. So now I wait to see what that brings.
Believe it or not, the picture shows something that is very, very close to being a 1 to 1 scale model to the GT fuel fill area.
Believe it or not, the picture shows something that is very, very close to being a 1 to 1 scale model to the GT fuel fill area.
Attachments
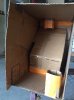
Mitch, too bad you can't take the car to them but the model should definitely help the fabricator. Depending on the tube diameter they use keep an eye on the two areas I marked in Red. You may have to cut down the lower portion of the fill cap assembly so you have a little more clearance for the union and effectively raise the ~45 deg bend below, which could interfere with the chassis.
Have the shop roll a small bead on both ends for a good seal.
Have the shop roll a small bead on both ends for a good seal.
Attachments
Last edited:
Mitch Krause
Supporter
The sides are mirror images, I am going to see how one goes before proceeding.
Tom, I did consider cutting, was not a fan of that yet, in particular on the tank one, as I figured that would end up with shavings in the tank. I am making a 1/4 spacer for under the top fill one that will help ever so slightly with the angle, if I need more, than that would be the first place to trim. We will see what happens once the bent pipe gets here.
Tom, I did consider cutting, was not a fan of that yet, in particular on the tank one, as I figured that would end up with shavings in the tank. I am making a 1/4 spacer for under the top fill one that will help ever so slightly with the angle, if I need more, than that would be the first place to trim. We will see what happens once the bent pipe gets here.
Ian Anderson
Lifetime Supporter
What diameter pipe are you looking for?
I would presume 2 inch 51mm
And how long
See if I can turn some up
Ian
I would presume 2 inch 51mm
And how long
See if I can turn some up
Ian
I am making a 1/4 spacer for under the top fill one that will help ever so slightly with the angle, if I need more, than that would be the first place to trim.
The 1/4" spacer will help raise the whole top assy as discussed earlier. I believe they were supposed to come with the (later?) kits. I ordered two spacers once I discovered they were available.
...Tom, I did consider cutting, was not a fan of that yet, in particular on the tank one, as I figured that would end up with shavings in the tank....
Forgot to add.....If you have to cut that area, try a shop vac taped next to the cut area while you're cutting to collect most of the shavings. You can also stuff some tank foam in there with the shop vac while you cut. Either way, your tank filter will collect some shop debris no matter how well you keep it clean, but most of it can be cleaned after the shakedown drive...
Mitch Krause
Supporter
Ian,
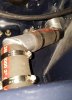
The filler and the pipe in the tank are both 2 inch OD. I did get some 2 inch OD exhaust pipe and was fooling a little with trying to cut that before I decided to wait on the custom shop thing to try that out, as well as sending a query to RCR (have not heard from them) on availability.
Will certainly use the plug the neck and use the shop vac advice if I end up cutting.
I have been working on forming a spacer from some 5 inch wide 1/4 inch thick AL plate that I have. Figure that is a good backup. It is hidden on the final, so if the circle is a little rough, no big deal. Now if only I could find a blade that lasted for more than 10 inches of cutting with my scroll saw......
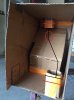
Mitch,
Hope this pic helps to show what I did on mine. Half of the pipe is tig welded to the bottom of the fill plate assy then rotated/indexed to the bottom pipe and mated using the reinforced 2" non-permeating rubber marine hose.
Hope this pic helps to show what I did on mine. Half of the pipe is tig welded to the bottom of the fill plate assy then rotated/indexed to the bottom pipe and mated using the reinforced 2" non-permeating rubber marine hose.
Ian,
The filler and the pipe in the tank are both 2 inch OD. I did get some 2 inch OD exhaust pipe and was fooling a little with trying to cut that before I decided to wait on the custom shop thing to try that out, as well as sending a query to RCR (have not heard from them) on availability.
Will certainly use the plug the neck and use the shop vac advice if I end up cutting.
I have been working on forming a spacer from some 5 inch wide 1/4 inch thick AL plate that I have. Figure that is a good backup. It is hidden on the final, so if the circle is a little rough, no big deal. Now if only I could find a blade that lasted for more than 10 inches of cutting with my scroll saw......
Attachments
Mitch Krause
Supporter
Tom,
Very nice view, that does help provide a great perspective. I did get the mandrel bent stainless steel pieces yesterday, didn't have time to fool with them last night (a couple posts coming on that), but they look great and keep a good radius on the bend so would not constrict the fill (much like yours). I will work with them yet to see what I have, still trying to avoid having to cut the top piece, but might have to head that direction as shown in your example. Thanks for the picture (worth a thousand words, certainly).
Mitch
Mitch Krause
Supporter
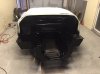
Painted Inside Rear Clip
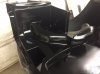
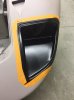
Had everything masked and ready to go and sprayed the inside of the rear clip with Eastwood Hot Rod Satin Black paint last night. The paint is better than the juvenile talent of the painter (yep, I have a few runs to deal with maybe), but I figured it was inside and something I could do and sacrifice some looks if I had too. Just have to figure out now if I want to call it good enough for now. I had primed and wet sanded everything, having the areas that I cared about much finer finished than some others. My only complaint is that I was expecting more of a flat finish (satin) that I ended up with, maybe it will dull a little as it drys.
Also just to try it out, I had finished one of the lights and sprayed that. Pics attached.
Attachments
Mitch Krause
Supporter
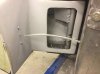
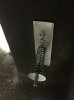
Door Limit Adjusts
Finished the door limit adjust last night also. Nothing too original here, copied from Chuck and Ryan's book. But posting some pics. Seems to work well. Inside AL plate, tapped for a #6 screws. 1/8 inch stainless cable. Cable is 6 inches up from top of tank. 2.5 inches in from inside edge of door and about centered on the post that is part of the frame.
Finished the door limit adjust last night also. Nothing too original here, copied from Chuck and Ryan's book. But posting some pics. Seems to work well. Inside AL plate, tapped for a #6 screws. 1/8 inch stainless cable. Cable is 6 inches up from top of tank. 2.5 inches in from inside edge of door and about centered on the post that is part of the frame.
Attachments
Mitch Krause
Supporter
Similar threads
- Replies
- 24
- Views
- 3K
- Replies
- 42
- Views
- 4K