Hi,
I own GT40 II P/2171. It has a Roush 427SR.
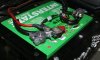
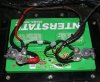
I noticed over the course of a couple weeks that the battery seemed to become weaker and weaker as time went by. Eventually, the battery would not turn-over the engine at all. Upon removing the lid on the battery box, I noticed one portion of the positive battery terminal had melted off. Pictures associated with this thread reflect the melt-down.
This is the second time this has happened. The first time was in 2009. Back then I simply dismissed the issue and replaced the terminal. (Probably the wrong course on action to take at that time.)
I don't understand any thing that goes beyond a simple conventional positive and negative cable connecting to the battery. I am uncertain what the other various wires and connections are for.
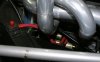
The installer did provide an extra red cable from the solenoid (I think) to a terminal point mounted on the frame. I believe this was done so a path to the positive terminal could be accessible without taking off the battery box lid.
I don't know if this is a possible clue, but my vehicle has the ammeter anomoly that pegs hard to the right as various things (example: lights, A/C, wipers) get turned on. I know the "How-To" portion on this web site addresses ways to correct this, even to the extent of replacing the ammeter with a volt meter.
Any thing offered to help me correct this problem will be greatly appreciated.
Thanks,
Don in Maine
I own GT40 II P/2171. It has a Roush 427SR.
I noticed over the course of a couple weeks that the battery seemed to become weaker and weaker as time went by. Eventually, the battery would not turn-over the engine at all. Upon removing the lid on the battery box, I noticed one portion of the positive battery terminal had melted off. Pictures associated with this thread reflect the melt-down.
This is the second time this has happened. The first time was in 2009. Back then I simply dismissed the issue and replaced the terminal. (Probably the wrong course on action to take at that time.)
I don't understand any thing that goes beyond a simple conventional positive and negative cable connecting to the battery. I am uncertain what the other various wires and connections are for.
The installer did provide an extra red cable from the solenoid (I think) to a terminal point mounted on the frame. I believe this was done so a path to the positive terminal could be accessible without taking off the battery box lid.
I don't know if this is a possible clue, but my vehicle has the ammeter anomoly that pegs hard to the right as various things (example: lights, A/C, wipers) get turned on. I know the "How-To" portion on this web site addresses ways to correct this, even to the extent of replacing the ammeter with a volt meter.
Any thing offered to help me correct this problem will be greatly appreciated.
Thanks,
Don in Maine