Nice work as always Don! Did you buid all of those front panels on the clam? I think you have the right idea, I just finished a kva mk-1 that hinged like that and it is much easier to work on. our mk-4's seem to be quite diffrent.Would it be ok if i drop my mk-4 off at your place and you could apply some of skill for me.......mahlon

You are using an out of date browser. It may not display this or other websites correctly.
You should upgrade or use an alternative browser.
You should upgrade or use an alternative browser.
Don's Mk IV Build
- Thread starter Don Nye
- Start date
- Status
- Not open for further replies.
D. Nye
Lifetime Supporter
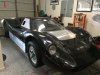
Drop her off any time your ready. Yes I made all the aluminum panels for the front and rear inner fender wells. My car came with some rear panels but I didn't like the look so I made some new ones. Most of what I'm doing is making it look as close to J7 as I can so if the inner fenders look differnt than what I have I make some new ones if possible. The front hinge seems to work great and after having it opened and closed a hundred times already it always returns to the same place which makes it quick and easy to work around things.
Sorry I missed the big party in Boulder Colorado at the Shelby American. I understood you had one or two of your cars there.
Best of luck with your Mk IV,
Sorry I missed the big party in Boulder Colorado at the Shelby American. I understood you had one or two of your cars there.
Best of luck with your Mk IV,
D. Nye
Lifetime Supporter
It's been over a month without posting something and people are asking what's going on so hear you go John.
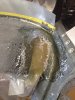
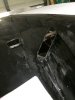
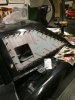
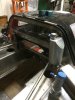
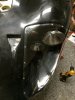
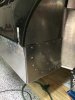
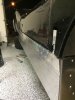
I have been working with the spider (body work) for what I believe is forever! It seems I made a big mistake by mating the inner and outer fiberglass shells of the spider which has made me lower the roll cage by about an inch and when you do that you need to move the right side of the front bar in to miss the driver’s door. I attached two pictures that show what I put in the inside of the spider to help with the sound and heat. I also started fiberglass repair of the windshield area in the lower right and left corners.
While redoing the roll cage I decided to make it look more like the original cars which I will post pictures very soon.
I have hung the doors with the roll cage modifications and everything now fits with the proper fit. Things are looking up and the speed should now pickup.
Don
Attachments
D. Nye
Lifetime Supporter
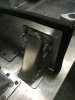
Did not have much time this weekend to work on the car but I did get the door latches installed on the drivers door. I made a trip to RCR about a year ago and got pictures of the completed Mk IV to see some of the details of their build. The door latches was an area I was not sure how the originals were done, there are very few pictures of the inside of the doors so it was a picture of the RCR car that gave me the inspiration of the design.
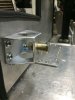
Took some 2" square aluminum tube and made my door posts to attach to the firewall. Turned out well and the biggest and most important thing it works.
Getting closer all the time.
Don
Took some 2" square aluminum tube and made my door posts to attach to the firewall. Turned out well and the biggest and most important thing it works.
Getting closer all the time.
Don
Attachments

Nice work Don! I wasn't sure if you where supplied with any brackets for the mounting of the pins or not. Have you decided on which way you are going to do the outside access to the latch. I have looked at the museums and am not sure if I want to do the hole in the door that way with a lever or what I am going to do, keep us posted on your work................m
D. Nye
Lifetime Supporter
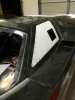
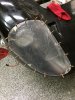
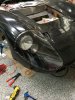
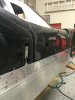
Made some progress over the weekend. With all the air openings now cut I can now start with making the ducting. I also installed the rear and door glass. Since I was drilling holes in Plexi I decided to move on to the headlight covers. Got the left one fitted and held in place waiting for more rivnuts in the mail. It took about two hours to fit and pin it in place. Maybe I was just being to slow but better safe than sorry.
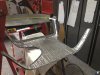
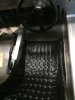
I set the drivers seat in to see how much room I have for the shifter. It's tight but will just fit, not a lot of room in these cars. I also fit the pedals to see how much room I have around the steering shaft, again not much room but looks like it will clear.
Enjoy the pictures,
Don
I set the drivers seat in to see how much room I have for the shifter. It's tight but will just fit, not a lot of room in these cars. I also fit the pedals to see how much room I have around the steering shaft, again not much room but looks like it will clear.
Enjoy the pictures,
Don
Attachments
-
 Rear Glass 1.JPG272.8 KB · Views: 377
 -
 Rear Glass In.JPG200.3 KB · Views: 361
 -
 Rear Air Opening.JPG228.8 KB · Views: 349
 -
 Right Glass 1.JPG268.1 KB · Views: 384
 -
 Right Window In.JPG231.5 KB · Views: 412
 -
 Left Window In.JPG237.5 KB · Views: 412
 -
 Left Head Light Cover.JPG312.8 KB · Views: 425
 -
 Seat Room.JPG218.2 KB · Views: 469
 -
 Pedal Fit.JPG202.6 KB · Views: 453
Don, you can always put a slight bend in the brake pedal for a little more toe clearance if necessary..its not unheard of in cars such as these
Don....I have the tilton pedal assembly in mine, and I agree that there is no room. The tiltons have adjustable pedal pads, and by adjusting the bolting positions I am able to get them on either side of the steering shaft with a little more room then the ones you have. The problem that I have is with my big feet transitioning from throttle to brake I hit the shaft way to easy, forget any chance of heel toe work in this configuration. I am looking into Borgeson joints as I have used them before, and they are smaller and capable of going to a steeper angle without binding which would allow movement of the shaft further up we will see...I have a question for you on the fuel system. I will have to look back on your post to see how you set it up with a crossover line, my two tanks are the same. I think I ended up with two from the same side! They are identical, putting one filler neck in front and one in back by the firewall along with the sending units at the opposite ends. I will check today hopefully they are for the side that has the fuel door, either way we will have to do a lot of modifications to at least one of them. I am not sure if I am going to cross connect the tanks like you, or set it so I can draw from one or the other. keep up the good work it is always nice to see........m
D. Nye
Lifetime Supporter
Mahlon,
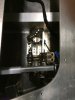
My tanks have the sending unit in the rear and I only wanted one fill spout with no gas lines in the car with me unlike the originals with the equalizer line behind the seats. I incorporated a Ford electric truck valve for the tank switch over. The left tank is the main normal operating tank with the right side acting as the reserve tank. The equalizer line could only get close to the bottom of the tank so once the fuel is gone on the left there is some fuel in the right tank to get me to the gas station or to the pits.
As for the pedals, I will see if Fran's advice will work out or I go another route with the pedals.
Best of luck with your build!
Don
Attachments

Don I have two right side fuel tanks they are the same we just checked so the right side is ok with the filler neck behind the dash and the sender at the back of the cabin near the firewall like yours. To make the left side fit as they are tapered and only go in one way it puts the sender up front behind the dash and the filler at the firewall in the back of the cabin. I will have to modify one of the fuel tanks . I have the tilton pedals sitting on the floor and can send you a picture if that helps. I have to do something for my big fat feet! it looks like the tiltons may provide a little more room when adjusted then the RCR ones and I may be able to modify the brake so we can heel toe. we have finished building the firewall because mine did not come with one, now We can get the seat and shifter sorted as best we can and then move to the pedals and steering column and then the dash..............thnks...............m
D. Nye
Lifetime Supporter
Wayne,
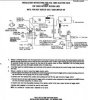
The attached picture shows you how it will work. We have two fuel senders, two fuel pickup lines and in my case one fuel pump. The wiring diagram shows how in the normal operation the valve is not energized but when you are on aux. tank the valve is and with the right toggle switch when you switch tanks you switch sending units. The hardest part is installing a equalizing line.
Don
Attachments
D. Nye
Lifetime Supporter
More work time on the car this last week.
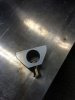
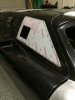
Once I had the side windows in, I realized that a door handle was needed, (Da!) so I could open the doors from the outside. I cut holes in both doors and made door handles for the inside. A picture of the original was scaled to locate this opening and size. It looks close to the right size and location. Remember this is a race car replica so it’s all about function.
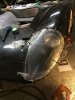
I moved to the rear bulkhead and installed the last tank I was missing. The overflow catch tank below the expansion tank signed by Ken.
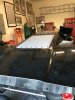
Head light covers were installed and because all the other windows were installed I decided to place the windshield in for its first trial fit. Stepping back and taking a picture I had to stop and just stare at it, what a neat looking car!
The only thing that is holding me back from installing the engine is the RBT transaxle. I’m not someone that complains much but I placed my order last May 1st with my deposit and as of today still waiting for a delivery date. It was ordered with a 3.77 ring gear and 0.62 5th utilizing the Pantera input shaft making the clutch a standard Ford 1-1/16” 10 spline disk, I understand what I ordered is not standard but really does it take that long to build one of these things? I’m guessing there are others that are waiting.
Once I get the transaxle I will get the engine in and started so we can all enjoy hearing this big FE rumble!
Enjoy the pictures.
Don
Once I had the side windows in, I realized that a door handle was needed, (Da!) so I could open the doors from the outside. I cut holes in both doors and made door handles for the inside. A picture of the original was scaled to locate this opening and size. It looks close to the right size and location. Remember this is a race car replica so it’s all about function.
I moved to the rear bulkhead and installed the last tank I was missing. The overflow catch tank below the expansion tank signed by Ken.
Head light covers were installed and because all the other windows were installed I decided to place the windshield in for its first trial fit. Stepping back and taking a picture I had to stop and just stare at it, what a neat looking car!
The only thing that is holding me back from installing the engine is the RBT transaxle. I’m not someone that complains much but I placed my order last May 1st with my deposit and as of today still waiting for a delivery date. It was ordered with a 3.77 ring gear and 0.62 5th utilizing the Pantera input shaft making the clutch a standard Ford 1-1/16” 10 spline disk, I understand what I ordered is not standard but really does it take that long to build one of these things? I’m guessing there are others that are waiting.
Once I get the transaxle I will get the engine in and started so we can all enjoy hearing this big FE rumble!
Enjoy the pictures.
Don
Attachments
D. Nye
Lifetime Supporter
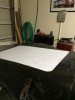
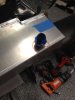
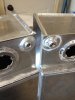
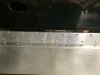
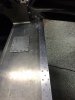
So last weekend I pulled out the rivet gun. What does 200 rivets look like?
Will finish up the right side tonight and get to start on the other side this weekend. Anyone that has done this can attest that it's not just the rivets it's drilling all the holes.
It's getting there.
Will finish up the right side tonight and get to start on the other side this weekend. Anyone that has done this can attest that it's not just the rivets it's drilling all the holes.
It's getting there.
Attachments
Nice job Don.
"The only thing that is holding me back from installing the engine is the RBT transaxle. I’m not someone that complains much but I placed my order last May 1st with my deposit and as of today still waiting for a delivery date."
Demand for RBT's is up since GT40 orders have increased. I had to wait 1 year for mine in 2007. You could buy them off the shelf in 2010 and there's a waiting list again now. I believe Quaife recently started another ZFQ batch due to demand.
- Status
- Not open for further replies.
Similar threads
- Replies
- 12
- Views
- 965