Davidmgbv8
Supporter
I may have interest if folks are getting rear glass made in the original pattern. What about the metal surround?

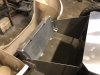
So, I noticed the return side of your radiator does not pull off the top. There's a good chance of you getting a big bubble of air in there and the top half of the radiator going unused. You need to either add a bleed from the top of the return or something to ensure the radiator is full of water, and not 1/2 air.
I'm also not real happy with the way those 2 vertical pieces are bent and bolt to the front. This puts a lot of stress on the bend and allows a lot of flex that will work harden adn crack the alum.
They're a good start, but I think we need some flat tabs connecting the verticals to the box.
Tomorrow, I'll try to sketch something.
View attachment 125342View attachment 125343View attachment 125344View attachment 125345So, I noticed the return side of your radiator does not pull off the top. There's a good chance of you getting a big bubble of air in there and the top half of the radiator going unused. You need to either add a bleed from the top of the return or something to ensure the radiator is full of water, and not 1/2 air.
I'm also not real happy with the way those 2 vertical pieces are bent and bolt to the front. This puts a lot of stress on the bend and allows a lot of flex that will work harden adn crack the alum.
They're a good start, but I think we need some flat tabs connecting the verticals to the box.
Tomorrow, I'll try to sketch something.
i read your build thread a few months ago,perfect build.did Chris make your headers?My GT40 started to show signs of a stress crack as mentioned. A couple of flat aluminum pieces bolted on to the extension and onto the firewall resolved the issue. Easy fix.
Dod you have to drill out? Mine are not drilled10mm air purge screws are located on top both sides of the radiator.
That’s how Im noticing them. I’m just confused on how it regulates the pressure that way though. So your pump to filter to the blue arrow then out regulator (red arrow) back to tank?On my Borla setup the gas feeds into the fuel rails and then the regulator. This is the way I got it and haven’t had any issues with it.
On my Borla setup the gas feeds into the fuel rails and then the regulator. This is the way I got it and haven’t had any issues with it.