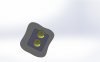
Hi
This is how a rear clip can be altered with new small lights location ( no need of moulded parts)
1/ Cut a rectangular area where light are to be located ( so the big round one disapear by being grinded off)
2/ cut a rectagular piece of aluminium foil or pvc sheet 20mm larger than the hole on clip and drill fixing holes all around
3/ have cups done measuring the lights and with help of "1040" pics ; can be done in doing one machined one and small
mold to replicate 4 of those or better have them done by afriend with 3D printer
4/ Wax the pannel described on 2/ and plce it with wood screws behind clip on each sides ( smooth lightly before all around
the cut to have asmooth transtion when moulding the repair)
5/ wax each cup and place them on the right position then drill and fit those with long 1/4 bolt ( head can protude as you
will cut the face to fit the light)
6/ With plasticine do a nice radius al around the base of each cup ( as shown on colored 3D views)
7/ Gelcoat all area
8/ Use resin and "Aerosil" mixed to have sort a paste compound you lay onto the transition , those radiuses and on top of cups
before laying 2 x450gr Matt to prevent bubbles
9/Let cure and unscrew the bolts and wood screws release the panel
10/ pull off (using the 4 bolts ) cups ; ET Voila job done
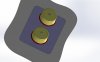