Need opnions.

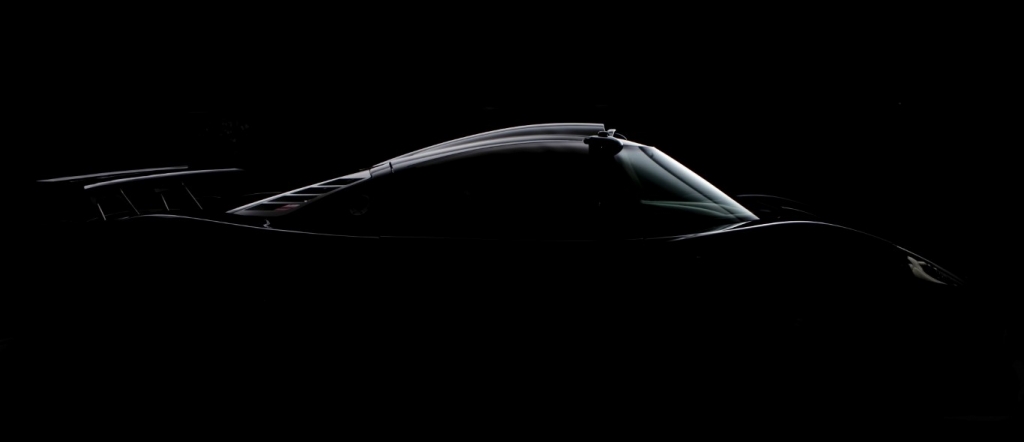
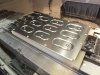
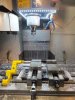
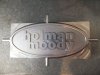
I am going to school to be a Machinist. I am also taking a laser class. We are required to cut out at lest three things. I got the dumb idea to do some thing SLC related. I planed on making a sign out if it. With SLC and super light coupe text on the top and bottom. Then maybe put some sort of lights behind it. I think it would look pretty cool.

I wanted to do some thing like this. http://www.cartype.com/pics/5917/full/panamera_profile-art.jpg

I just could not get it right. So that lead me to this.
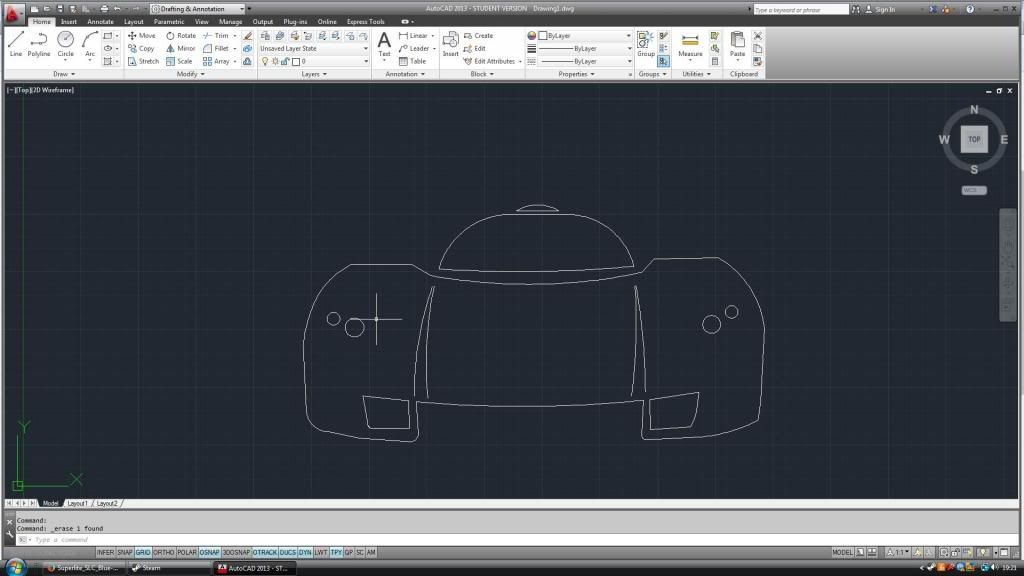
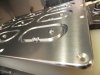
I know the left air intake is a little messed up. I am also not sure on how to do the windshield area. The pic on which I traced. Has the doors open. I just was not sure how it would look. So I left them out. I could always draw some doors on later. I just wonder how I can make it better.

If you guys have any suggestions. I am open to any. Also so you know. I don't have a SLC or access to a SLC. I am just useing the pics I found on this site. If any one has high res pictures that they would like to share. I would not say no.
 
Last edited:
I live in CADD all day.
An easy tip is to only to draw half a symmetrical subject and mirror the image around the centerline. That would take care of your air intakes and other irregularities. Save yourself a sh!tload of time in the process too.

Also, the car profile in the link you posted would be WAY easier to do in Illustrator or numerous other graphics oriented programs instead on AD's Autocadd.
 
Sorry I am getting back so late. I did try the mirror. For some reason every time I would try it. The pic would vanish. After goign in to photo shop. I used the brush tool to trace the out line of the car. Then imported it in to cad. I think it looks pretty good.

 
Well I can fix that. I don't know why I thought it was two words.

Since I have you here. Can I get in trouble for making this? It will not be sold, or mass produced. It will just be hanging on my wall in my man cave.
 
Can I get in trouble for making this? It will not be sold, or mass produced. It will just be hanging on my wall in my man cave.

No. Legally, what you're doing is no different than a kid in junior high school drawing a picture of a tuner WRX with the caption "Subies Rule!" on the cover of his notebook. Carry on.

JR
 
Law states for patent, trademark, etc. you can make/copy anything for your own use. If you start to sell it then you are breaking patent, trademark laws.

Post picture of finished product.
 
Maybe this will help? I believe this image was originally part of an ad for the old Aspira/ SLC/ Rapier sales program.

1_silo_side_low_res__Medium_.jpg
 
I will post a pic. It might not be in till this four feet of snow melts though. As I don't fell like digging out my shed. That has my wood tools in it. I would like to put in in a wooden box. Nothing fancy, I will just be easier to hang, and hide the lights.

Thanks for the pic. I will mess with it right now. To see which one I like better.
 
Last edited:
Hi Tipptruck1

I own my own CNC Mill and work with CAD and CAM all day and use Bobcad. It has an add on called Bobart that is great at getting toolpath off pictures. I grabbed a picture of an orange SL C and dragged this off it. Took about 15 minutes with a little cleaning up (one of Fran's babys)
Send me am email and I will send you a DXF for you to use...

Second picture is of GT40 logo that I came up with to use on my own project build log to start in a little while...

Cheers Craig Young
 

Attachments

  • slc engraving.jpg
    slc engraving.jpg
    121.5 KB · Views: 318
  • DSCF4421.JPG
    DSCF4421.JPG
    26.6 KB · Views: 289
The GT40 is made from a small billet of aluminum. I used 4 tools to make it.
8mm ball end 4 flute carbide, 1mm, 2mm and 4mm carbide. It took a little while as with such small tools I have to be gentle.
The other pictures are some of the parts I have been making for the GT40..


Cheers Craig Young
 

Attachments

  • DSCF4413.JPG
    DSCF4413.JPG
    369.9 KB · Views: 269
  • DSCF3307.JPG
    DSCF3307.JPG
    433.6 KB · Views: 300
  • DSCF3925.JPG
    DSCF3925.JPG
    371 KB · Views: 307
  • DSCF3929.JPG
    DSCF3929.JPG
    265.2 KB · Views: 299
I can relate. Last year we made jaws for our tap wrench in school. We had this little 2 flute 45 degree end mill. We could only take off a couple thousands at a time. While the feed was some thing like 10 minutes across. For a part that was a little over 3/4 of a inch.

My question is about pic two. It looks like you can see your steps. From every depth of cut. Why not add some cutter comp? We usually add any were from 10-20 thousands. Then our final cut is a clean up cut. So the part is smooth.
 
Hi Tipptruck1
The parts in the second picture are the rockers for the in-board suspension.
It looks like there are ridges but when you run your finger down the faces it is really smooth. The tool used was a Taegutec 50mm cutter with 5 polished carbide inserts running at 2500 RPM and moving at 1000mm per minute. I usually leave 0.2mm to take off as a finish cut and have done that on these parts.
If I required a super smooth finish I could have used a 20mm long series carbide (Max 76mm cut length) at 1200 RPM but when you get a large amount of flute engagement often you end up with harmonics through the tool which doesn't help the surface finish. Not to mention it is a lot slower and requires extra toolpath and tool offset setting.

I thought i would add a couple of extra picture. The first is my machine and vices. The second is some flanges for intakes and the third and fourth is a custom-made badge for a friend with a 1964 ford galaxie.

Cheers Craig Young
 

Attachments

  • DSCF0720.jpg
    DSCF0720.jpg
    273 KB · Views: 262
  • DSCF1725.jpg
    DSCF1725.jpg
    224.9 KB · Views: 288
  • DSCF0651.jpg
    DSCF0651.jpg
    193.8 KB · Views: 272
  • DSCF0652.jpg
    DSCF0652.jpg
    156.6 KB · Views: 281
I love how this has turned from a cad slc topic. To a machining topic. Any way Craig I did email you. Let me know if you got it on this topic.
 
Hi Tipptruck1
Yes I got your e-mail but i am not sure that bobcad has a student version. I know you can download a demo version from there website but as it wont let you save it is pretty limited.
I am pretty sure that a V21 version is around $1000USD but its not the greatest at CAD but OK at CAM.

It really doesn't matter what CAD program you can get as it is the (CAM) Computer Aided Machining that is where it all happens. Almost 90% of the work I do is 2D profiles and drilling so a CAD system with all the bells and whistles might not be what you need.

But for complicated parts you just save any 3D file as a IGES or STEP file then start to program how it cuts from there.

The best way I can describe using a CAM system to program a CNC mill is that you have all the options in the world on how to cut the part but the only way to learn is to actually do it.. There are no back buttons in CNC..

I have broken tools and ripped parts out of vices but learn't something each and everytime..

Cheers Craig Young
 
Hi Tipptruck1
To try and bring this back to the SLC I will cut the SLC engraving in a couple of days and send it to you to put up on your wall... E-mail me your address.

To all others sorry about the thread drift... pictures to follow

Cheers Craig Young
 
Can't really go back in a hand mill or lathe also. I have also screwed up a handful of tools. I haven't ripped a part from a vice yet. I have crashed the lathe once. Some gos for the mill. When I crashed the mill. The teachers were right behind me. That is worst then crashing when they are not around.
 
I got it cut out today. I chose to make it out of stainless. The good for right now. With a 10 thousands cut. The side of the car is visible. By me holding it up to normal lights. The bad. I didn't make the web on the R wide enough. So I am missing the middle of the R. You can still tell it is a R though.

Now to worst part for me any way. Deciding if I want to polish it. I also have to make the box, and find LED lighting. Three thigns I hate. Polishing, Electrical, and wood work.

I will post I pic by this weekend. Only if I choose not to polish it.
 
Back
Top