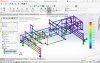
Hi Clive, it looks very weak in bending have you done any FEA work, to look at other load cases? I assume you are not using the roof as a structural member?

You are using an out of date browser. It may not display this or other websites correctly.
You should upgrade or use an alternative browser.
You should upgrade or use an alternative browser.
Scratch Build of Jag XJ220 Replica
- Thread starter Clive B
- Start date
Im assuming you mean the large floorpan area is very weak? This is yet to be filled as seat mounting tests are rather stringent and the seat runners will need to be firmly mounted to the chassis members (50x25x3mm). Will be adding these when I decide on the seats I will use.Hi Clive, it looks very weak in bending have you done any FEA work, to look at other load cases? I assume you are not using the roof as a structural member?
The centre backbone (within the passenger cabin) is also braced on my actual chassis as well as front and rear firewall crossmembers to channel strain through trussed members (triangulate squares!)
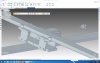
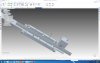
I did revisit the front torsion test (from post 20) this used 8000N force rather than the 4000N requirement. Have re-posted the correct one here.
Attachments
Clive B How soon would you have a body with glass, interior and chassis? I am in Canada and there are certain 'restraints' on the import of kit/replica vehicles. If you plan to build a complete, running car, I'm very happy for you but, for my needs, there is a different approach. Still, your work looks great.
Chassis (and suspension) and basic panels are now (mostly) complete and next step is to fit and finish the panels to suitable standard. Then seats, interior, closing panels, glass and interior, engine and wiring. Still much work!
Glass is a big problem because of the unique shape of the windscreen. I can get a local production of a screen for around $15K and $3K per screen, alternately Pilkington in the UK have OEM screens for around $3.4K. Im also investigating other options before I decide.
Glass is a big problem because of the unique shape of the windscreen. I can get a local production of a screen for around $15K and $3K per screen, alternately Pilkington in the UK have OEM screens for around $3.4K. Im also investigating other options before I decide.
Just saw there is an original going to auction this month.
https://www.historics.co.uk/buying/auctions/2021-04-17/cars/ref-178-1992-jaguar-xj220-sb/
https://www.historics.co.uk/buying/auctions/2021-04-17/cars/ref-178-1992-jaguar-xj220-sb/
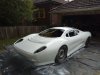
Here are a couple of pictures, have epoxy primed the car and temporarily fitted the doors, boot and bonnet. Im now fitting hinges and gapping the panels before applying high build primer and blocking.
Attachments


Over 1 year since my previous post! I haven't given up on this project, just have been very busy working on this and also Im temporarily back at my old job as a contractor.
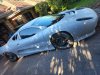
Got the windscreen, hatch and door glass in! Have had big problems with the windscreen and door glass, this is version 2 and have spent lots of time trying to fit it. Its not quite complete yet, apologies for the gaps and some panels, these still need much work.
Got the windscreen, hatch and door glass in! Have had big problems with the windscreen and door glass, this is version 2 and have spent lots of time trying to fit it. Its not quite complete yet, apologies for the gaps and some panels, these still need much work.
Attachments

Someone asked a question on the CNC router I built for building the panels. Here are a couple of pictures of the Z and X axis which will give a better idea of how its built rather than a long explanation. Here are a couple of key points:
I used a 'mod 1' (fine pitch) rack and pinion for the X,Y and Z and the smallest pinion I could find that fit the shaft of the stepper.
Bearings were 'cam follower' type bearings and aluminium bar as the guides for the axis.
Stepper motors were closed loop type - HSS57.
Software to run the CNC used was Mach 3.
Screws for assembly were metal self tappers (into aluminium, used lots).
Design aim was for a large format, high speed and foam cutting only.
Things to improve:
Increase the length and strength of the roller guides and rollers. These undergo a lot of leverage especially at high Z lengths.
Use eccentric type cam followers to adjust for zero lash.
Use lighter spindle with larger diameter bit, max size atm is only 10mm.
Attachments
Davidmgbv8
Supporter
Any update on this project?
This project is still progressing even though not much progress. 3 months travelling hasn't helped!
I have imported a Jag V12 6.0 engine for this and have an 8HP55 8 speed transaxle (from an Audi Quatro). Engine is up and running on an engine stand. It's only got exhaust stubbs on atm and sounds a bit like a Merlin from a Spit! I had to design an adaptor to mate with the transaxle which has delayed it a lot. Details of this are on another thread on GT40s.
I have imported a Jag V12 6.0 engine for this and have an 8HP55 8 speed transaxle (from an Audi Quatro). Engine is up and running on an engine stand. It's only got exhaust stubbs on atm and sounds a bit like a Merlin from a Spit! I had to design an adaptor to mate with the transaxle which has delayed it a lot. Details of this are on another thread on GT40s.