
- Forums
- GT40 Replica Manufacturers' Corner
- RCR Forum - RCR40/SLC/917/Superlite Aero
- The SLC Clubhouse
You are using an out of date browser. It may not display this or other websites correctly.
You should upgrade or use an alternative browser.
You should upgrade or use an alternative browser.
That time just after you decide but before you know what you want
- Thread starter CamT
- Start date
What is the "tunnel option"?
In the details section of the website:
Splitter tunnels for Street splitter. These simple fiberglass tunnels are epoxied to the street splitter to create a venturi effect under the splitter, and are almost as effective as the race splitter. A great upgrade to a Street splitter, with no loss of ground clearance as found in the Race splitter. Must be epoxied in by the builder, and openings cut into the Street splitter.
I haven't come across any photos that show what this is. I'm guessing it's an add-on to the the street splitter that requires cutting a portion of the splitter then a u-shaped tunnel/piece is fastened above. This would create a low pressure zone in the tunnel which would help extract air from under the splitter. I'm over simplifying it but that would be my guess based on the description.
Where does this air get directed toward?
That's right- they are U-shaped pieces that mount upside-down on a standard street splitter. After mounting, the area under them is cut out, so they resemble the interior of the current track splitter.
The air gets directed to the wheels, whose pumping action helps extract the air under the tunnels for more downforce.
Part of the confusion about splitters is that the variety, and hence naming, has changed over time. The standard street splitter is flat (mostly) throughout. The track splitter (sometimes in the past labelled as the race splitter) is a molded fiberglass or Carbon fiber piece that has a deeper opening and a much deeper (ca 2") lip. It's targeted to the track, but people do run it on the street. The lip could be trimmed a bit to get some extra clearance. The race splitter is really a wing that is part of the front end aero package available for race cars. It's not at all suitable for any cars that see street duty, and even track cars will see the designed effectiveness only when implemented as part of the entire front-end aero package for race cars.
The new Superlite site, which should launch in a few weeks, will have pictures of all three options, as well as pricing, etc.
Pete, I have a spare set if you would like them. I'll try to remember to take a picture of them tonight for all to see.
A.J.
A.J.
Trying to do more research on basic fiberglass repair and painting, the two things that worry me most about this build.
Does anyone have any online references I should look at for learning about how to work with fiberglass, which types to use and when, and where to source materials? Projects I know I'll want to do:
- build up the rear taillight area and go with round tail lights similar to what Howard did - his post shows the materials he used, I just need to figure out where to get them and what ratio to mix.
- Bill's re-shaping of the rear vent, I'll need to re-build the leading edge of the exterior back up. This will require me to use some type of flat surface to lay fiberglass sheets up against. Would I just use bondo to build up the rounded portion of the lip where the old and new join? Is there a specific bondo for fiberglass? What would you use for a release if you're using a metal plate for your mold? What if you were doing a single-use mold?
- tunnel attach to street splitter. Basically just epoxy would work, anything special or standard for fiberglass compatibility?
I think those modifications summarize the majority of the types of mods I'll be doing. Major filling in of a cavity, bonding something else to fiberglass, and laying up "walls" where there were none. In a few YouTube videos I watched it seemed there were different weights(?) of fiberglass cloth being used. I also wasn't super clear on what type of resin you would want for this type of work or if there was a jack of all trades resin.
Next topic - painting. My father in law has painted a good number of vehicles but he mostly sticks with single stage paints. I'm wanting to do a base coat metallic, a pearl clear, then a number of clear clearcoats on top. What are folks using to primer? Everyone says you should use primers and paints from the same system. I've come across TheCoatingStore kits on eBay which seem to have a good selection and the colors I'm wanting to use. When I inquired with them they said that they do not offer primer in low VOC (I'm in Cali). Anyone use the UreKem line of paints and mixed with a different brand primer? For those who use low VOC paints is there a different manufacturer I should look at?
I've watched Allan's videos and it seems the process is:
- bondo/correct any major flaws
- block sand 200 grit to prep gel cost for primer
- 2 part epoxy primer to help primer bond to gel coat (how many coats recommended?)
- high build urethane primer 2-3x coats until satisfied, block sand with 200 and finish with 400, is there such thing as too much primer?
- base coat, 3 coats
- pearl coat, not sure how many or how to know when you've achieved the right look, probably just need to experiment
- clear coat, 4-5 coats --> is there any concern with doing too many coats? Swirl marks drive me crazy so I'm anticipating this car will get corrected a number of times. Want to get a healthy clear coat built up to take it!
Pete, I have a spare set if you would like them. I'll try to remember to take a picture of them tonight for all to see.
A.J.
AJ - any luck digging those up and snapping a pic? I was going through Howard's build and saw that he made a set, I imagine these are probably pretty similar.
http://www.gt40s.com/forum/slc-clubhouse/26735-slc-24-howard-jones-18.html
Post 711
Tools -
I'm almost as excited about buying more tools as I am about working on this project!
Anyone have recommendations for the following?
- polisher w/vacuum attachment for polishing body/gel coat/primer
- tools/blade types to cut fiberglass. What's the trick to leaving a nice edge? I get the cut short to the edge then creep up to it. I have a dremel and an angle grinder so tony hammer and sledge hammer. I imagine the right tool is something in the middle. how does this look for cutting panels? Dremel 6-Amp Corded Saw-Max Tool Kit SM20-01H at The Home Depot - Mobile
- Any particular riv-nut guns or kits recommended? I plan to riv-nut every location I plan to put a bolt through aluminum paneling.
Other recommended tools?
Cutters - I've also seen people use these oscillating multi tools to cut as well ...
Variable Speed Oscillating Multi-Tool
Do most people do rough cuts using one of these less accurate tools then just sand their way to the edge they want?
Variable Speed Oscillating Multi-Tool
Do most people do rough cuts using one of these less accurate tools then just sand their way to the edge they want?
PeteB
GT40s Supporter
Body saw for cutting fiberglass. I bought his cheap one from Harbor Freight and it's worked well: High Speed Metal Saw
Body saw for cutting fiberglass. I bought his cheap one from Harbor Freight and it's worked well: High Speed Metal Saw
Looks primal, I like it! Probably easier to negotiate curves with this type of cutter as opposed to a disk. What do you use to creep up to the finished edge? Any specific blade (teeth count?) recommended?
In my opinion, the dremel type tool has way to short and fast of a ossicilation to do much more than burn up blades (that are $20 each). My right hand tool is a Milwaukie M12 Hackzall. It is cordless too. It fits blades from it's big brother, the sawzall. In all of the work I have done I have not gone through even one metal blade. Don't use wood blade, way too aggressive.
I think most guys are tapping holes in the aluminum instead of riv-nuts. You may want to consider that as an option.
There are some drill bit/tap combination bits that will save lots of time.
I'm hyper paranoid about cross threading or stripping a hole in raw aluminum. Here's what I've seen recommended for tapping:
[ame=http://www.amazon.com/Greenlee-DTAPKIT-6-Piece-Combination-Drill/dp/B0041FIR1E/]Greenlee DTAPKIT 6-32 to 1/4-20 6-Piece Combination Drill and Tap Set - Countersink Bits - Amazon.com[/ame]
Maybe I'll order the kit and try it out a few times on a scrap piece to see how it does. With riv-nuts you just drill it out if you cross thread. Is there a con I'm not considering with the riv-nuts?
Use with tap wax. Alum likes to gall. The wax will lubricate and give nice clean threads. Just tap holes for fasteners up to 1/4". Larger than 1/4", use rivnut. Kind of rare to need to go higher than 1/4" though just bolting on components.
You can get rivnuts in steel, alum, and stainless steel. I am using both s.s. and alum depending on its exposure and part it is holding.
You can get rivnuts in steel, alum, and stainless steel. I am using both s.s. and alum depending on its exposure and part it is holding.
Last edited:
Those tap drills are a dream. I have gotten so used to them that it's nothing to use my ratcheting hammer drill with one of those bits. I have 1/4-20 and 10-32. The latter is a bit more delicate, I did break one when I was trying to tap through a clearance hole in the fiberglass. The bit contacted the fiberglass and going off angle snapped it. But the 1/4-20 has been indestructible after 100s of tapped holes. I usually don't even bother with cutting fluid any more.....
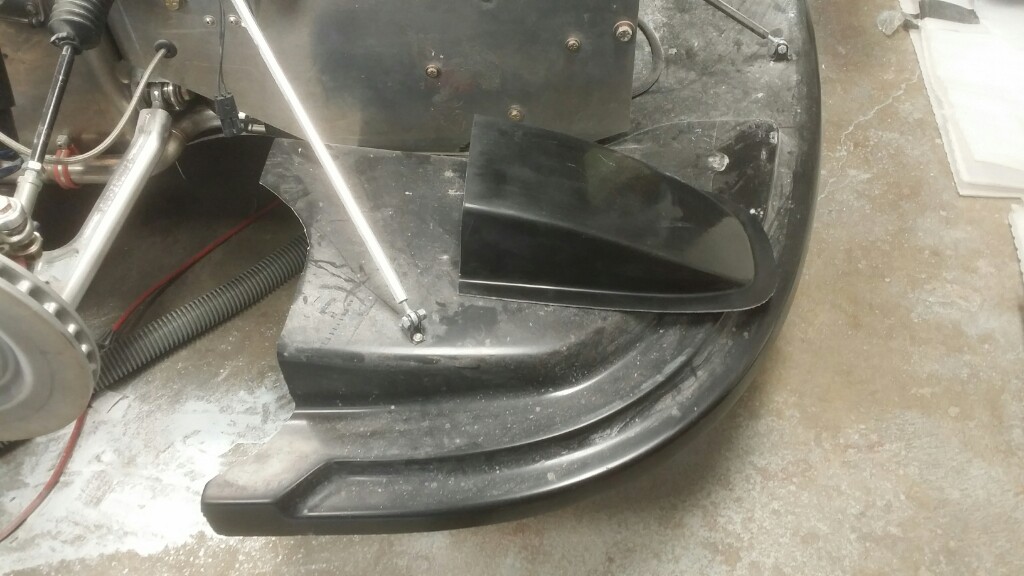
Here's you picture as promised! This is a tunnel vent that's designed for the standard splitter sitting on top of the tunnel that's integrated on the track day splitter:
As far as cutting holes in the fiberglass, this is similar to what Pete posted but is electric instead of pneumatic. Someone here recommend it. I have an angle grinder, a Dremel tool with various cutters, and a sawzall. But none hold a candle to this if there are any curves involved:
Harbor Freight
I also followed the initial recommendation and bought these too
[ame="http://www.amazon.com/Lenox-Tools-20427424T-Airsaw-5-Pack/dp/B0028W0V0M"]Amazon[/ame]
but I'm not sure if I'm going to need them. The blade that comes with the saw is nearly identical, same 24 tooth design.
Be sure to buy the warranty with the tool at harbor freight. I'm on my 2nd saw. The first one overheated the first time I used it and seized up. I thought I could fix it by opening up vent holes in the case and that didn't help. I bought a 2nd one with the warranty and waddaya know, it runs like a CHAMP.
I tried using one of the Lenox blades in my std size sawzall and it was way too much for the blade. First time the blade came out of the cut, it got bent like a pretzel before I could even react.
If I have a straight line to cut, I use my angle grinder with a 4.5" cutoff wheel. Regardless, the way to get a great looking edge is leave about 1mm of material, then file the rest bY hand. If you're relying on a power tool for your finished edge, you're setting yourself up for heartbreak.
A.J.
Also (and credit to Allan) drum sander mounted on a drill.
One of the most underrated tools in fiberglass trim work.
Thanks guys - further digging seems like the consensus is to drill/tap the frame where necessary and to not bother with riv-nuts. I'll plan to practice on some scrap pieces before drilling into the real deal!
Found another discussion on this topic here:
http://www.gt40s.com/forum/slc-clubhouse/39778-rev-nuts.html
AJ - appreciate the pic. Looks like the track splitter has a significant tunnel in comparison to the street modification pieces (wider)? It also has the inlet portion of the tunnel directed toward the center of the splitter underside.
Similar threads
- Replies
- 11
- Views
- 1K
- Replies
- 5
- Views
- 667
- Replies
- 1
- Views
- 457