Allan's RCR40 Build

Allen

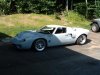
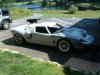
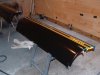
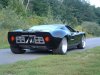
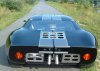
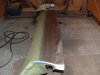
Looking at your flares a little closer i just realised that these are the flares i designed.
attachment.php

I sent a set to Fran to see what he thinks of. I´m very happy to see that they found a good spot to be on your car. It shows clearly the versatility of the design that they fit also your very wide +3" 17" whereas they also fit my plus 4" 15"´s. How did you like the fit of them ?

I also have the mould for the fitting sill extensions for it and Fran should have a pair of them as well. If you still want them tell me.


Al it looked like whitetail land to me. Usually hunting them is permitted from end of october to end of Jan/feb ( at least for us bowhunters) depends on the specific states regulations

TOM
 
Last edited:
Somehow I haven't checked my own thread in awhile and missed some posts. Too busy building I guess...

Thanks AJ for the compliments, soon we'll be heading out (racing) in our 40s. Gotta watch out for those deer in the driveway though.

Tom
For the overflow/expansion tanks I used the same Canton tanks as many builders. I put the expansion tank as high up as possible so that it was above the engine. A water line comes out of the top of the engine over to the tank then back to the water pump. It ended up taking in 5.5 gallons of coolant and I ran it for awhile with the cap off to allow it to bleed off air bubbles. The over flow tank was placed as low as possible and just fit. I filled it halfway and it ended up pulling a quarter of the tank back into the system. So far it has held temperature very well.

I used a high torque indexing starter, but still had to modify the mounts to get it to attach with the engine way up forward.

As for the flares, they look great on the car and are very well constructed. The first part of attaching them to the body was straight forward and fit really well. Blending them into the body was challenging for me because there are so many curves, vents, angles and compound contours to work with. It just took some patience, lots of sand paper and some breaks. I'm glad that I got to be one of the trial fitters of the flares.
Thanks for the offer on the sill extensions; I already formed some with foam and fiberglass cloth though.

I'll be updating some pictures soon.
 
First Drive

Despite all the rain in the Northeast, I got the chance to take my 40 out for a first drive down the 1/4 mile driveway. I know it was tempting time the 1/4 but I restrained myself for now and no deer jumped out in front of me. If you listen though you can hear my dogs cheering.
Experimenting with some cats and a little different exhaust. Besides that I've been finishing up the wiring and doing a lot of body prep for paint.


YouTube - Gt40 first drive
 

Chuck

Supporter
Allan:

That was great. Your are absolutely blasting through this build. Wasn't it about four months ago that you took delivery? Unbelieveable!
 
Allan:

That was great. Your are absolutely blasting through this build. Wasn't it about four months ago that you took delivery? Unbelieveable!


That's what happens when there are so many great posts and ideas from builders that have gone before me! Note how many ideas I incorporated from other builds.
Thanks
 

Randy V

Moderator-Admin
Staff member
Admin
Lifetime Supporter
It sounds like sweet music to me... :thumbsup::thumbsup::thumbsup:

Do yourself a favor and lower the ride height just a little - those rear CV joints look like they are at quite an angle ad you wouldn't want to damage them while go-karting!
 
All Done

:shocked:
OK sorry, couldn't resist. I found this vintage metal model at a car show today that had a flea market also. Looks pretty authentic though and it's a replica of the '69 Lemans and is 1:18 hand built by Jouef evolution.

My 40 is getting close though. Have the body primed with slick sand and have been busy wet sanding it. It will be an interesting task to paint it.
 

Attachments

  • 009.jpg
    009.jpg
    57.4 KB · Views: 369
  • 005.jpg
    005.jpg
    27.8 KB · Views: 340
Ready for paint

So I've been wet sanding the primer/filler all week and have it cut back so that it's ready for final paint. I took the following steps to prep for paint:
Did all the body work, worked all the seams, block sanded the entire body with 120 grit, sprayed the primer filler then sanded that back with 320 grit. Then I checked for pin holes or areas that I didn't like and spot putty them then touched them up with some non sanding primer.
 

Attachments

  • 7-19 GT40 001.jpg
    7-19 GT40 001.jpg
    59.6 KB · Views: 464
  • 7-19 GT40 004.jpg
    7-19 GT40 004.jpg
    61.6 KB · Views: 534
  • 7-19 GT40 006.jpg
    7-19 GT40 006.jpg
    45.5 KB · Views: 523
Getting close

OK, it's not completely done but I'm pretty close. Here's some teaser pictures and when it's all done I'll post the pictures I'll be using for DMV.

So it looks good for Labor Day!!!
 

Attachments

  • GT40 paint process 004.jpg
    GT40 paint process 004.jpg
    34.1 KB · Views: 312
  • GT40 paint process 005.jpg
    GT40 paint process 005.jpg
    41 KB · Views: 338
  • GT40 paint process 006.jpg
    GT40 paint process 006.jpg
    35.7 KB · Views: 311
  • GT40 paint process 007.jpg
    GT40 paint process 007.jpg
    38.5 KB · Views: 347
  • GT40 paint process 002.jpg
    GT40 paint process 002.jpg
    48.3 KB · Views: 344
  • GT40 paint process 003.jpg
    GT40 paint process 003.jpg
    66.4 KB · Views: 405
Pictures

Went for a short drive and took some pictures. The basecoat is black cherry pearl and the main stripe pewter with a clearcoat. The paint really changes color according to the lighting and angle. The clear polished up really well.
 

Attachments

  • gt40 finished 013.jpg
    gt40 finished 013.jpg
    49.6 KB · Views: 565
  • gt40 finished 012.jpg
    gt40 finished 012.jpg
    74.4 KB · Views: 555
  • gt40 finished 005.jpg
    gt40 finished 005.jpg
    54.9 KB · Views: 491
  • gt40 finished 006.jpg
    gt40 finished 006.jpg
    48.9 KB · Views: 410
  • gt40 finished 016.jpg
    gt40 finished 016.jpg
    56.2 KB · Views: 504
  • gt40 finished 018.jpg
    gt40 finished 018.jpg
    45.2 KB · Views: 437

Ron McCall

Supporter
Absolutely GORGEOUS!!! What a striking car! The flairs look perfect!
I see you mounted the mirrors on the doors like Chuck did.
DIfferent ,but cool,way to mount the tail lights too.
The only suggestion I have would be to paint the AC condensor black. It really stands out on the black car. Other than that, I love it!
 
Back
Top