Chuck and Ryan's RCR Build

Jim Rosenthal

Supporter
Very nice. I notice you have the same anti-theft device as I do; no labels on any of the dash switches. Of course the fact that my dash isn't even in the car yet is an even better anti-theft device....
 

Chuck

Supporter
Good one Jim ! ! !

The lack of identifying labels was inspired by the Cobra. The notion of having to turn on a fuel pump to make it go would further befuddle a would be thief.

But of course not having a dash in the car at all is probably the ultimate anti theft device . . .

When Ryan is next home the rear clip goes on after being off for the last six months. Only a clear dry day standing in the way of a (hopefully) good drive.
 

Jim Rosenthal

Supporter
We are still getting snow, and 50 mph gusts of wind today. I haven't driven anything other than my Gwagen for the last week. I'm going to post photos of the world's best 4wd vehicle later on...

I hope you're able to get a drive in soon. Everyone here in the mid-Atlantic is hunkered down just waiting it out, hoping the weather gets tired of all this, too, and changes.
 

Chuck

Supporter
Hang in there Jim. Spring is only . . . . . well never mind.

This global cooling is a pain getting adjusted to.

Forcast is for a chance of sun and temps dipping above freezing on Saturday. Just maybe time for a drive.
 
*****headline*****
washington post, today...

Al Gore found frozen to death, as his car was stranded during the blizzard of 2010.
 
Good one Jim ! ! !

The lack of identifying labels was inspired by the Cobra. The notion of having to turn on a fuel pump to make it go would further befuddle a would be thief.

But of course not having a dash in the car at all is probably the ultimate anti theft device . . .

When Ryan is next home the rear clip goes on after being off for the last six months. Only a clear dry day standing in the way of a (hopefully) good drive.

Fuel pump switch befuddles me all the time!

I used to always turn off the fuel pump when I'd stop to fill up (incase somebody would jump in in the 3seconds I'm not looking, lol). And, believe it or not, within 2months I had 4 separate occasions where I turned it off, filled up, started it up, proceeded forward 5feet, stalled it; started it; 1 foot forward; stall; rinse and repeat, then stand there for 20-30minutes wondering WTF was wrong, then finally realize I forgot to turn it back on!

After the 4th 'doh' moment I stopped using my fuel pump switch, lol.

The second time it happened I think I had people ready to kill me - I stalled right outside the gas station, smack dab in the middle of the turn lane. Caused a massive traffic jam for like 20minutes because nobody could get around me, then when I realized the problem I flipped the switch and drove off.....man, people behind me must have been sooooo pissed :lipsrsealed:
 

Chuck

Supporter
Half shafts

Putting the half shafts in place was expected to be a quick job. Any job expected to be quick won’t be.

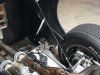
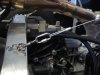
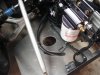
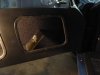
The problem is that at the limits of travel the half shaft would bind against the stub axle. Recall from an earlier post that we ground away some material on the stub axle to prevent this from happening. We did not remove enough.

Also some material had to be removed from the half shaft for the same reason.

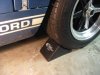
This was done with the car jacked up and the rear suspension lower arms resting on the chassis – the absolute limit of downward travel, not likely to be seen in daily driving. But this is exactly the position the car would be in when when jacked up so the wheels can be removed; so assuring that they could turn freely was important.

The process was one of grind a little material away, install the half shafts, find out where it is binding, remove, grind a little more, and then repeat the process. Fortunately the small grinding bit on the tool we were using worked well. After we were sure it all fit, the freshly ground areas were touched up with a bit of black paint using a small brush.

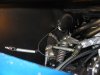
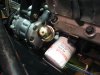
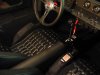
The bolts to secure the half shafts to the straps on the stub axle were M8-1.0 x 20, socket head bolts. A regular bolt won’t work due to the clearance issue. It is curious that the stub axles from the vintage Corvette used metric bolts. A bit of BLUE lock tight was used on the bolts. These will be checked regularly to make sure they remain tight.

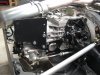
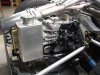
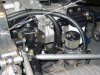
When we drove the car on our street last weekend we immediately noted a substantial vibration that was directly related to road speed, not engine speed. The problem was traced to the half shafts. The yokes on the right half shaft were about thirty degrees out of alignment. It was a simple fix to remove the half shaft, pull it apart, and slide it back together. Vibration gone! But the take away lesson is that the ends of the half shaft need to be aligned.

Four inches of snow are predicted for tonight. Once again the 'first highway drive' has been postponed.
 

Attachments

  • HalfShaft1.JPG
    HalfShaft1.JPG
    193.1 KB · Views: 625
  • HalfShafts5.JPG
    HalfShafts5.JPG
    196.7 KB · Views: 628
  • HalfShaft2.JPG
    HalfShaft2.JPG
    165.9 KB · Views: 630

Chuck

Supporter
Dalton:

I have not added anti sway bars, front or rear. Based on the twelved hundred miles we have driven I don't think we really need them. Of course if we were going to take it on the track for some serious driving that might be a different story. With the stock street suspension supplied by RCR it corners flat and handles more than well enough for street use.

Should we change our mind they could always be added later.
 

Jim Rosenthal

Supporter
Interesting that they don't use CV joints! the stub axles and the transaxle in my car are set up for CV joints- they are called "Porsche 930" CV joints, but they aren't made by Porsche at all...turns out the Porsche 930 CV joint is a generic term for high-performance CV joint, from what I can gather....and my car uses two different, nearly identical, bolt types for the inner and outer flanges. Don't ask how I found out....

Chuck, I think the only explanation for this winter is that God doesn't like sports car. He doesn't like Gwagens, either- my fuel pump fuse keeps getting hot, we can't figure out why.

Hope you get to drive soon. We are all REAL sick of this weather. A friend of mine in Springfield, IL, emailed me today that the East Coast had won the snow war, by an avalanche. Gee, thanks.
 
Jim,
You must have a different hub than what RCR uses. Mine use the same bolts inboard and out. I found out the hard way when they(The Drive Shaft Shop) sent me two different nearly identical size bolts(different thread pitch). Nearly ruined the threads before I discovered what had been done.

Bill
 
The original stock ZF boxes from the Pantera use a spicer inboard flange...
M1 boxes use a CV flange...these are available on rebuilt boxes at quite a premium price from places like Pantera Performance...
A new ZF/RBT can be ordered with CV flanges too.
As the box Chuck has was a rebuilt/recon and was "on the shelf " the day Chuck and Ryan decided to drop by he has a spicer style ZF...
No real mystery.

930 is a generic term for the larger/stronger 108mm CV joints as opposed to the 100mm units used on less powerful Import cars such as VW/Audi
 

Jim Rosenthal

Supporter
Yes, mine is an M1 box and has a CV flange. And it takes the 108 mm CV joints as you said. All that stuff is temporarily in place, but not greased up and the bolts snugged up, since we don't know if we might have to take it out again....

Chuck, the weather isn't cooperating here, either....
 

Chuck

Supporter
Got up this morning. Overcast but raining. Pavement dry. Temp above 50 degrees. Finally, a good day for a test drive.

Started right up. Drove down the street. The vibration from the mis aligned half shaft which we addressed during the super bowl was gone. A bit of smoke from the new exhaust wrap as it settled in gave us pause, but that quickly cleared. Quick inspection in the drive way a mile later and all appeared to be in order. So time for a highway drive.

The ZF has much more useable gear spacing than did the 016. But Ryan had to keep remininding me where the gears were - the different pattern takes a bit of getting used to. The rebuilt engine pulls well, although we did not push it much above 4000 RPM. We drove about about twenty miles. Oil pressure, oil temp, and water temp all were where they were supposed to be.

Only issue of concern that we noticed is the heat from the headers affecting the fiberglass, noted on another thread.

Did I mention that it is LOUD? A whole lot louder than with the muffler style exhaust used with the 016. Ear plugs will probably be the norm - just like the Cobra!

We now need to go back and recheck various bolts before we go out for a longer ride. The exhaust pipes need to be sealed at the collector and bolted down properly. But at this point all the bits and pieces seem to be cooperating with each other very well.

It has been six months since we started the drivetrain rebuild. I seems to have been worth it. A few more drives and we will know more.
 

Chuck

Supporter
Rear Clip Springs

Like many originals, cable was used to fabricate supports to hold the clip when opened. But take a look at where the cable lies when the clip it closed: dangerously close to the half shafts. We had visions of the cable getting tangled in the half shafts and causing all sorts of nastiness.

This problem was addressed on many original GTs with a length of shock cord. We thought a a light, easily stretched spring would be a bit more appropriate. Indeed some original GTs can be seen with a similar arrangement.

The third picture shows the clip closed. The cable is pulled safely back away from the spinning half shaft. Now we will be able to sleep at night . . . .
 

Attachments

  • ClipSupport1.JPG
    ClipSupport1.JPG
    175.4 KB · Views: 613
  • ClipSupport4.JPG
    ClipSupport4.JPG
    144.9 KB · Views: 587
  • clipSupport2.JPG
    clipSupport2.JPG
    138.9 KB · Views: 606

Chuck

Supporter
Recovery Tank and Puke Tank

The recovery tank was mounted on the starboard side of the ZF in the same approximate location it had been mounted on the Audi 016. Indeed we used the same mounting plate, with a bit of trimming and new mounting holes. It sets well above the transmission linkage. It works well in this location. There is no problem with the expansion tank drawing in coolant as the engine cools.

The puke tank took some thought. Finding a suitable location was a challenge. We ended up mounting it next to the oil filter. A large hole was drilled in the rear panel so that the bottom of the Moroso tank extends below. This works well because it makes it easy to drain any oil that may accumulate and because it lowers it so the top rests even with the oil filter.

Brass barb type fittings were used, Summit PRM-15172, on the valve covers and the Canton puke tank. Before installing the visible portion of the fittings was painted engine semi gloss black and then backed in the oven at 175 degrees for thirty minutes.

The hose is half inch I.D. transmission coolant line from our local NAPA store. Pricey, but in this application we did not want to use heater hose. It is more flexible than the stainless covered hose, and looks more ‘vintage’. A twelve inch length of heat resistant sleeve shields the hoses where they pass under the collectors: probably not necessary since they don’t come that close.
 

Attachments

  • RecoveryTank3.JPG
    RecoveryTank3.JPG
    168 KB · Views: 534
  • RecoveryTank4.JPG
    RecoveryTank4.JPG
    169.1 KB · Views: 911
  • PukeTank1.JPG
    PukeTank1.JPG
    164.2 KB · Views: 468
  • PukeTankComplete2.JPG
    PukeTankComplete2.JPG
    192.7 KB · Views: 511
  • PukeTankComplete3.JPG
    PukeTankComplete3.JPG
    164.9 KB · Views: 488

Chuck

Supporter
Jim:

Oil temp gauge sender and warning light sender on the filter bracket. The oil pressure gauge sender is on the block, per the attached picture. (Oil filter relocated after pic taken).
 

Attachments

  • OilLightTemp.JPG
    OilLightTemp.JPG
    151.8 KB · Views: 428
  • OilPressureSending.JPG
    OilPressureSending.JPG
    137.5 KB · Views: 453
  • OilTemp3.JPG
    OilTemp3.JPG
    104 KB · Views: 412

Chuck

Supporter
Parking Brake

An effective parking brake can be a challenge. The original GT had a lever under the dash, which just does not work on most reproductions. One can mount the hand brake lever between the seats, but that does not look original and can be something of an eyesore. Then there is the issue of routing the brake cable around the engine in a practical manner that will function properly.

In the course of the engine rebuild and transmission replacement an alternative arrangement for the parking brake was sought. While the interior was torn apart the brake handle, cables and calipers were removed. The replacement center console is now free of that ungainly handle.

But an alternative system was needed. So after much thought and analysis a new parking brake system was developed for our GT.

The new system has several benefits:

1. It is cost effective.

2. It is fool proof. When engaged there is no issue about whether the lever was pulled tight enough or not.

3. Engagement can be observed from outside the car. If walking away and one can’t recall whether the parking brake was applied or not (a momentary lapse of memory that seems to occur more often with the accumulation of years), a mere glance back at the car will answer the question.

4. It is compatible with all GT-40s regardless of design or manufacture.

5. A spare can be easily stored for those concerned with possible mechanical failures. We keep a spare in the driver’s door pocket.

We have found this new system to be effective and would recommend it to any one facing a similar dilemma.
 

Attachments

  • ParkingStop3.JPG
    ParkingStop3.JPG
    133.6 KB · Views: 525
  • ParkingStop1.JPG
    ParkingStop1.JPG
    154.7 KB · Views: 502
  • ParkingStop2.JPG
    ParkingStop2.JPG
    151.1 KB · Views: 539
Back
Top