Chuck and Ryan's RCR Build

Hi Chuck and Ryan,

I have been reading with great interest for some time now and I am inspired by the details you have shared with everyone - resources like this are invaluable to many.

I guess a GT owners' work is never truly 'done'... ;)


Chris
 

Chuck

Supporter
Correction

Opps. The numbers posted for the AC and alternator belts were incomplete. They can be found on the NAPA website. The correct numbers are:

Alternator: NBH-257365, 37 1/8”, 942 mm, $13.99
AC: NBH-257390, 39 5/8”, 1005 mm, $13.99


Thanks Allen for bringing this to my attention.


Chris: Thanks. Hope it is helpful.


Jim: STARTED THE ENGINE THIS WEEK FOR THE FIRST IN FIVE MONTHS. Ran only briefly, but it started right up. As soon at the snow melts and the pavement drys, ROAD TIME!
 

Attachments

  • BeltAlternator.JPG
    BeltAlternator.JPG
    128.6 KB · Views: 410

Chuck

Supporter
Headers and pipes.

Ryan installed the headers and pipes. While visiting Fran we picked up a bracket that supports the pipes over the transmission. It is a simple piece cut from aluminum but works perfectly. But note that it is asymmetrical. If you put it on backwards the pipes won’t line up. We know.

The header bolts were initially put in place but left loose. The collector and pipes were assembled, but not tightened. Once everything was in place the bits and pieces were wiggled until Ryan was satisfied with the fit, and then every thing was tightened down. With a bit of care one can get a near perfect alignment of the pipes – something we deem important when viewing the rear end of the GT.

Four springs, #86 Ext. Spring, part number 110166778, were obtained form Fastenall. Four small threaded rods were placed on the bracket as connecting points for the springs. A 3/8” aluminum spacer was used on one side of each spring to keep the springs apart.

Ryan dulled the stainless pipes with some supper fine steel wool to give them a more vintage patina.
 

Attachments

  • ZFTranPolishPipes.JPG
    ZFTranPolishPipes.JPG
    140.2 KB · Views: 699
  • ExhaustPipeSprings2.JPG
    ExhaustPipeSprings2.JPG
    130.1 KB · Views: 658
  • ExhaustPipes1.JPG
    ExhaustPipes1.JPG
    186.2 KB · Views: 744
  • ExhaustPipes2.JPG
    ExhaustPipes2.JPG
    171.9 KB · Views: 632
Good to hear there's a bracket now available to secure those individual pipes. Mine don't align too well at the moment, so I was looking at ways to secure them in a reliable way. I key in on exhaust alignment when I'm behind a nice car and want mine perfect!

Thanks for posting the pics and part number for the springs.
 

Ron McCall

Supporter
WOW!!

The end result is amazing!!
I LOVE the dull finish on the pipes!

Now if I can only talk Fran into making a set of these
headers for a 9.2" deck Yates head motor I will be in business!
 

Chuck

Supporter
Tom:

We fired the engine only breifly. And they do sound good - almost as loud as the Cobra although won't be bad inside the cabin since the noise goes backwards and the noise will have a hard time keeping up, especially if Ryan is driving.

Can't wait for the weather (and my schedule) to break so we can get it out on the road and hear what they will really sound like . . . .
 

Chuck

Supporter
Shifter Cables

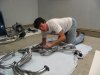
The cables were too long to simply run directly along the inner chassis to the rear of the GT, but Fran assured us they were the right length. I suspect the cables are designed to be used in different applications depending upon the specific shifter location, engine hardware, etc. A bit of experimenting resulted in a good solution that keeps the cables low and out of the way without sharp bends.

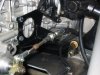
The cable that connects to the passenger side of the transmission was brought down the driver side along the base of the chassis, just inside the oil pan adjacent to the brake line and the wire harness. It then crosses under the oil pan just forward of the transmission, passes between the bell housing and lower chassis cross member and connects to the transmission cable bracket.

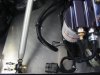
The cable that connects to the rear of the transmission was brought down the passenger side along the base of the chassis, just inside the oil pan adjacent to the brake line and the wire harness. After passing between the bell housing and lower chassis cross member it was looped to the driver side, and than back to the connection on the rear of the transmission.

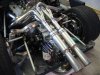
The cables were bundled with the wire harnesses and secured with wire ties in two locations on each side. The two cables were also wire tied together where the passed over each other by the bell housing on the passenger side.

An opening was cut in the rear panel, in an arc to follow the cable, and then passed below the panel to connect to the rear of the transmission. In addition, a 5/8” hose clamp was added for a bit more security.

This approach resulted in smooth, gradual turns and kept the cables out of the way of other hardware. It also kept the cables clear of the pulleys on the front of the engine. There is minimal movement of the cables.

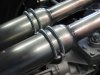
Finally, the shifter cables were covered with 3/8” fuel line, slit the entire length to slide it over the cable, and secured in several places with small wire ties. This really works well to prevent chaffing.
 

Attachments

  • Shift Cable Routing 001.jpg
    Shift Cable Routing 001.jpg
    29.7 KB · Views: 669
  • ShifterCableClamp.JPG
    ShifterCableClamp.JPG
    145.8 KB · Views: 619
  • ShifterCableRouting2.JPG
    ShifterCableRouting2.JPG
    160.5 KB · Views: 729
Chuck and Ryan,
I have never enjoyed any post on building as much as I have yours. You guys simply amaze me and the attention to detail is second to none. Fran out to put this builder blog on his web-site IMHO.
Garry
 

Chuck

Supporter
Mike, Garry. Thanks. For me the thrill has been the build, but the drive can't be far behind . . . . this dang weather!
 
Garry,

I agree..in fact Chuck has been kind enough to put his build log on DVD.

We have copies that are available FOC to RCR builders ...just give Vicki at RCR a call/email.
 
Last edited:
Chuck,
Are those the RCR glass packs? I was curious how bad they would be in the car, since that is what I am running. I like loud, but not TOO loud, you know what I mean? I'd rather not have to wear ear plugs.
Looks fantastic, as usual!
-J.
 

Chuck

Supporter
Chuck,
Are those the RCR glass packs? I was curious how bad they would be in the car, since that is what I am running. I like loud, but not TOO loud, you know what I mean? I'd rather not have to wear ear plugs.
Looks fantastic, as usual!
-J.

Got five inches of snow this weekend, plus a few more details to finish, after which we will give you a first hand report as to how LOUD those pipes are. I really don't expect it to be a problem since (1) they point backwards, (2) the cabin is reasonably well insulated and (3) we will out run the noise.

Oh well, two out of three ? ? ?
 

Chuck

Supporter
Steering Wheel

Like several others on the forum, we replaced the steering wheel with the Grant leather wheel, Part number GRT 1130 It is about an inch larger in diameter than the wheel supplied by RCR, but still smaller than the original GT. (It is also available in vinyl, Part No. GRT 739)

The swap was straightforward. Just replace the bolts provided by RCR with smaller socket head bolts of the appropriate length. You may need the Grant Horn Button, GRT-5875, not for the horn feature but for the bezel. You may want to see if the one supplied with the wheel will suffice before ordering the bezel.

If one wanted to be a bit more authentic, the shinny silver spokes could be painted semi gloss black. But for our purposes, the chrome instrument bezels and silver spokes added a bit of bling to the interior making it a bit less drab than the original would but yet close enough in appearance to create the ‘feel’ of the original.
 

Attachments

  • SteeringWheelLeather.JPG
    SteeringWheelLeather.JPG
    149.1 KB · Views: 683
Back
Top