McCopy mk 5

Here is a question for all the suspension buffs.
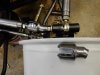
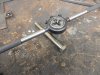
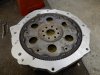
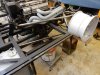
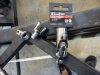
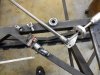
As you can see, I have been using a GT40 plan for building this chassis as a road going car and have had to make a few adjustments along the way. When I started setting up the rear suspension, the bottom arm fouled the chassis on droop so surgery corrected that.
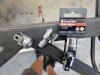
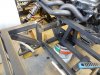
Now that I have put in the top trailing arm, a top rail at the rear of the chassis also fouls on droop, I had raised the top mount (A) to help over come this but am now undecided over the angle of that top arm.
Q. Should mount (A) be lower.
Q. What is the effect, anti dive anti squat? or just crap.

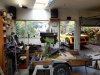
I have all the rear suspension mocked up now so can see the real picture.
(Moving that top rail now is simple,later would be a pain.)
Cheers
 

Attachments

  • DSCN2068.jpg
    DSCN2068.jpg
    183.3 KB · Views: 307
  • img20170513_12594887.pdf
    120.3 KB · Views: 204

Terry Oxandale

Skinny Man
Looking at the photo, it appears that the lower arm will contact the modified lower chassis point before the upper arm will. It also appears you've got perhaps 3-4 inches of clearance at the ride height propped up with the wood. If this is all correct, and that the drawing is not to scale on the frame member, then wouldn't you be pretty close to "not a problem"? Lastly, it appears that the frame member is roughly 60% of the length of the trailing arm. This tells me that with a 4" droop from what you're showing in the photos, that you'd only have 60% of that amount of droop at the point where the arm is above the frame. Obviously you've already dropped the suspension, and contact has been made, or you wouldn't have posted this. But from the photo, it appears not so bad?
 
Russell 80mm is a hell of a lot of droop, unless of course you going 4 wheel driving,, as for the bottom arm I would keep it as close to parallel with the ground as possible, and the top arm I like to see approx. 4-8 degrees of drop to the chassis pick up
cheers John
 
John
Yes that`s what I thought, I forgot to note that the dotted line represented the bottom of the chassis giving 80 mm of ground clearance. I have always thought / seen the top arm drop towards the front mount. When I lower that top mount A, it will foul the chassis so its out with the cut off wheel. The side on picture of your F5000 alerted me to the problem.
Whilst waiting for confirmation, I started on the gear change system. You do not need to spend large amounts of money to achieve a solid result when you are time rich. I used good 1/2 drive socket universals and turned them down to fit the tube and only need 1 change of direction to get to the gearbox selector shaft. $10.00 each beats the expensive bits. All I have to do now is weld it all together.
Cheersz
 

Attachments

  • DSCN2087.jpg
    DSCN2087.jpg
    152.5 KB · Views: 297
  • DSCN2088.jpg
    DSCN2088.jpg
    131.5 KB · Views: 256
  • DSCN2090.jpg
    DSCN2090.jpg
    157.8 KB · Views: 305
Problem solved, it can droop all it likes now. The top arm now looks correct.
Cheers
 

Attachments

  • DSCN2092.jpg
    DSCN2092.jpg
    180.9 KB · Views: 317
Much better mate, as you had it every time you launch it would have tried to lift the front of the car up. remember the bottom radius rod is in compression, and the top one is in tension.
cheers John
 
remember the bottom radius rod is in compression, and the top one is in tension.
cheers John

Wrong, under fwd acceleration the top/bottom radius rods are both under compression, any difference in the amount of compression is mainly due to difference in distance from axle c/l to respective radius arm attach points to the upright. Under braking because the caliper is mounted to upright the lower RR is under tension & upper can be either as the rate of deceleration may negate any compression force depending on tire grip and other factors.
 
yep , after I typed and posted that I thought you wally that's for a live axle and Russ's car is Independent. sorry Jac must be the onslaught of altimeters setting in.
cheers John
 
Gee you guys are a worry, don`t want to exhaust all my options now that I have cured that part.
In the past, I have run the exhaust pipe across the back of the car and then out the back giving a 400mm extra length, On this car I could easily just run straight out the back on the same side giving a much shorter pipe run.
Would this cause any issues?
They will exit low down so I will not need the altimeter.
Cheers
Russell
 
Personally I don't think it will matter Rus, most 40's are straight out the back over top of the trans, as is mine, if there is a loss I doubt very much if i'll notice it. lol

cheers John
 
A few more hours in the shed today, due to the angle of the top radius rod end attachment to the upright, I have needed to make 2 new clevis`s with built in angle. Lots of fun without a mill but just on 5 hours of toil and we have the task done. Now I can finalize the rear suspension set up and cut / weld the trailing arms. Trying to get all the rear set up done before I turn the car around and over again.
Cheers
 

Attachments

  • DSCN2120.jpg
    DSCN2120.jpg
    111.8 KB · Views: 285
Very nicely done Russell but seems like a lot of work when you just need to position the clevis with the bolt vertical. its only 4 or so inch of travel so not a huge amount of movement in the rose joint, I'm sure you have your reasons and as I said very nicely made.

Cheers Leon
 
Just a little idea to share....i may have re invented the wheel but hey!
Do you have trouble threading a rod or bolt and keeping the thread straight (don`t have thread cutting on my lathe) then this may help you. I needed to thread both ends of some bolts and my first attempt gave a wobbly thread despite my best efforts. I then made up a guide to fit in my die handle to guide the bolt straight and hey presto despite these being 8.8 bolts, I can thread them straight as.
If its been done before then this is a Mk11 version.
Cheers
 

Attachments

  • DSCN2122.jpg
    DSCN2122.jpg
    213.7 KB · Views: 248
  • DSCN2121.jpg
    DSCN2121.jpg
    222.6 KB · Views: 278
Hey Russ, put the bolt in the lathe and use your tail stock (with the centre removed)against the die to present a straight face for cutting the thread. Will save you making up all the guides for each size bolt.
 
No work in the shed today, just a return trip to Rotorua to collect a mill drill that I bought at auction (half of Auckland rates) Glad I did not attend on the Friday as two very good larger lathes sold for $500 and $900.00 each...what a bargain.
Now its safely installed thanks to my trusty little hoist, i can set up for some fun.
Cheers
 

Attachments

  • DSCN2136.jpg
    DSCN2136.jpg
    196.8 KB · Views: 270
  • DSCN2138.jpg
    DSCN2138.jpg
    202.5 KB · Views: 255
There were some questions regarding fitting an Audi to a Alfa? gearbox but I cant remember the thread anyway here are the photos as promised.
Cheers
This is an adaptor for a Toyota 1uz running the Toyota flex plate and mated to an Audi trans.
 

Attachments

  • DSCN2142.jpg
    DSCN2142.jpg
    173.5 KB · Views: 280
  • DSCN2141.jpg
    DSCN2141.jpg
    198.2 KB · Views: 200
  • DSCN2143.jpg
    DSCN2143.jpg
    172.2 KB · Views: 199
Back
Top