

You are using an out of date browser. It may not display this or other websites correctly.
You should upgrade or use an alternative browser.
You should upgrade or use an alternative browser.
Sean S.
Supporter
Check out Jason’s build. He did a really nice job on his. http://www.gt40supercharged.com/gt40_interior.htmlI was on the fence with the door eyebrows as well... but I haven't seen people use something that ties into the roll bar, and searching the forums didn't yield any results. Could you point me to an example?
BTW, I have no problems at 3/16" gaps as well around the doors. I had the same problem with the doors dragging during opening until I opened them up slightly. 3/16" is my target everywhere but I had to take a break from the fiberglass work... lots to circle back to in the future.
You're flying through this body work!!!!! keep up the great work.
Post in thread 'Jason's Coyote Powered RCR40 Downunder'
https://www.gt40s.com/threads/jasons-coyote-powered-rcr40-downunder.26333/post-371055
I’ve seen a couple others do it similar to this as well tying into the roll bars.
Last edited:
Sean S.
Supporter
Thanks Randy.photo is of the car after paint (thanks Mitch)..
What kind of gaps did it have for the doors? Did you keep them at 1/8”?
Last edited:
I’m pretty sure I sanded them out to 3/16” all the way around to make room for sealing primer and paint. Mitch had the car painted, so he’d know for sure - but 3/16” generally gives you a 1/8” gap after paint.Thanks Randy.
What kind of gaps did it have for the doors? Did you keep them at 1/8”?
Sean S.
Supporter
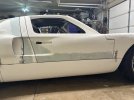
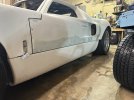
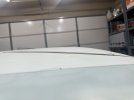
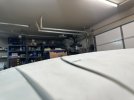
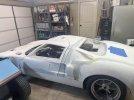
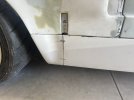
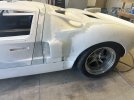
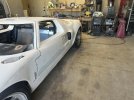
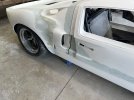
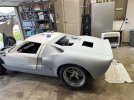
I feel like I’m at a pretty big milestone. Just need to do a little more to the top of the passenger door and I can say the doors and clamshell are now fitted. I put 3/16” all the way around as suggested. It looks great. I used a steel flat bar I sanded each end on to make sure it was 3/16”. I sanded the gaps until the bar would slip in and slightly drag.
Opening the doors up got rid of the dragging issue I had on the spider, I also under cut the door there a bit more to make a sharper point. I plan to keep moving on the bodywork for now. I’m hoping I can get most of it done over the next few weeks.
Opening the doors up got rid of the dragging issue I had on the spider, I also under cut the door there a bit more to make a sharper point. I plan to keep moving on the bodywork for now. I’m hoping I can get most of it done over the next few weeks.
Attachments

Sean S.
Supporter
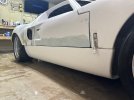
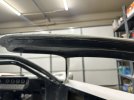
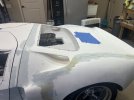
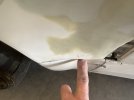
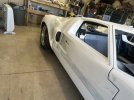
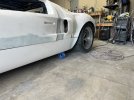
I was able to get the rear of the passenger door to lay flush with the spider. I had to make a cut in the door shell that would allow me to glue the door skin on to let it sit a bit lower. This worked out well. Now that section of the door sits even with the spider, and I can finally say that the door and spider fitment is completed.
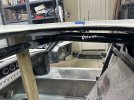
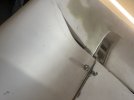
I decided to go ahead and cut out the center sections of the roll bar and move them 2” inboard while I was working on the doors. I have them tacked in for now and will weld them out once I pull it all apart for finishing. I still need to test it with a seat in it, but I’m m sure this will get those bars far enough away from my head. I like that the center bars sit well inside the door jambs now, I didn’t like the look of them out past the jambs at all.
I decided to go ahead and cut out the center sections of the roll bar and move them 2” inboard while I was working on the doors. I have them tacked in for now and will weld them out once I pull it all apart for finishing. I still need to test it with a seat in it, but I’m m sure this will get those bars far enough away from my head. I like that the center bars sit well inside the door jambs now, I didn’t like the look of them out past the jambs at all.
Attachments
Sean S.
Supporter
Thanks Randy.Nice work Sean! I had to warp the rear edge of my doors also. Heat gun and Irwin clamps to the rescue..
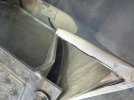
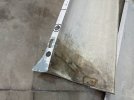
I did use a heat gun to take most of that warp out, but couldn’t get the last 1/8” to lay down right there. Cutting it was the only way I could think of to remove it.
I feel like I’m at a pretty big milestone. Just need to do a little more to the top of the passenger door and I can say the doors and clamshell are now fitted. I put 3/16” all the way around as suggested. It looks great. I used a steel flat bar I sanded each end on to make sure it was 3/16”. I sanded the gaps until the bar would slip in and slightly drag.
Opening the doors up got rid of the dragging issue I had on the spider, I also under cut the door there a bit more to make a sharper point. I plan to keep moving on the bodywork for now. I’m hoping I can get most of it done over the next few weeks.
We seem to have body filler on identical places along the sides of the car lol. This is definitely a big milestone!!! looking great.
Sean S.
Supporter
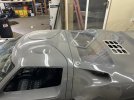
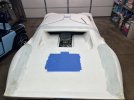
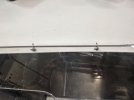
Went ahead and fitted the windows to make sure I didn’t need to do any body filler around them, so far everything looks pretty good where the glass meets the body. I plan to go ahead and mount the headlight covers as well to check them before proceeding with the bodywork. I was happy to see my air cleaner clears the rear window.
Attachments
Rod Dittmar
Supporter
Hi Sean,
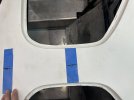
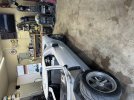
Everything is looking great! What are you using for attaching your windows? On mine, I've drilled & tapped for #6 screws. However, I had trouble with the fiberglass lip not being quite wide enough in a couple of areas. Lower part of the headlamp covers for one, but especially the top 3 screws on the left side door. I had to add some glass along that edge (red arrow in the attached pic) to make the lip wide enough to drill into.
Rod
Attachments

Sean S.
Supporter
Thanks BryanBody is looking really, really good!
Still have a lot of finessing left to do, but overall it’s coming together. I think I’m getting close to spraying a guide coat on everything but the front clip to start blocking. I’m hoping to get the front Sorted out within the next week or so.
Sean S.
Supporter
Hi Rod.Hi Sean,
Everything is looking great! What are you using for attaching your windows? On mine, I've drilled & tapped for #6 screws. However, I had trouble with the fiberglass lip not being quite wide enough in a couple of areas. Lower part of the headlamp covers for one, but especially the top 3 screws on the left side door. I had to add some glass along that edge (red arrow in the attached pic) to make the lip wide enough to drill into.
Rod
Thank you.
I used 8-32 on the rear window since I had a large flange to work with. I used 6-32 on the side windows and centered the screws to the smallest edge(the top of the doors where you indicated) since that flange was all over the place on width I figured centering it on the smallest flange was the way to go and just made the other screws the same spacing off the edge of the glass to make them all match.
I haven’t made it to the headlight covers yet, but I’m hoping to also use 6-32 screws there as well.
Attachments
Last edited:
Chet Zerlin
Supporter
Fantastic progress Sean! Bodywork looks great!
Have you decided how you want to seal your windows yet? I've heard of several different methods. I can't decide if I want to paid the back side of the window around the border black first as well to hide imperfections in the material I use to seal the window.Hi Rod.
Thank you.
I used 8-32 on the rear window since I had a large flange to work with. I used 6-32 on the side windows and centered the screws to the smallest edge(the top of the doors where you indicated) since that flange was all over the place on width I figured centering it on the smallest flange was the way to go and just made the other screws the same spacing off the edge of the glass to make them all match.
I haven’t made it to the headlight covers yet, but I’m hoping to also use 6-32 screws there as well.
Sean S.
Supporter
I haven’t even researched any of that yet. I was thinking about painting the backside of the glass to hide how uneven the flange is behind it, but not sure if that’s even necessary.Have you decided how you want to seal your windows yet? I've heard of several different methods. I can't decide if I want to paid the back side of the window around the border black first as well to hide imperfections in the material I use to seal the window.
Sean S.
Supporter
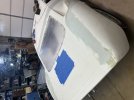
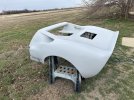
Got the flares that attach to the rocket panels on. Still need to pull them off to glass them and need to get some body filler to make it match the clamshell. I was surprised the curves were this far off on the 2 pieces.
I also had to cut the tops off due to how warped they were, I plan to fill it back in with the top flange of the old ones to save a bit of work. I cut the old ones to make the support I screwed into on the back side, that worked out great since it was already curved to what I needed to hold.
I also had to cut the tops off due to how warped they were, I plan to fill it back in with the top flange of the old ones to save a bit of work. I cut the old ones to make the support I screwed into on the back side, that worked out great since it was already curved to what I needed to hold.
Attachments
Sean S.
Supporter
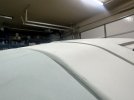
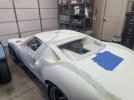
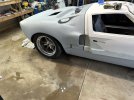
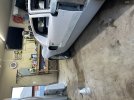
Wish I could say that was easy. After tons of fiberglass and body filler dust……. I got the rocker panels done with the flares attached. Went ahead and primed them and the clamshell with high build primer to start blocking them. It’s nice to see that clamshell as one color. Spider and doors will be getting the primer soon. Only big challenge I have now is a little more finessing on the front clip to call the body fitted.
Attachments
Similar threads
- Replies
- 24
- Views
- 3K