Howard Jones
Supporter
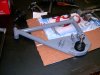
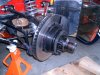
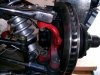
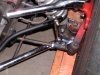
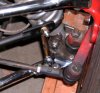
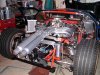
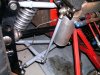
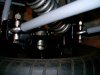
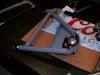
You guys got me hooked on finally redoing my standard GTD suspension parts that still had the original bushing in them. I decided to do this as best as I could with still using the original uprights. Granada's at the front and the fabricated steel panzer parts on the rear. This was partly to retain the original wear parts such as the wheel bearing and more importantly the stub shafts at the rear. At least in the future all that needs to be sourced is what came with the GTD kit as far as bearings go.
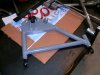
I made the top transverse links on the rear several years ago along with the bolt-on relocating brackets that are in the pictures above, post #3, as well as new upper a-arms for the front. These pretty much fixed the lack of caster and camber adjustment on the front and the far too-extreme camber gain curve on the rear as well s adding camber adjustment. So it was time to finish the job and get rid of the rest of the bushings.
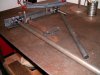
I considered doing the A-arms with sleeved adjusters like the ones in post #18 but since it's going to remain a street car I really don't need the quick adjustability because once it is set it really doesn't change with rod ends. I am going to continue to adjust the rear toe with the shim method used on the original parts at the inboard pickup point of the lower a-arm. Frankly, once I had it all back together and measured things I found that I was right a 0 toe and all I had to do was place a washer or two in the stack at either side of the center rod end. Good enough and it really cant change unless something comes loose or bends. Not likely.
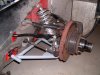
At the lower front things got done a bit differently. I considered using screw-in ball joints when I made the lowers but the desire to keep things original overcame the "make it better" gremlin so I used new Garanada ball joints. I just cut off the bent tang and drilled two new holes in the flat plate. Now the ball joint can be removed without changing the rest of the suspension setup. They just drop out of the bottom once the stud is pushed out of the upright. I also moved the roll bar lower pickup point for the vertical link a bit toward the center of the assembly to reduce interference with the wheel/tire when the car was at full lock.
Here are some pictures. The old stuff is crome and dirty and the new stuff is grey.
I made the top transverse links on the rear several years ago along with the bolt-on relocating brackets that are in the pictures above, post #3, as well as new upper a-arms for the front. These pretty much fixed the lack of caster and camber adjustment on the front and the far too-extreme camber gain curve on the rear as well s adding camber adjustment. So it was time to finish the job and get rid of the rest of the bushings.
I considered doing the A-arms with sleeved adjusters like the ones in post #18 but since it's going to remain a street car I really don't need the quick adjustability because once it is set it really doesn't change with rod ends. I am going to continue to adjust the rear toe with the shim method used on the original parts at the inboard pickup point of the lower a-arm. Frankly, once I had it all back together and measured things I found that I was right a 0 toe and all I had to do was place a washer or two in the stack at either side of the center rod end. Good enough and it really cant change unless something comes loose or bends. Not likely.
At the lower front things got done a bit differently. I considered using screw-in ball joints when I made the lowers but the desire to keep things original overcame the "make it better" gremlin so I used new Garanada ball joints. I just cut off the bent tang and drilled two new holes in the flat plate. Now the ball joint can be removed without changing the rest of the suspension setup. They just drop out of the bottom once the stud is pushed out of the upright. I also moved the roll bar lower pickup point for the vertical link a bit toward the center of the assembly to reduce interference with the wheel/tire when the car was at full lock.
Here are some pictures. The old stuff is crome and dirty and the new stuff is grey.
Attachments
-
 HPIM0059.JPG62.2 KB · Views: 339
 -
 HPIM0060.JPG54.5 KB · Views: 324
 -
 HPIM0229.JPG47.8 KB · Views: 316
 -
 HPIM0229_edited.JPG25.7 KB · Views: 319
 -
 HPIM0231.JPG80.6 KB · Views: 319
 -
 HPIM2598.JPG879.9 KB · Views: 319
 -
 HPIM2599.JPG925.2 KB · Views: 310
 -
 HPIM2600.JPG643.9 KB · Views: 301
 -
 HPIM2602.JPG801.7 KB · Views: 301
 -
 HPIM2604.JPG695.4 KB · Views: 317