Just curious if anyone has had to trim the bottom of the dash where it contacts the sponsons on the RCR 40 to achieve the level the dash should be at with the doors. I might be right where I need to be without trimming but it's hard to tell from other's photos. Most of the photos I'm able to locate, both of the doors are open. Please let me know if it looks right or if I need to do some cutting...


You are using an out of date browser. It may not display this or other websites correctly.
You should upgrade or use an alternative browser.
You should upgrade or use an alternative browser.
RCR 40 Dash Fitment
- Thread starter Sean Tinnell
- Start date
Chris Kouba
Supporter
Pretty certain that I didn't do any trimming.
Chris Kouba
Supporter
Looks a little high. Check your fitment with the spider in place and see how it sits with the base of the windscreen.
Can't post pics from my phone but will shortly.
Can't post pics from my phone but will shortly.
Chris Kouba
Supporter
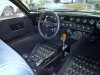
Here you go Sean. Looks like you might be right in the ballpark.

Hi Sean, from the photos looks like the dash is sitting a bit too far forward (close to the windshield). Once you straighten the vertical portion of the dash it will look like the photo from Chis. You can expect some trimming here and there as the build progresses. On the RCR 40 pictured here I cut the bottom portion of the dash off much like the original race version GT40 Mk1. The cut off sections were then carpeted to bring back a road car trim level. Still have a little trimming to achieve the desired effect...
Randy Folsom
Supporter
Just getting started with the dash. It looks like it needs a lot of trimming. My question: is it supposed to be elevated above the aluminum deck or flat on the deck.

These are pictures from the online manual. It looks like they cut the bottom of the feet off well short of the sponson. But it also looks like there are still feet on the bottom for a mounting screw. Both can’t be correct. They also mention trimmings something flush, but it is not clear to me what. From the manual: “The mating surface to the dash vertical pillar must be trimmed flush.”
I have no idea what this is a picture of
For what its worth, the alignment on a real road car

Randy Folsom
Supporter
Thx much, but there are plenty of pictures of what an installed dash looks like. Also, RCR’s LHD dash is not built the same as the RHD. The RHD dash is molded from an original and is lighter, while the LHD uses a ‘new’ mold and is heavier.
Hi Randy,
You are going to have an awesome car, that's for sure")
You will find the body panels and dash have plenty of extra flange area to trim for fit. The extra area is left over from the molds. The excess flange also protects the parts in shipping, and during the assembly process. It leaves the final trim to fit up to the builder, so it's all good.
To expand on your Dash Fitment question, and I may be repeating this advice if not, hears how I approach installing a new set of body panels and dash:
a) Pretty Much Essential: Block the chassis off the ground at your desired ride height - then fit all the suspension (less coilovers, sway bars) with brake discs and tires mounted with close suspension alignment is the best way to make sure the chassis / suspension is correct before you start permanently mounting any body panels.
a) Leave the dash to last, the roof spider sets all the body panels
b) Be careful and do not over trim flanges
c) Set roof spider on chassis. Check for initial squareness across the chassis and on the cowl. Some extra flange width can be trimmed back so as to not interfere with door fitting but leave as much as possible of this flange for the weather-strips. Also the flange at the lower windshield opening to the cowl top may require some tidying up.
d) Loosely fit the remaining panels, both doors, sill panels, front and rear subframes mount the nose and tail clips, set in center hood panel. These parts can be temporarily held in place with clecos, duct tape, lifted with foam board strips wood offcuts to align the gaps and shapes between panels. The front and rear clips can be supported with jacks or blocks of wood if you're not ready to tackle the rear hinges and front bobbins.
e) A "happy place" where all the panels line up and gaps are as close as possible will become apparent. As the roof spider sets the rest of the panels, it makes it possible to confirm the location of Fuel Filler Caps on the front clip. The location of the sill panels matches the front and rear clips. This also gives an early indication of wheelbase / wheels and tires / wheel well opening clearance and symmetry.
On the matter of "symmetry" the body has to fit the chassis not the other way around. I've seen cars with a different wheelbase on each side in an effort to match up wheel openings. Do not do this.
f) Trim the dash to fit, keeping a close eye on the leading edge of the dash with the windshield to cowl area and the interior door gaps.
Everything will line up, it takes a lot of fiddling, off and on, off and on, off and on but it's worth it in the end.
Looking forward to following your build
Cheers
Ian
You are going to have an awesome car, that's for sure
You will find the body panels and dash have plenty of extra flange area to trim for fit. The extra area is left over from the molds. The excess flange also protects the parts in shipping, and during the assembly process. It leaves the final trim to fit up to the builder, so it's all good.
To expand on your Dash Fitment question, and I may be repeating this advice if not, hears how I approach installing a new set of body panels and dash:
a) Pretty Much Essential: Block the chassis off the ground at your desired ride height - then fit all the suspension (less coilovers, sway bars) with brake discs and tires mounted with close suspension alignment is the best way to make sure the chassis / suspension is correct before you start permanently mounting any body panels.
a) Leave the dash to last, the roof spider sets all the body panels
b) Be careful and do not over trim flanges
c) Set roof spider on chassis. Check for initial squareness across the chassis and on the cowl. Some extra flange width can be trimmed back so as to not interfere with door fitting but leave as much as possible of this flange for the weather-strips. Also the flange at the lower windshield opening to the cowl top may require some tidying up.
d) Loosely fit the remaining panels, both doors, sill panels, front and rear subframes mount the nose and tail clips, set in center hood panel. These parts can be temporarily held in place with clecos, duct tape, lifted with foam board strips wood offcuts to align the gaps and shapes between panels. The front and rear clips can be supported with jacks or blocks of wood if you're not ready to tackle the rear hinges and front bobbins.
e) A "happy place" where all the panels line up and gaps are as close as possible will become apparent. As the roof spider sets the rest of the panels, it makes it possible to confirm the location of Fuel Filler Caps on the front clip. The location of the sill panels matches the front and rear clips. This also gives an early indication of wheelbase / wheels and tires / wheel well opening clearance and symmetry.
On the matter of "symmetry" the body has to fit the chassis not the other way around. I've seen cars with a different wheelbase on each side in an effort to match up wheel openings. Do not do this.
f) Trim the dash to fit, keeping a close eye on the leading edge of the dash with the windshield to cowl area and the interior door gaps.
Everything will line up, it takes a lot of fiddling, off and on, off and on, off and on but it's worth it in the end.
Looking forward to following your build
Cheers
Ian
Randy Folsom
Supporter
Ian,Hi Randy,
You are going to have an awesome car, that's for sure
You will find the body panels and dash have plenty of extra flange area to trim for fit. The extra area is left over from the molds. The excess flange also protects the parts in shipping, and during the assembly process. It leaves the final trim to fit up to the builder, so it's all good.
To expand on your Dash Fitment question, and I may be repeating this advice if not, hears how I approach installing a new set of body panels and dash:
a) Pretty Much Essential: Block the chassis off the ground at your desired ride height - then fit all the suspension (less coilovers, sway bars) with brake discs and tires mounted with close suspension alignment is the best way to make sure the chassis / suspension is correct before you start permanently mounting any body panels.
a) Leave the dash to last, the roof spider sets all the body panels
b) Be careful and do not over trim flanges
c) Set roof spider on chassis. Check for initial squareness across the chassis and on the cowl. Some extra flange width can be trimmed back so as to not interfere with door fitting but leave as much as possible of this flange for the weather-strips. Also the flange at the lower windshield opening to the cowl top may require some tidying up.
d) Loosely fit the remaining panels, both doors, sill panels, front and rear subframes mount the nose and tail clips, set in center hood panel. These parts can be temporarily held in place with clecos, duct tape, lifted with foam board strips wood offcuts to align the gaps and shapes between panels. The front and rear clips can be supported with jacks or blocks of wood if you're not ready to tackle the rear hinges and front bobbins.
e) A "happy place" where all the panels line up and gaps are as close as possible will become apparent. As the roof spider sets the rest of the panels, it makes it possible to confirm the location of Fuel Filler Caps on the front clip. The location of the sill panels matches the front and rear clips. This also gives an early indication of wheelbase / wheels and tires / wheel well opening clearance and symmetry.
On the matter of "symmetry" the body has to fit the chassis not the other way around. I've seen cars with a different wheelbase on each side in an effort to match up wheel openings. Do not do this.
f) Trim the dash to fit, keeping a close eye on the leading edge of the dash with the windshield to cowl area and the interior door gaps.
Everything will line up, it takes a lot of fiddling, off and on, off and on, off and on but it's worth it in the end.
Looking forward to following your build
Cheers
Ian
Thx much for the detailed body fitting outline.
The reason I want to see how the dash fits before the rest of the body is so I can figure out the front hoop mounting. I am not using the RCR provided hoop.
I don’t want to cut off the bottoms of the dash pillars if I’m not supposed to. The bottoms of those pillars look too nice to be just convenient for making or shipping the dash, but that is the case.
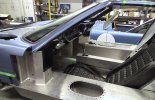
Ignore the spider height in this picture. It is sitting on top of the dash because the dash is in way.
Randy Folsom
Supporter
Randy,Randy - mine was cut off on the bottom so it would lay down on the cowl.
As I recall, the originals and RHD RCR dash stopped a few inches above the top of the sill / sponson..
Thx much. Another question. There is a depression in the front center of the dash for the windshield defroster/dehumidifier. It actually goes down below the lip that goes around the front of the dash. To lay the dash flush on the aluminum deck, I would need to shave it off or cut a hole in the aluminum deck.
Cheers, Randy
Hi Randy,
Here's a pic of the RCR GT40 in our shop. It also does not use the front half of the roll hoop. It's not a track car. The lower portion of the dash was trimmed up (like the race cars) so carpeting could be fitted to the exposed part of the cowl bridge.
The dashes in these cars (like many brands of replicas) can be extremely finnicky to fit. Avoid cutting off too much flange in a rush to get the instrument panel in.
Also be prepared to get creative with defroster and eyeball vent ducting... so concentrate on the fitment of the roof spider to the cowl bridge, then work on the dash fit and ducting later.
Following my guideline ensures the body panels and interior all line up making assembly / reassembly is easy and repeatable. You will have this car car assembled and unassembled several times, so plan ahead
Cheers
Ian
Attachments
Randy Folsom
Supporter
Ian, Thx much for the pictures. They are helpful. I am only going to remove enough material to set the dash on top of the aluminum deck and push it far enough in to get an idea of where the forward hoop will eventually come up through the dash if the hoop is tucked up tight to the A-pillars. Cheers, Randy
The demister depression on mine was not that deep. I had also bought the manifold piece from RCR that fit up against that depression and transferred the air from the 3 ducts coming from the HVAC box (through the cowl) to get the air over to the eyeball vents. I never cared for the engineering and execution of that whole system.Randy,
Thx much. Another question. There is a depression in the front center of the dash for the windshield defroster/dehumidifier. It actually goes down below the lip that goes around the front of the dash. To lay the dash flush on the aluminum deck, I would need to shave it off or cut a hole in the aluminum deck.
Cheers, Randy
Similar threads
- Replies
- 25
- Views
- 2K
- Replies
- 20
- Views
- 10K
- Replies
- 4
- Views
- 1K
- Replies
- 20
- Views
- 2K
- Replies
- 6
- Views
- 1K