Phil's AK40 build log

The real motivation to actually start some proper metal work, came from quite an unexpected source.

I bought an AC unit from Car Builder Solutions in June 2025 and they chucked in a catalogue with loads of stuff I want that I don't need! Somewhere in the catalogue, they promoted a DVD (remember those?) which is all up on YouTube.

The videos explain the basics really well, and give good step-by-step guide to fitting panels to a frame / chassis (bear in mind I am more use to working with wood and spend all day behind a desk, so this was invaluable for me).

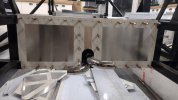
I even took the plunge and cut a panel in half because it would not fit as I wanted.

IMG_20250823_162137308.jpg


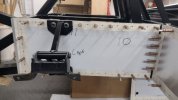
With my new found enthusiasim for drilling holes, I am now on a mission fitting panels. My aim is for one a week, but I am not really keeping count. I mocked up some panels in cardboard and 3mm rivets at 30mm spacing was most pleasing to my eye.

IMG_20250906_102947549.jpg

IMG_20250913_163205067.jpg
IMG_20251003_174529206.jpg


Finally, I have now aquired a personalised number plate on finance, so no new parts for the next 18 months, which will give me time to fit the panels and look at everything that is still wrapped up.
 

Neil

Supporter
Well, it's been quite a while since I posted an update. I have been busy buying parts but in truth a bit nervous to actually do any work! That means drilling holes and cutting things up, and I want to make sure I know what I am doing when I need to take the plunge.

So, what have I bought recently?

November 2023 - June 2024
Suspension - wishbones, uprights, steering rack, roll bars front and rear.
The bolts for the suspension did not fit through the mounting holes in the chassis, probably because of the powder coating, so I had to take a bit off. I only had an old, corded power drill with "high" or "low" setting and this was far too aggressive for a large drill bit (1/2 inch), so also bought a cordless drill and some new drill bits. I think I took a little bit more off than just the powder coating, but the bolts are a snug fit with no play.

AK Sportscars originally offered AVO springs/dampers but I believe they went out of business so had to tie a bit of cable to hold the wishbones up.

View attachment 150846

November 2024
Brakes - Discs, pads, bells, calipers, brake lines, flexible hoses
Hand-brake calipers
Pedal box, reservoirs
Nitron springs and shocks all round.

I spent some time bolting the discs to the bells using the supplied nut and bolt kit, but needed an E8 socket for the bolt heads. I also loosely fitted the calipers to the uprights - I know this is going to cause trouble in future. I can't see a way of changing brakes pads without removing the caliper, which of course has split washers to prevent the bolts coming undone.

For the springs / shocks, some of the mounting points on the chassis or wishbones needed opening, and one bush needed turning down otherwise I would need to cut the mounting point off and weld in a new, wider one.

Eventually, with the suspension on all round and a few panels mocked up, it is starting to look like the chassis of a car, and not just a bunch of metal tubes - great motivation.

View attachment 150850
View attachment 150848
View attachment 150849

July 2025
Gear shifter and rod, fuel tanks, radiator, central cooling tubes and silicon hoses, engine mounts.

Still wrapped in bubble-wrap.
Powder coaters usually offer an option to mask holes to prevent your problem.
 
Hi Phil,
Just been having a read/look through your build thread. I note that you state at the beginning that this is a 10 year project ..... I hope not as otherwise you will not be able to register it. The cut-off date is 2030 so you've got 4 years to get it finished and through IVA. Allowing for the time frame to get an IVA test and potential re-test(s) then you're probably looking at 3.5 years.
There has recently been a problem with the acceptance of Engine Dating Certificates. I advise you talk to Jon at AK about this. He recently ran into this problem.
The Labour government has also stated that it intends to adopt all EU safety requirements and this would have massive implications for IVA. It would mean the requirement for Lane Assist, Parking Assist, etc, etc. Currently there is a lot of talk but as of yet there has been no government communication.
In summary there is every indication that builders are well advised to 'work like the devil' to get cars through IVA as soon as possible.
I wish you well with your build.
Best regards
Steve Dean (Norfolk)
 

Brian Kissel

Staff member
Admin
Lifetime Supporter
Thanks for the input Steve. Your guidance is always helpful and welcomed. Hate to see someone spend all the time and money on a project, only to not be able to register it.

Regards Brian
 
With some time off over the Christmas and New Year, I have made some more progress fitting panels in the engine bay - lower rear bulk head and the side panels.

The side panels needed clearance holes for the engine mounting brackets. I just need to do a bit of de-burring on some holes and then these can can back off so I can reuse the clecos, and will no doubt need drilling for fuel lines, electrics etc. when I come to that stage.
 

Attachments

  • IMG_20260111_173833867.jpg
    IMG_20260111_173833867.jpg
    315.6 KB · Views: 82
  • IMG_20260118_172654330.jpg
    IMG_20260118_172654330.jpg
    336.4 KB · Views: 86
  • IMG_20260118_172750847.jpg
    IMG_20260118_172750847.jpg
    269 KB · Views: 75
  • IMG_20260118_172709620.jpg
    IMG_20260118_172709620.jpg
    350.8 KB · Views: 93
I am surprise by the dimension of the engine brackets, for 302 bloc the seem to leave a lot of space between the engine and the side walls ?
 
With some time off over the Christmas and New Year, I have made some more progress fitting panels in the engine bay - lower rear bulk head and the side panels.

The side panels needed clearance holes for the engine mounting brackets. I just need to do a bit of de-burring on some holes and then these can can back off so I can reuse the clecos, and will no doubt need drilling for fuel lines, electrics etc. when I come to that stage.
Have you tried a dummy assembly with the 302 block ?
my AK brackets were way way off using the supplied holes in the chassis...
Jerry
 
Have you tried a dummy assembly with the 302 block ?
my AK brackets were way way off using the supplied holes in the chassis...
Jerry
Agreed.
The holes in my chassis for the engine mounts were also way out. This is because they are positioned for use with a 302 and a UN1. As you are using a Quaife transmission, you may need to move the hole (engine mount) position forward.
Rob
 
Phil (and indeed any AK builder),
Please could you let me know what size holes for the 6 fasteners used to secure the inspection panel in the photo. They are so small and my eye sight isn't up to it!

1768839168804.png
 
Thanks to Jean-Marc, Jerry and Rob for the prompts about the engine mounts...

I am going to install a Ford 302 small-block (F1SE, 1991) with Quaife gearbox. The engine block is still on the stand and I do not have an engine crane at the moment so cannot dry fit. I measured across the mounting holes in the block and it is approx. 33cm across centres. I then measured across the mounts in the car and came to the same value (all a little bit by eye, but "close enough" that it appears to be right). I have no clue how well the enigne fits fore/aft as I do not have the gearbox or all the gear the will fit on the front of the engine.

Does anyone have nominal measurements for a naked block with reference to chassis rails?
 
Phil (and indeed any AK builder),
Please could you let me know what size holes for the 6 fasteners used to secure the inspection panel in the photo. They are so small and my eye sight isn't up to it!

View attachment 151353

Rob, the rivnuts were pre-installed in the backing panel, and the holes pre-drilled in the cover panel. The bolts I used are M4 - simply because they fitted and I wanted to mock-up the fitted panel.

Hope this helps
 
It has been a few months, but I am making steady progress. More panel fitting and a few new parts.

I now have two low pressure fuel pumps - Facet Red Top "Competition" or "Works" kits, which include an extra filter, vibration dampeners and hosetails. I will probably swap the push fit fittings for AN6 fittings.
https://www.burtonpower.com/facet-electric-fuel-pump-kit-red-top-works-6-7-25psi-fac480532k.html

I got my dashboard from AK at their Open Day this past weekend, and the seatbelt fitting bar.

I also collected four CV joints - J&R CV Joints, part number JR454. I know AK have to make a profit and external parts will have a mark up, but do yourself a favour...
https://www.jandrcvjoints.co.uk/catalogsearch/result/?q=jr454

I have been slowly continuing fitting panels to the chassis - roughly one per week(end), so here is 5 weeks work!
IMG_20260208_172831962.jpg


Another milestone piece - upper rear bulkhead panel. I decided to fit the upper panel over the top of the lower panel so there was a softer edge for when I fit carpet across the whole piece.

I started by lining up the lower edge of the bottom panel with the bottom edge of the lower rail and drilling the bottom row of holes. Then I lined up the upper panel and drilled the vertical holes. Finally put the two together and drilled through both panels and into the chassis for the middle row.
IMG_20260228_165603085.jpg


Also drilled the brackets for both fuel tanks, and ordered some 3/8" UNF Nyloc nuts (once I worked out the thread size). The breather pipe is very close to the inner bolt so will have to make some decisions when it all needs tightening up.
IMG_20260305_211124839.jpg


Was I naïve to think these would line up? It appears the measurements from the left and right hand edge have been swapped - either for the panel or the fuel tank. I will probably make a larger opening with cover plate anyway. How often will I need to pull the fuel tank float through this hole?
IMG_20260305_211210502.jpg


Everyone's favourite panel! There is just enough flex to be able to fit this panel without splitting or elongating any cutouts.
IMG_20260417_161507465.jpg


Lastly, working back at the front on these inner panels. Because of the angle inwards as the panel moves rearwards, I have added a fold 1" from the leading edge so the front edge of the panel lies flush with the vertical rail and the rivets can sit flat.
IMG_20260504_173050582.jpg
 
Last edited:
Hi Phil, looking good, it's really interesting to see that your panels seem to be slightly different to mine (even the numbering looks different) for instance your panel 53 folds back into into the chassis whereas mine folds forward to line up with the panel next to it ...

Have you taken into account that this panel is supposed to go 23mm lower than the chassis, looking at the picture from the build manual the bottom of the panels you've put in are supposed to line up with it (or at least that way my assumption)

1778770771526.jpeg
 
Also I see you've made the same mistake as me as there is no way to fit a rivet here as I couldn't get the rivet tool in here :( 
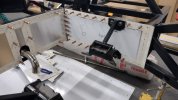
actually unless you're going to rivet this first before attaching to the car?

1778770869075.png
 
Back
Top