CAV - Getting the Horsepower to the Ground – Part IV

Bob,
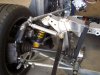
I think all of us that own these cars are a always doing something we think will improve or make them look good. If you need a hand give me a ring. I'll be glad to help.
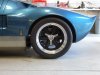
I just returned from a car show up in Pine Top. It was nice as always. I met a new friend named Gerald. He purchased a pre owned CAV and said it's the same color as my RF. I told him about you and he said that he had already spoken to you. I also told him about Gary Gibbs and the updates he has done. He is real nice fellow. I invited him to our annual Christmas party on Dec.3rd. He promises to come. Now all I have to do is get you there with your CAV. There will be only two RF's and two CAV's against 35 Cobras. I hope you can come. Anybody else out there who wants to come just drop me a note to let me know.

Hersh /ubbthreads/images/graemlins/smile.gif
 
From the previous picture of the arc scored on the black plate, the hole for the upper shock mount could be located anywhere along the arc and all the important dimensions and goals of this modification will be satisfied. In addition, several holes could be placed along the arc so that the tip angle of the shock absorber could be adjusted.

Starting at the most upright position, tipping the shock to the inside has the same effect as using a spring with a lower rate. This is a common race car feature that makes it easy to fine tune handling at the track without the hassle of swapping out springs. And, it might be a huge advantage for a GT40 street car that was driven on both high speed race tracks and in smaller low speed autocross events. Two or three steps of shock absorber angle, rear sway bar adjustment, and tire pressure is a significant degree of adjustability.

AutoFutura has of course beaten me to the punch and already designed a multiple position shock mount for their new cars. John sent me a set of their new brackets and I used them as a pattern to lay out a series of holes to position the shock from more upright than stock to less upright than stock. Using the same black plate, I drilled the holes with a .45 caliber Thompson Submachine gun and then trimmed off some of the excess plate material. The shock absorber was then installed in each of the hole locations and all the corresponding measurements and clearances checked a second time.
 

Attachments

  • 65572-ShockMountTestHoles.JPG
    65572-ShockMountTestHoles.JPG
    112.1 KB · Views: 324
The new multi-position shock bracket from AutoFutura is shown in a previous picture in Part III of this series. AutoFutura elected to make their bracket duplicate the original CAV shock angle and then permit the stock to be tipped inward in two steps. I wish I could use their new brackets without modification but I can’t. To meet all the measurement criteria in this effort, my upper mounts will need to be higher than stock. So, the AutoFutura brackets will not be a direct fit.

For my purposes I think the mounting holes on my car should at least straddle the stock CAV shock angle. The outer hole will make the shock more upright than stock CAV and the second hole less upright than stock CAV. At this time I do not know if I want a third mounting hole that could be either more or less upright. This picture shows one side of an imaginary bracket. The shaded area illustrate how the bracket might be boxed in with a structural cap and then all welded in place to an even more imaginary bracket on the far side.

October 4th will be the next post about the progress on this project because I am on a business trip. By the time I get back I need to decide if I should use modified AutoFutura brackets or fabricate a new set from scratch. Structurally it will make no difference, but if I do make new brackets, should the new brackets include the third adjustment position and should that be above or below stock? This is your forum, I am just borrowing it so the next few days are wide open for any comments you might have.

I have been told to just make sure that when I am done, nothing is out-of-whack. Am I the last one to know that in-whack is better?
 

Attachments

  • 65695-ImaginaryBracket_2.JPG
    65695-ImaginaryBracket_2.JPG
    115.6 KB · Views: 354

Neal

Lifetime Supporter
[ QUOTE ]
I drilled the holes with a .45 caliber Thompson Submachine gun

[/ QUOTE ]

Nice shot Bob!
 
I would guess that a single hole on either side of stock would be sufficient. Whatever is the easiest and best way to get that would be the ticket. Does the new Autofutura bracket use the same center to center distances that you are going with?
 
If you take your medications regularly you will stop seeing imaginary brackets. Finally, here is a picture of the real one made of 0.120 inch thick SS plate. (And thank you Howard, this time I used the correct caliber weapon to drill the holes.) The left and right sides of my CAV were very symmetrical which made fabricating the parts to fit and then locating both brackets much easier. The brackets were located and then tack welded in place while being held by the 13 inch long gauges.

An additional piece will be added on the top to box-in the brackets and cap-off the open chassis tubes beside the crossmember. The flat part of the cap near the crossmember will include weld nuts concealed on the bottom side for mounting a stock CAV sway bar. Original style GT40 sway bar mount can also be added to the tops of the outer most shock absorber locations.

I decided to make the brackets wider than necessary. The extra width will let me use spacers to center the upper shock bushing in the bracket so there is no binding. This is a detail of design seen on other brands of replicas which I think is smart and prudent.

Just like on the AutoFutura brackets, I used three shock absorber mounting angles, but mine are on each side of the stock CAV shock angle. This also seemed to be prudent and in-whack. If my requirements ever get so specific that I need to change the springs, at least I will be able to use a method of limits to experimentally determine if I need more or less spring rate.

So, with only one post to go in Part IV, I am almost done. Bring on the welder!
 

Attachments

  • 66098-CAV-newuppershockmount-1_2.JPG
    66098-CAV-newuppershockmount-1_2.JPG
    110.9 KB · Views: 332
This is the last step for phase IV. Hurray! The car is now on its wheels and can be moved around! The new brackets are positioned and welded in place as shown in this picture with the shocks and springs. And, while these are not quite tractor brackets, I will admit that they are a bit over designed. I like them, they look cool and are made of shiny stainless steel to match the rest of the car.
 

Attachments

  • 66327-CAV-CustomShockMount-1_3.JPG
    66327-CAV-CustomShockMount-1_3.JPG
    117.6 KB · Views: 321
In this close up picture you can see the three mounting positions for the shock absorber (above, at, and below stock). The two additional holes on the top of the bracket are captive nuts that can be used to mount the support for the stock CAV sway bar. Alternately, an original style GT40 sway bar mount can also be installed over the top of the shock absorber. The washers used to center the top of the shock will be replaced with polished aluminum bushing.

The last custom parts to be installed in this phase were the aluminum cones (or hats) for the tops of the springs on the shock absorbers. These parts came from the same source that supplied the adjustable motor mounts and the crossmember. The stock CAV shocks have dull gray colored flat cast caps at the top of the springs with aluminum spacers at the bottom. In this case, all I had to do was remove the aluminum spacer at the bottom and replace the flat gray cast piece with the cone hat. Now the tops of the shocks catch your attention and these pieces of “eye candy” also look like those found on most original GT40s.
 

Attachments

  • 66328-CAV-CustomShockMount-2_3.JPG
    66328-CAV-CustomShockMount-2_3.JPG
    125.8 KB · Views: 299
And finally for closure, here is the “AFTER” picture of the wheel and tire centered in the wheel well. When compared to the first picture of part IV, this is a big improvement.

I got everything I had hoped for out of this series of modifications. The space between the top of the tire and the wheel well was reduced. I was able to center the adjustment range for ride height. The proportion of suspension rise to drop was also improved mostly by setting the stroke of the shock into the middle of its working range. The custom shock brackets (in the style of AutoFutura) made the angle of the shocks adjustable, and provided a means to eliminate binding at the upper shock absorber bushing. The shock absorber caps were an extra bonus.

So where to from here? There is really nothing different or unusual about re-installing the engine, transmission, and headers so I will stop posting for about a month. Unless I get run over by a truck (or get a life) I will resume with Part V to fit the rear sway bar and set the position of the engine and transmission (maybe a la 1083). And, maybe even find out what my ghost writer meant when he suggested that “such rotation is a very maintenance action, as a kindly viewpoint from Drawing B.” Succinct and to the point.

Pic of wheel well
----------------------------------------------------
 

Attachments

  • 66329-CAV-ImprovedWheelWellFit-3_2.JPG
    66329-CAV-ImprovedWheelWellFit-3_2.JPG
    95 KB · Views: 306
Back
Top