CAV - Getting The Horsepower To The Ground - Part VII

Pat Buckley

GT40s Supporter
I have a question on an earlier post/picture. In Ian's post of 3-17 he wrote of the original problem with the guide bushing going bad, and causing sloppy shifting. I have thought this over for some time as I am designing a rod shifter myself, and have followed your progress though the postings. However, here is my thought. The proplem with the original bushing was never really talked about as to why it failed. It took me back to my 9th grade geometry classes. Glad I paid atention then.
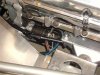
You show the original rod as aiming off to the side and going through two different bushings after the failed bushing. I think therein lies your problem with that bushing. Don't get me wrong for the improvements have been simply great and will help out the other CAV owners, and other ZF guys with their shifters. Whay is wrong to me is that you have the rod going off at an angle and held firmly in its position by the three bushings. When you shift forward or backward there is a torque on those bushings. The rod wants to go in the same direction, but it is not allowed to because it is aimed off in another direction, putting a thrust onto the bushing. With the new and improved version, which has the rod held in front and behind the shift lever, this seems to be even more pronounced than with the old shifter. It is sort of like a parrallellogram in a way. the piece connecting the two parrallel rods wants to move in the same direction but can't because it is held in place. If it is allowed to move forward and back in its own direction, it will cause a bind further down the line. Has that piece been changed? If not , it seems to be the next area of failure. I don't know if I am making this clear or not. If not I will draw it out and post the drawing. This is a real problem for us all since we only have about 15 degrees to play with on the universals. Maybe a few more pics are needed to see how the rods are aligned, and my not needing to be concerned. Just a thought.

Bill


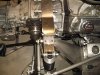
I'm not sure this answers your question, but the upgraded shifter I purchased from Ian Clark has the two Heim joints angled toward the right so that this binding is decreased as well as to clear the emergency brake assembly.
 

Ian Clark

Supporter
Hi Bill,

There's a lot of great ideas being shown in this thread, some simple and effective, some intensive and effective and some are really brilliant. Also for every shifter design that worked there's a half dozen or so test peices that didn't pan out. All of this stuff is custom and one off. Wonderful.

Anyways I'm confused about your comment about binding through three bushings. I don't think any of the designs here have three in a row uninterupted. There would be alignment issues on three in a row, I agree.

The original CAV shifter was not properly developed when the early ZF cars were being delivered (pre Autofutura - pre s/n 100). What was needed was changing the single long shaft that curved it's way from the shifter stick down the console, around the engine and through a hanger bearing on the motor mount (seriously - all that in one bent piece ) into a multi piece shaft with bearings supporting the intermediate shafts and u-joints. Presto... quantum improvement in shifting.

Bobs new part is really fantastic from a fabrication point of view and more along the lines of the original part than what CAV Canada is doing now. We both saw fit to eliminate the OEM Audi/VW bits from the mechanism.

There are packaging issues in the CAV console that challenge the rod path and u-joint angles, however with a bit of planning we've never exceeded the recommended angularity specs for the u-joints. So you should be able to make it too.

Please feel free to call on the tollfree number if I can be of any assistance.

Cheers
 
Hi Bill,

Thanks for your comments. I also follow your posts and did take a long look at the shifter pictures you posted. (I give you instant credibility because of the cool colors you picked for your car!)

You are absolutely right that the best geometry for the shifter would be a single rod exactly inline from the ZF straight forward to the shifter with no jogs and no u-joints. However to mount a rod shifter in the center console I needed to get around the bell housing and the engine so at least 3 jogs are necessary. There is a jog to the side at the u-joint at the end of the shifter but it is essentially a straight shot from there, through a support at the engine cover and back to a support on the motor mount.* A second rod then goes from the back of the motor mount direct to the control shaft on the ZF. I have already posted pictures of my “length and rotation adjustment coupling.”

The exact length of the rods, location of the u-joints, and the exact path the rods must take is slightly different from car to car depending on the chassis, how low the engine is mounted, what oil pan is used, and other clearance issues. On the design that Jim and I came up with, we went overboard trying to make sure our shifter design had maximum adjustability. The shift stick in the cradle can be adjusted back and forth to center in a console opening, the u-joint at the end of the shifter can be located anywhere in the area between the shifter and the emergency brake. For that matter the shifter cradle itself can be mounted raised or even angled to one side and will still work perfectly. The secret as Gary suggested is that the linkage must have minimal flex and be well supported.

Here are a few pictures of my linkage through the engine bulkhead, to the motor mount, to the transmission. These photos are before I installed the length and rotation adjustment coupling. To the best of my knowledge this shift linkage route is similar to most center console ZF installations.

(*However having this one rod all one long pieced make it more difficult to install and remove if needed. I added a straight aligned u-joint just in front of the oil pan just for service convenience.)
 

Attachments

  • CAV-Shifter-Rods-1.jpg
    CAV-Shifter-Rods-1.jpg
    73.2 KB · Views: 392
  • CAV-Shifter-Rods-2.jpg
    CAV-Shifter-Rods-2.jpg
    52.4 KB · Views: 371
  • CAV-Shifter-Rods-3.jpg
    CAV-Shifter-Rods-3.jpg
    59.5 KB · Views: 400
Back
Top